PROGRAMMING

INITIAL PROGRAMMING

TO ENTER THE PROGRAM MODE

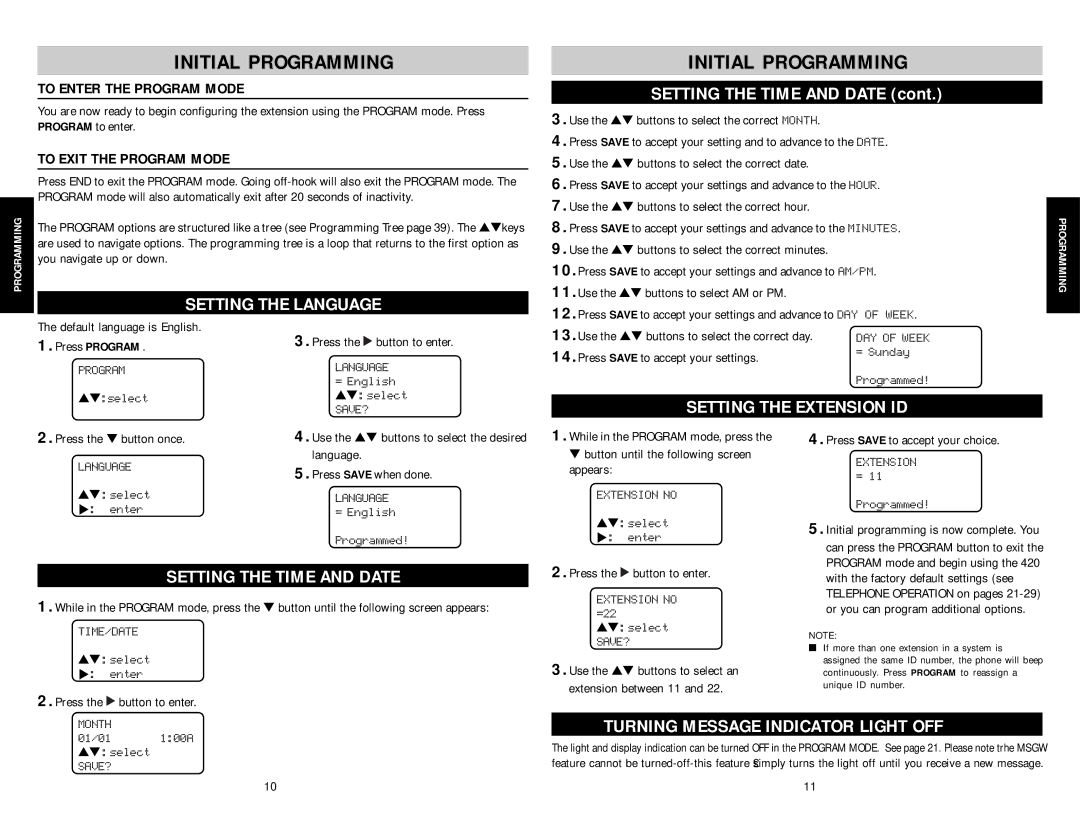
You are now ready to begin configuring the extension using the PROGRAM mode. Press PROGRAM to enter.

TO EXIT THE PROGRAM MODE

Press END to exit the PROGRAM mode. Going off-hook will also exit the PROGRAM mode. The PROGRAM mode will also automatically exit after 20 seconds of inactivity.

The PROGRAM options are structured like a tree (see Programming Tree page 39). The ▲▼ keys are used to navigate options. The programming tree is a loop that returns to the first option as you navigate up or down.

SETTING THE LANGUAGE


INITIAL PROGRAMMING


SETTING THE TIME AND DATE (cont.)


3

. Use the ▲▼ buttons to select the correct MONTH.


4

. Press SAVE to accept your setting and to advance to the DATE.


5

. Use the ▲▼ buttons to select the correct date.


6

. Press SAVE to accept your settings and advance to the HOUR.


7

. Use the ▲▼ buttons to select the correct hour.


8

. Press SAVE to accept your settings and advance to the MINUTES.


PROGRAMMING

9

. Use the ▲▼ buttons to select the correct minutes.


10.Press SAVE to accept your settings and advance to AM/PM.


11.Use the ▲▼ buttons to select AM or PM.


12.Press SAVE to accept your settings and advance to DAY OF WEEK.


The default language is English.

1 . Press PROGRAM .

PROGRAM

▲▼ :select

3 .

Press the button to enter.

LANGUAGE

=English

▲▼ :select SAVE?

13.Use the ▲▼ buttons to select the correct day.

DAY OF WEEK

14.Press SAVE to accept your settings.

= Sunday


Programmed!

SETTING THE EXTENSION ID

2 . Press the button once.

LANGUAGE

▲▼ :select : enter

4 .

5 .

Use the ▲▼ buttons to select the desired language.

Press SAVE when done.

LANGUAGE

= English

1 . While in the PROGRAM mode, press the

button until the following screen appears:

EXTENSION NO

4 . Press SAVE to accept your choice.

EXTENSION

=11

Programmed!

Programmed!

▲▼ :select : enter

5 . Initial programming is now complete. You can press the PROGRAM button to exit the PROGRAM mode and begin using the 420

SETTING THE TIME AND DATE

1 . While in the PROGRAM mode, press the button until the following screen appears:

TIME/DATE

▲▼ :select : enter

2 . Press the button to enter.

2 . Press the button to enter.

EXTENSION NO =22

▲▼ :select SAVE?

3 . Use the ▲▼ buttons to select an extension between 11 and 22.

with the factory default settings (see TELEPHONE OPERATION on pages 21-29) or you can program additional options.

NOTE:

If more than one extension in a system is assigned the same ID number, the phone will beep continuously. Press PROGRAM to reassign a unique ID number.

MONTH

01/01 1:00A ▲▼ :select SAVE?

10

TURNING MESSAGE INDICATOR LIGHT OFF

The light and display indication can be turned OFF in the PROGRAM MODE. See page 21. Please note trhe MSGW feature cannot be turned-off-this feature £simply turns the light off until you receive a new message.

11

Page 7
Image 7
AT&T SBC-420 user manual Initial Programming, Setting the Language, Setting the Extension ID, Setting the Time and Date

SBC-420 specifications

The AT&T SBC-420 is a high-performance broadband and voice communication device designed to meet the demands of both residential and business users. As a part of AT&T's ongoing commitment to providing reliable connectivity solutions, the SBC-420 integrates advanced technologies to enhance user experience and deliver robust service capabilities.

One of the main features of the SBC-420 is its dual-mode functionality, allowing it to operate as both a digital subscriber line (DSL) modem and a Voice over Internet Protocol (VoIP) gateway. This versatility makes it an ideal choice for users who require both high-speed internet access and digital voice services. With its support for multiple simultaneous calls over the same broadband connection, the SBC-420 ensures that users can enjoy clear and uninterrupted voice communication.

The SBC-420 is equipped with advanced DSL technology, supporting ADSL2+ for faster download speeds and improved performance. This technology enables users to experience seamless streaming, gaming, and browsing capabilities, even during peak usage times. The device brings high-speed internet access right into the home or office, reducing latency and enhancing the overall internet experience.

In terms of wireless connectivity, the SBC-420 features built-in Wi-Fi capabilities, offering users the flexibility to connect multiple devices without the need for additional routers or access points. With dual-band support, this device can reduce interference and provide stable connections across various environments. The inclusion of multiple Ethernet ports also ensures that wired connections can be established for devices that require a more dependable connection.

Security is a key focus for the SBC-420, which includes robust encryption protocols to protect user data and maintain privacy across the network. The device simplifies network management and security settings, allowing users to easily monitor and configure their home or office network to their specific needs.

Overall, the AT&T SBC-420 combines essential features, cutting-edge technologies, and user-friendly characteristics into a single device that excels in delivering fast internet and reliable voice services. Its adaptability, advanced performance, and commitment to security make it an excellent choice for a wide range of users, from casual consumers to small businesses seeking dependable communication solutions.