H
I
J
K
On the Wireless Security Settings screen, select a level of WEP encryption, 64 Bit Keys or 128 Bit Keys. Then enter a Passphrase to automatically generate a WEP key. Then click Next.
If you would like to enter your WEP key manually, leave the Passphrase field blank and enter the WEP key on the next screen. Then click Next.
If you used a Passphrase, then a WEP key will appear on the following screen. Otherwise, enter your WEP key in the Key 1 field. Click Next.
On the Confirmation screen, make sure your settings are correct. Click Yes to save your new settings.
On the Congratulations screen, click User Install to install the PrintServer’s driver.
H
I
J
K
3 |
|
| Install and Configure the | |
|
| PrintServer’s Driver | ||
|
|
| ||
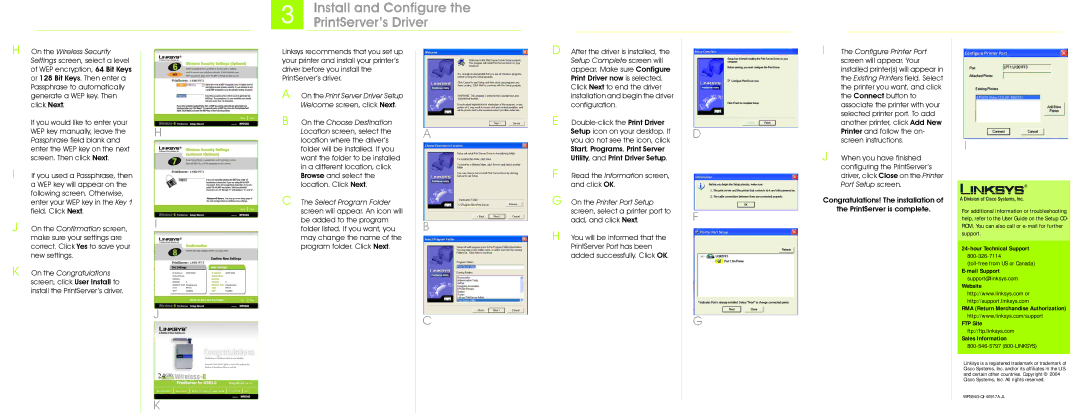
Linksys recommends that you set up |
| |||
your printer and install your printer’s |
| |||
driver before you install the |
| |||
PrintServer’s driver. |
| |||
A On the Print Server Driver Setup |
| |||
| Welcome screen, click Next. |
| ||
B On the Choose Destination | A | |||
| Location screen, select the | |||
|
| |||
| location where the driver’s |
| ||
| folder will be installed. If you |
| ||
| want the folder to be installed |
| ||
| in a different location, click |
| ||
| Browse and select the |
| ||
| location. Click Next. |
| ||
C The Select Program Folder |
| |||
| screen will appear. An icon will |
| ||
| be added to the program | B | ||
| folder listed. If you want, you | |||
| may change the name of the |
| ||
| program folder. Click Next. |
| ||
C
D After the driver is installed, the Setup Complete screen will appear. Make sure Configure Print Driver now is selected. Click Next to end the driver installation and begin the driver configuration.
E
F Read the Information screen, and click OK.
G On the Printer Port Setup screen, select a printer port to add, and click Next.
H You will be informed that the PrintServer Port has been added successfully. Click OK.
D
F
G
I The Configure Printer Port screen will appear. Your installed printer(s) will appear in the Existing Printers field. Select the printer you want, and click the Connect button to associate the printer with your selected printer port. To add another printer, click Add New Printer and follow the on- screen instructions.
J When you have finished configuring the PrintServer’s driver, click Close on the Printer Port Setup screen.
Congratulations! The installation of the PrintServer is complete.
I
For additional information or troubleshooting help, refer to the User Guide on the Setup CD- ROM. You can also call or
support@linksys.com Website
http://www.linksys.com or http://support.linksys.com
RMA (Return Merchandise Authorization)
http://www.linksys.com/support
FTP Site
ftp://ftp.linksys.com
Sales Information
Linksys is a registered trademark or trademark of Cisco Systems, Inc. and/or its affiliates in the U.S. and certain other countries. Copyright © 2004 Cisco Systems, Inc. All rights reserved.