Wireless- G
Word definition
How to Use This User Guide
Copyright and Trademarks
Table of Contents
Common Problems and Solutions Frequently Asked Questions
Appendix a Troubleshooting
Appendix B Wireless Security
Appendix C Upgrading Firmware Appendix D Windows Help
Router’s Side Panel
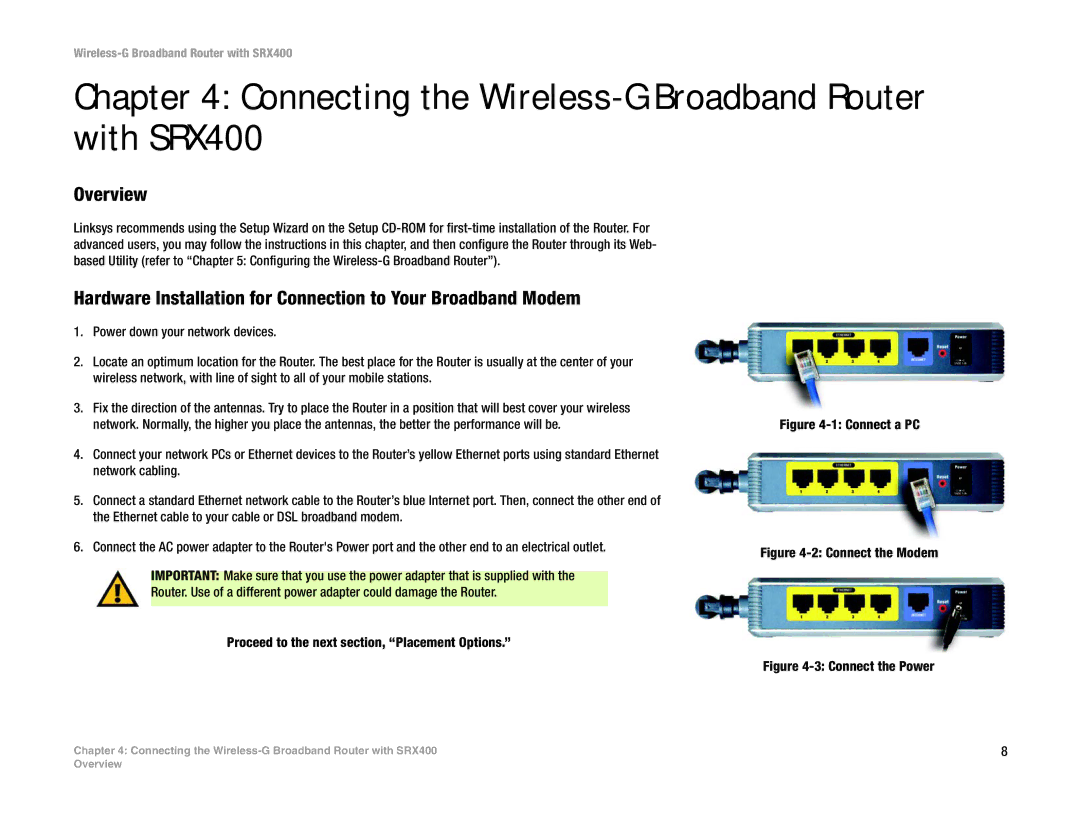
Connect a PC
24 Security Tab Firewall
Introduction
Welcome
What’s in this Guide?
Wireless-G Broadband Router with SRX400
Ssid your wireless network’s name
Planning Your Wireless Network
Ad-Hoc versus Infrastructure Mode
Network Topology
Planning Your Wireless Network Network Layout
Broadband an always-on, fast Internet connection
Getting to Know the Wireless-G Broadband Router with SRX400
Router’s Ports and Reset Button
Power
Router’s LEDs
Connecting the Wireless-G Broadband Router with SRX400
Overview
Wall-Mount Option
Placement Options
Stand Option
Configuring the Wireless-G Broadband Router
Isp your internet provider
Internet Connection Type
Setup Tab Basic Setup
Internet Setup
Static IP Connection Type
Pptp Connection Type
Router IP
Network Setup
Optional Settings
Packet a unit of data sent over a network
Network Address Server Settings Dhcp
Time Setting
Setup Tab Ddns
Ddns
Setup Tab MAC Address Clone
Mac address the unique address that a
Advanced Routing
Setup Tab Advanced Routing
NAT Mode
Dynamic Routing
16 Setup Tab Advanced Routing NAT Mode Routing Table
Wireless Tab Basic Wireless Settings
Wireless Network
Encryption encoding data transmitted in a network
Wireless Tab Wireless Security
Wireless Security
20 Wireless Tab Wireless Security WEP
Wireless Tab Wireless MAC Filter
Wireless MAC Filter
Wireless Tab Advanced Wireless Settings
Advanced Wireless
Wireless-G Broadband Router with SRX400
VPN Pass Through
Security Tab Firewall
Firewall
Block WAN Request
To create an Internet Access policy
Access Restrictions Tab Internet Access
Internet Access
Ftp a protocol used to transfer files over a TCP/IP network
Url the address of a file located on the Internet
Port Range
Applications and Gaming Tab Port Range Forward
Port Range Forward
Port Triggering
Applications and Gaming Tab Port Triggering
Applications and Gaming Tab DMZ
Triggered Range and Forwarded Range
Internet Access Priority
QoS Quality of Service
Wireless
Applications and Gaming Tab QoS
Summary
Port Range
Cancel Changes button
Local Router Access
Administration Tab Management
Router Password
Https Web Access
UPnP
Multicast
URL Filter Log
Administration Tab Log
System Log
DoS Log
Traceroute Test
Administration Tab Diagnostics
Ping Test
Ping Parameters
Factory Defaults
Administration Tab Factory Defaults
Administration Tab Firmware Upgrade
Upgrade Firmware
Restore Configuration
Administration Tab Config Management
Backup Configuration
Internet Connection
Status Tab Router
Router Information
Status Tab Local Network
Local Network
Status Tab Wireless
Wireless
System Performance
Internet/Wireless
Status Tab System Performance
Wireless-G Broadband Router with SRX400
Need to set a static IP address on a PC
Appendix a Troubleshooting
Common Problems and Solutions
For Windows 98SE, Me, 2000, and XP
Open a command prompt. For Windows 98SE and Me
Application Start and End Protocol IP Address Enabled
TCP
Can’t get the Internet game, server, or application to work
Wireless-G Broadband Router with SRX400
Need to upgrade the firmware
To start over, I need to set the Router to factory default
My power LED will not stop flashing
My DSL service’s PPPoE is always disconnecting
My wireless-G speed seems to be slow
Cannot connect to the Internet
How do I turn on SRX on my router?
Frequently Asked Questions
Where is the Router installed on the network?
Is IPSec Pass-Through supported by the Router?
Does the Router support ICQ send file?
How can I block corrupted FTP downloads?
What is DMZ Hosting?
What is the Ieee 802.11b standard?
What are the advanced features of the Router?
What is the Ieee 802.11g standard?
Is the Router cross-platform compatible?
What is ad-hoc mode?
What Ieee 802.11g features are supported?
What Ieee 802.11b features are supported?
What is infrastructure mode?
What is DSSS? What is FHSS? And what are their differences?
What is ISM band?
What is Spread Spectrum?
What is WEP?
Have excellent signal strength, but I cannot see my network
How do I reset the Router?
How do I resolve issues with signal loss?
Security Threats Facing Wireless Networks
Appendix B Wireless Security
Security Precautions
Security Threats Facing Wireless Networks
Wireless-G Broadband Router with SRX400
Figure C-1 Upgrade Firmware
Appendix C Upgrading Firmware
Network Neighborhood/My Network Places
Appendix D Windows Help
Shared Resources
Figure E-1 IP Configuration Screen
Windows 98SE or Me Instructions
Windows 2000 or XP Instructions
For the Router’s Web-based Utility
Appendix F Glossary
Wireless-G Broadband Router with SRX400
Wireless-G Broadband Router with SRX400
Wireless-G Broadband Router with SRX400
Wireless-G Broadband Router with SRX400
Model
Appendix G Specifications
FCC, IC-03, CE, Wi-Fi 802.11b, 802.11g, WPA
Standards
Operating Humidity
Operating Temp
Storage Temp
To 40 C 32 F to 104 F
Appendix H Warranty Information
Limited Warranty
Appendix I Regulatory Information
FCC Statement
Wireless-G Broadband Router with SRX400
Wireless-G Broadband Router with SRX400
Wireless-G Broadband Router with SRX400
Wireless-G Broadband Router with SRX400
Dual-Band Wireless Access Point
Information section in this Guide
Appendix J Contact Information
Need to contact Linksys?