3 | Install the Viewer & Recorder Utility |
4 | Connect the Video Camera for |
Wireless Network Use |
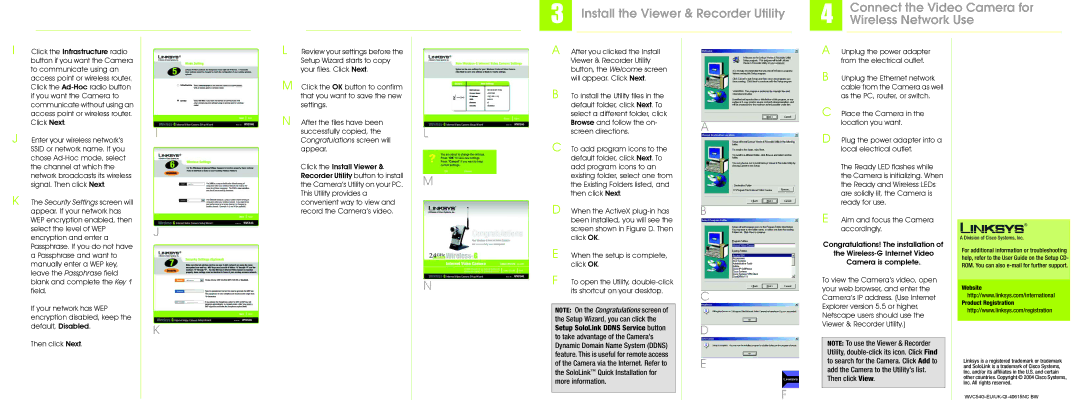
I Click the Infrastructure radio button if you want the Camera to communicate using an access point or wireless router. Click the
J Enter your wireless network’s SSID or network name. If you chose
K The Security Settings screen will appear. If your network has WEP encryption enabled, then select the level of WEP encryption and enter a Passphrase. If you do not have a Passphrase and want to manually enter a WEP key, leave the Passphrase field blank and complete the Key 1 field.
If your network has WEP encryption disabled, keep the default, Disabled.
Then click Next.
I
J
K
L Review your settings before the Setup Wizard starts to copy your files. Click Next.
M Click the OK button to confirm that you want to save the new settings.
N After the files have been successfully copied, the Congratulations screen will appear.
Click the Install Viewer & Recorder Utility button to install the Camera’s Utility on your PC. This Utility provides a convenient way to view and record the Camera’s video.
L
M
N
A After you clicked the Install Viewer & Recorder Utility button, the Welcome screen will appear. Click Next.
B To install the Utility files in the default folder, click Next. To select a different folder, click Browse and follow the on- screen directions.
C To add program icons to the default folder, click Next. To add program icons to an existing folder, select one from the Existing Folders listed, and then click Next.
D When the ActiveX
E When the setup is complete, click OK.
F To open the Utility,
NOTE: On the Congratulations screen of
the Setup Wizard, you can click the
Setup SoloLink DDNS Service button
to take advantage of the Camera’s Dynamic Domain Name System (DDNS) feature. This is useful for remote access of the Camera via the Internet. Refer to the SoloLink™ Quick Installation for more information.
A
B
C
D
E
A
B Unplug the Ethernet network cable from the Camera as well as the PC, router, or switch.
C
D Plug the power adapter into a local electrical outlet.
The Ready LED flashes while the Camera is initializing. When the Ready and Wireless LEDs are solidly lit, the Camera is ready for use.
E Aim and focus the Camera accordingly.
Congratulations! The installation of the
To view the Camera’s video, open your web browser, and enter the Camera’s IP address. (Use Internet Explorer version 5.5 or higher. Netscape users should use the Viewer & Recorder Utility.)
NOTE: To use the Viewer & Recorder Utility,
For additional information or troubleshooting help, refer to the User Guide on the Setup CD- ROM. You can also
Website
http://www.linksys.com/international
Product Registration
http://www.linksys.com/registration
Linksys is a registered trademark or trademark and SoloLink is a trademark of Cisco Systems, Inc. and/or its affiliates in the U.S. and certain other countries. Copyright © 2004 Cisco Systems, Inc. All rights reserved.
F