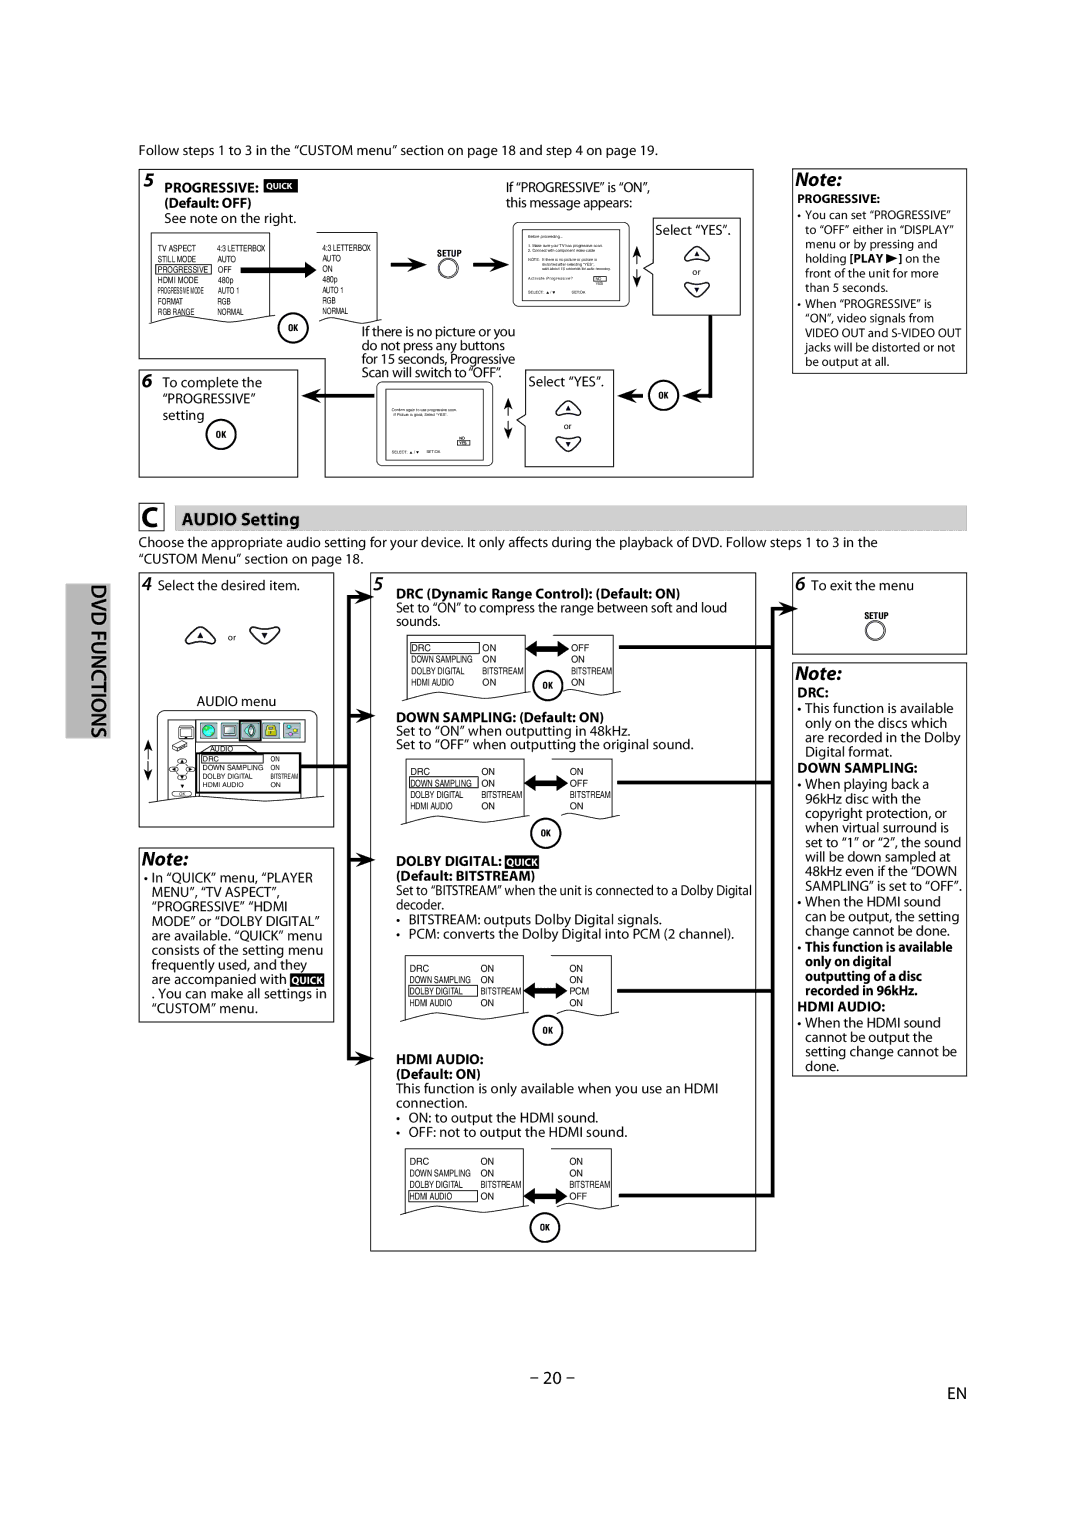
Follow steps 1 to 3 in the “CUSTOM menu” section on page 18 and step 4 on page 19.
5 PROGRESSIVE: |
| If “PROGRESSIVE” is “ON”, |
QUICK | ||
| ||
(Default: OFF) | this message appears: | |
See note on the right. |
| |
Select “YES”.
Note:
PROGRESSIVE:
• You can set “PROGRESSIVE” |
to “OFF” either in “DISPLAY” |
TV ASPECT | 4:3 LETTERBOX | 4:3 LETTERBOX |
| SETUP | |
STILL MODE | AUTO | AUTO |
| ||
|
| ||||
PROGRESSIVE | OFF |
| ON |
|
|
HDMI MODE | 480p | 480p |
|
| |
PROGRESSIVE MODE | AUTO 1 | AUTO 1 | |
FORMAT | RGB | RGB | |
RGB RANGE | NORMAL | NORMAL | |
|
| OK | If there is no picture or you |
|
|
| do not press any buttons |
|
|
| for 15 seconds, Progressive |
6 To complete the | Scan will switch to “OFF”. | ||
| |||
| “PROGRESSIVE” |
| |
| setting |
| Confirm again to use progressive scan. |
|
| If Picture is good, Select “YES”. | |
|
| OK | NO |
|
|
| YES |
|
|
| SELECT: K / L SET:OK |
C | AUDIO Setting |
| |
Before proceeding…
1.Make sure your TV has progressive scan.
2.Connect with component video cable
NOTE: If there is no picture or picture is distorted after selecting “YES”,
wait about 15 seconds for auto recovery.
Activate Progressive? | NO | |
|
| YES |
SELECT: K / L | SET:OK |
|
Select “YES”.
or
or
OK
menu or by pressing and |
holding [PLAY B] on the |
front of the unit for more |
than 5 seconds. |
• When “PROGRESSIVE” is |
“ON”, video signals from |
VIDEO OUT and |
jacks will be distorted or not |
be output at all. |
Choose the appropriate audio setting for your device. It only affects during the playback of DVD. Follow steps 1 to 3 in the “CUSTOM Menu” section on page 18.
DVD | 4 Select the desired item. | |
|
| |
FUNCTIONS | or |
|
AUDIO menu | ||
|
| |
| AUDIO |
|
| DRC | ON |
| DOWN SAMPLING | ON |
| DOLBY DIGITAL | BITSTREAM |
| HDMI AUDIO | ON |
| OK |
|
| Note: |
|
•In “QUICK” menu, “PLAYER MENU”, “TV ASPECT”,
“PROGRESSIVE” “HDMI MODE” or “DOLBY DIGITAL” are available. “QUICK” menu consists of the setting menu frequently used, and they are accompanied with QUICK
. You can make all settings in “CUSTOM” menu.
5DRC (Dynamic Range Control): (Default: ON)
Set to “ON” to compress the range between soft and loud sounds.
|
|
|
|
|
|
|
DRC | ON |
|
|
| OFF | |
|
|
|
|
|
|
|
DOWN SAMPLING | ON |
|
|
| ON | |
DOLBY DIGITAL | BITSTREAM |
|
|
|
| BITSTREAM |
HDMI AUDIO | ON |
| OK |
| ON | |
|
|
|
|
| ||
|
|
|
|
|
|
|
DOWN SAMPLING: (Default: ON)
Set to “ON” when outputting in 48kHz.
Set to “OFF” when outputting the original sound.
DRC | ON |
| ON |
DOWN SAMPLING | ON |
| OFF |
| |||
DOLBY DIGITAL | BITSTREAM |
| BITSTREAM |
HDMI AUDIO | ON |
| ON |
|
|
|
|
OK
DOLBY DIGITAL: QUICK
(Default: BITSTREAM)
Set to “BITSTREAM” when the unit is connected to a Dolby Digital decoder.
•BITSTREAM: outputs Dolby Digital signals.
•PCM: converts the Dolby Digital into PCM (2 channel).
DRC | ON |
| ON |
DOWN SAMPLING | ON |
| ON |
DOLBY DIGITAL | BITSTREAM |
| PCM |
| |||
HDMI AUDIO | ON |
| ON |
OK
HDMI AUDIO: (Default: ON)
This function is only available when you use an HDMI connection.
•ON: to output the HDMI sound.
•OFF: not to output the HDMI sound.
DRC | ON |
| ON |
DOWN SAMPLING | ON |
| ON |
DOLBY DIGITAL | BITSTREAM |
| BITSTREAM |
HDMI AUDIO | ON |
| OFF |
| |||
| |||
|
|
|
|
6To exit the menu
SETUP
Note:
DRC:
•This function is available only on the discs which are recorded in the Dolby Digital format.
DOWN SAMPLING:
•When playing back a 96kHz disc with the copyright protection, or when virtual surround is set to “1” or “2”, the sound will be down sampled at 48kHz even if the “DOWN SAMPLING” is set to “OFF”.
•When the HDMI sound can be output, the setting change cannot be done.
•This function is available only on digital outputting of a disc recorded in 96kHz.
HDMI AUDIO:
•When the HDMI sound cannot be output the setting change cannot be done.
OK
– 20 –
EN
