Owner’s Manual
Video Cassette Recorder
MSC455
If you need additional operating assis- tance after reading this owner’s manual or to order replacement accessories, please call
TOLL FREE :
RF Output Channel
If channel 3 is already occupied for broadcasting,
1) | Set your TV to channel 4. |
2) | Insert a |
3) | Press [PLAY B] once. |
4) | After a few seconds, hold [PLAY B] on the unit for 3 seconds. |
| • The RF output channel will change to channel 4 from channel 3 and you |
| will see a playback picture. |
| • When a picture does not appear on the TV screen, repeat step 4). |
5) | Press [STOP C] to stop playback. |
Hint
• The RF output channel |
may not change when you |
adjust tracking during |
playback. In this case, |
stop the playback, and |
start the playback again. |
After that, hold [PLAY B] |
on the VCR for 3 seconds |
again. |
1. Before Using Your VCR
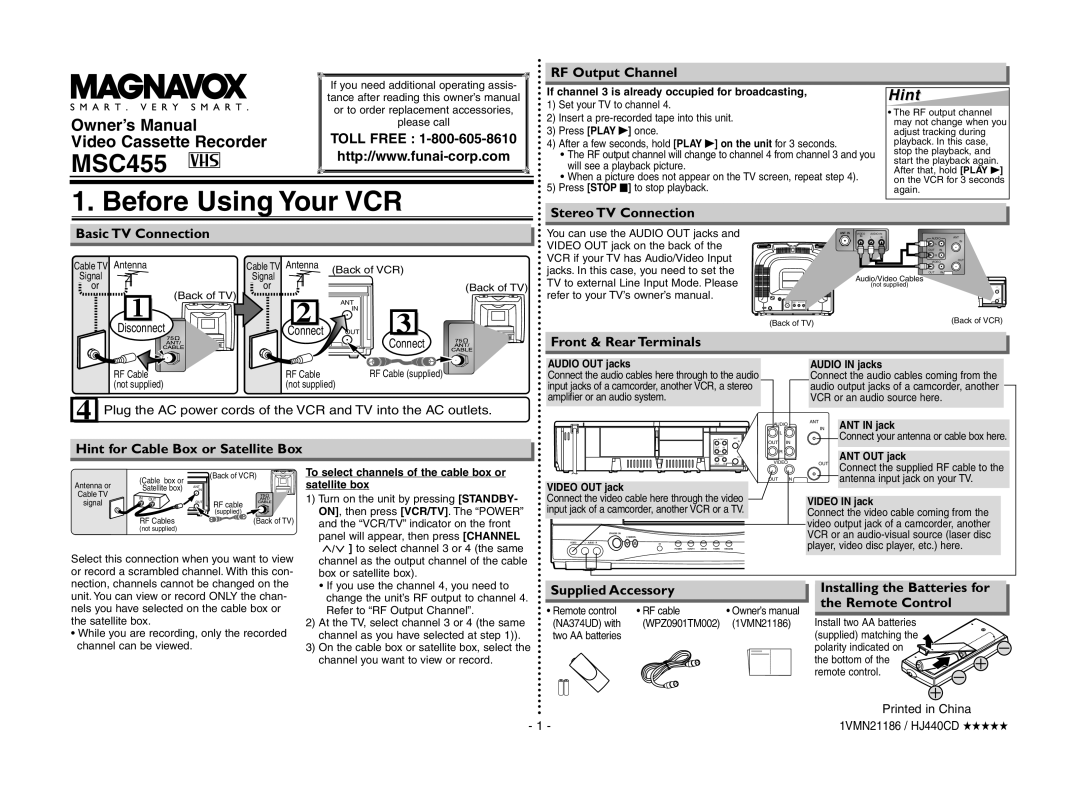
Basic TV Connection
Stereo TV Connection
You can use the AUDIO OUT jacks and VIDEO OUT jack on the back of the
VIDEO AUDIO IN |
|
| ||
IN | L | R | AUDIO | ANT |
|
|
| L | IN |
|
|
|
| |
OUT IN
Antenna | Antenna |
VCR if your TV has Audio/Video Input
R
VIDEO
OUT
Cable TV | Cable TV |
Signal | Signal |
or | or |
| (Back of TV) |
Disconnect | 2 |
Connect |
(Back of VCR)
(Back of TV)
ANT |
|
IN | 3 |
OUT |
jacks. In this case, you need to set the TV to external Line Input Mode. Please refer to your TV’s owner’s manual.
(Back of TV)
OUT IN ![]()
Audio/Video Cables
(not supplied)
(Back of VCR)
Connect |
Front & Rear Terminals
RF Cable | RF Cable | RF Cable (supplied) |
(not supplied) | (not supplied) |
|
4 Plug the AC power cords of the VCR and TV into the AC outlets.
Hint for Cable Box or Satellite Box
AUDIO OUT jacks |
|
| AUDIO IN jacks | |
Connect the audio cables here through to the audio |
| Connect the audio cables coming from the | ||
input jacks of a camcorder, another VCR, a stereo |
| audio output jacks of a camcorder, another | ||
amplifier or an audio system. |
|
| VCR or an audio source here. | |
|
| AUDIO | ANT | ANT IN jack |
|
| IN | ||
|
|
| ||
|
| L |
| Connect your antenna or cable box here. |
AUDIO | ANT |
|
| |
IN | OUT IN |
| ||
L |
|
|
| |
OUT IN |
|
|
|
|
R |
| R |
| ANT OUT jack |
VIDEO | OUT |
|
| |
|
| VIDEO |
| |
OUT IN |
| OUT | Connect the supplied RF cable to the | |
|
|
|
| |
| (Cable | box or |
| (Back of VCR) |
| |
Antenna or |
|
|
| |||
Satellite box) | ANT |
|
| |||
Cable TV | IN |
|
| |||
IN | OUT |
|
|
|
| |
signal |
| OUT | RF cable | E | ||
|
|
|
|
| (supplied) |
|
RF Cables | (Back of TV) |
(not supplied)
To select channels of the cable box or satellite box
1) Turn on the unit by pressing [STANDBY- |
ON], then press [VCR/TV]. The “POWER” |
and the “VCR/TV” indicator on the front |
panel will appear, then press [CHANNEL |
] to select channel 3 or 4 (the same |
VIDEO OUT jack | OUT | IN | antenna input jack on your TV. |
|
| ||
|
|
| |
Connect the video cable here through the video |
| VIDEO IN jack | |
input jack of a camcorder, another VCR or a TV. |
| Connect the video cable coming from the | |
|
|
| video output jack of a camcorder, another |
|
| VCR or an | |
| CHANNEL |
| |
VIDEO L - AUDIO - R | IR |
| player, video disc player, etc.) here. |
| POWER VCR/TV CST.IN TIMER RECORD |
| |
Select this connection when you want to view or record a scrambled channel. With this con- nection, channels cannot be changed on the unit. You can view or record ONLY the chan- nels you have selected on the cable box or the satellite box.
• While you are recording, only the recorded channel can be viewed.
| channel as the output channel of the cable |
| box or satellite box). |
| • If you use the channel 4, you need to |
| change the unit’s RF output to channel 4. |
| Refer to “RF Output Channel”. |
2) | At the TV, select channel 3 or 4 (the same |
| channel as you have selected at step 1)). |
3) | On the cable box or satellite box, select the |
| channel you want to view or record. |
Supplied Accessory
• Remote control | • RF cable | • Owner’s manual |
(NA374UD) with | (WPZ0901TM002) | (1VMN21186) |
two AA batteries |
|
|
Installing the Batteries for the Remote Control
Install two AA batteries (supplied) matching the polarity indicated on ![]() the bottom of the
the bottom of the ![]() remote control.
remote control. ![]()
![]()
![]()
| Printed in China |
- 1 - | 1VMN21186 / HJ440CD ★★★★★ |
