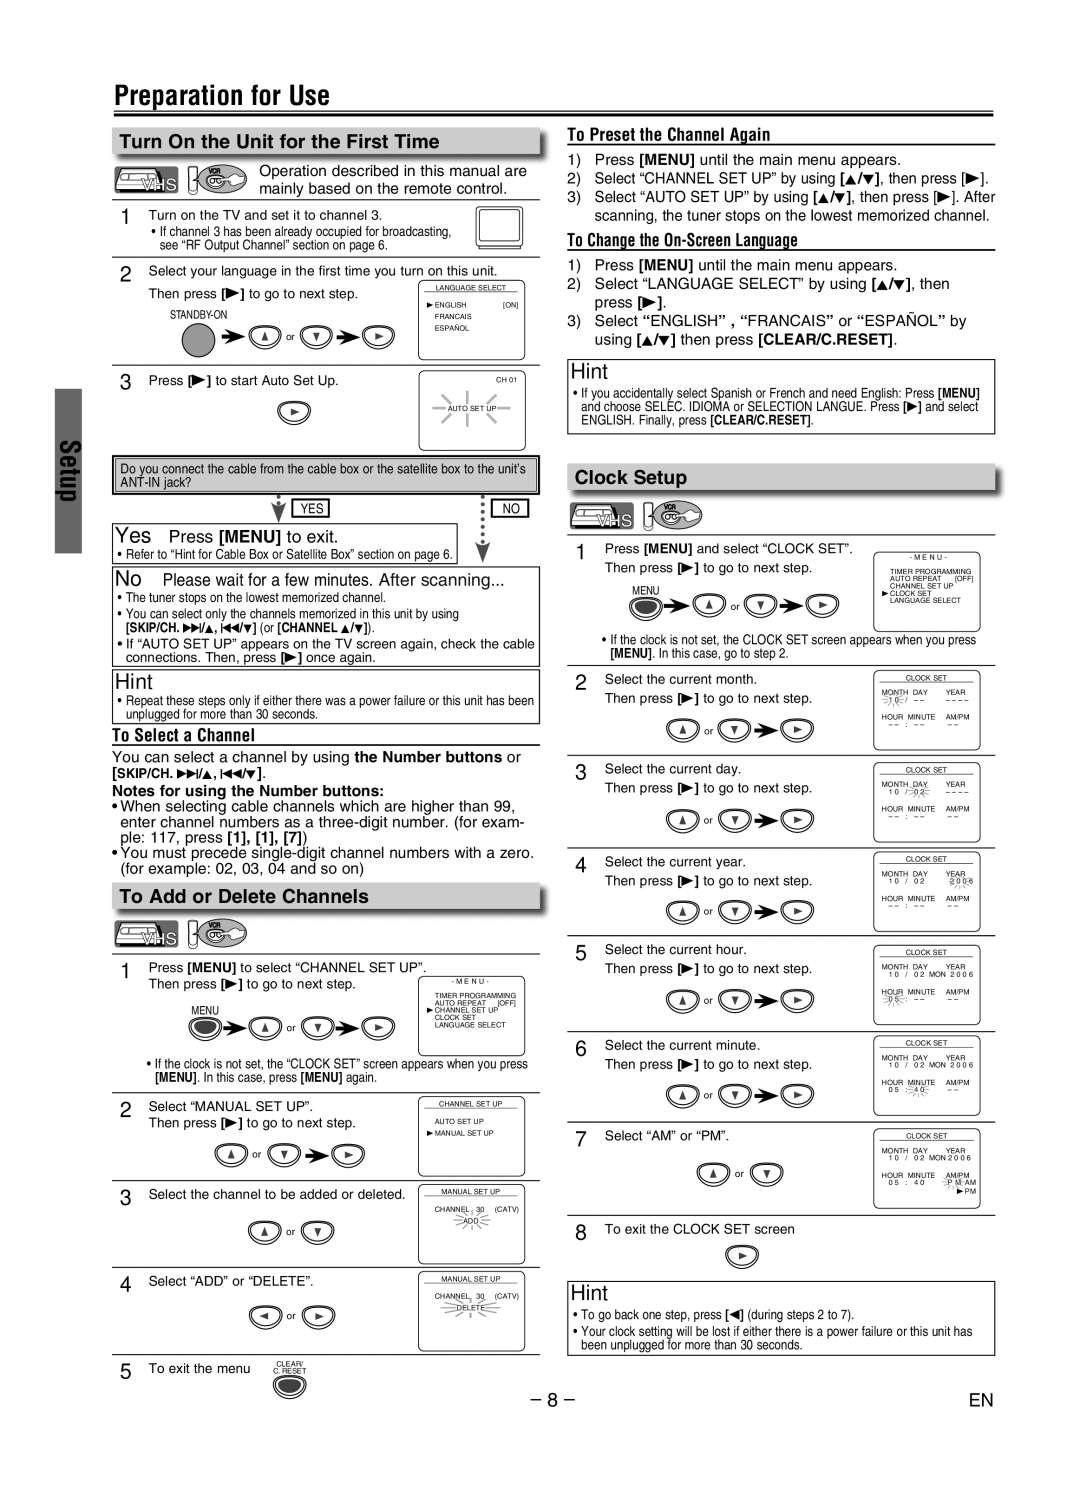
Preparation for Use

Turn On the Unit for the First Time


VCR

Operation described in this manual are


mainly based on the remote control.

1

Turn on the TV and set it to channel .


• If channel  has been already occupied for broadcasting,


see “RF Output Channel” section on page 6.


2

Select your language in the first time you turn on this unit.


Then press [B] to go to next step.

LANGUAGE SELECT


BENGLISH

[ON]


STANDBY-ON


FRANCAIS


or

ESPAÑOL


3

Press [B] to start Auto Set Up.


CH 01

AUTO SET UP

To Preset the Channel Again

1)Press [MENU] until the main menu appears.

2)Select “CHANNEL SET UP” by using [K//L], then press [B].

) Select “AUTO SET UP” by using [K//L], then press [B]. After scanning, the tuner stops on the lowest memorized channel.

To Change the On-Screen Language

1)Press [MENU] until the main menu appears.

2)Select “LANGUAGE SELECT” by using [K/L], then press [B].

) Select ENGLISH” , “FRANCAISor ESPAÑOLby

using [K/L] then press [CLEAR/C.RESET].

Hint

If you accidentally select Spanish or French and need English: Press [MENU] and choose SELEC. IDIOMA or SELECTION LANGUE. Press [B] and select ENGLISH. Finally, press [CLEAR/C.RESET].

Setup

Do you connect the cable from the cable box or the satellite box to the unit’s ANT-IN jack?

YES

NO

Yes Press [MENU] to exit.

• Refer to “Hint for Cable Box or Satellite Box” section on page 6.

Please wait for a few minutes. After scanning...

• The tuner stops on the lowest memorized channel.

• You can select only the channels memorized in this unit by using

[SKIP/CH. G///K, H//L] (or [CHANNEL K///L]).

Clock Setup

VCR

1 Press [MENU] and select “CLOCK SET”. Then press [B] to go to next step.

MENU

or

- M E N U -

TIMER PROGRAMMING AUTO REPEAT [OFF] CHANNEL SET UP

BCLOCK SET LANGUAGE SELECT

• If “AUTO SET UP” appears on the TV screen again, check the cable

connections. Then, press [B] once again.

If the clock is not set, the CLOCK SET screen appears when you press [MENU]. In this case, go to step 2.

• Repeat these steps only if either there was a power failure or this unit has been

unplugged for more than 0 seconds.

To Select a Channel

You can select a channel by using the Number buttons or [SKIP/CH. G/K, H/L].

Notes for using the Number buttons:

When selecting cable channels which are higher than 99, enter channel numbers as a three-digit number. (for exam- ple: 117, press [1], [1], [7])

You must precede single-digit channel numbers with a zero. (for example: 02, 0, 04 and so on)

To Add or Delete Channels


VCR


1

Press [MENU] to select “CHANNEL SET UP”.


Then press [B] to go to next step.

- M E N U -


TIMER PROGRAMMING


MENU

AUTO REPEAT [OFF]


BCHANNEL SET UP


CLOCK SET

or

LANGUAGE SELECT


If the clock is not set, the “CLOCK SET” screen appears when you press [MENU]. In this case, press [MENU] again.

2

Select “MANUAL SET UP”.

CHANNEL SET UP


Then press [B] to go to next step.

AUTO SET UP

BMANUAL SET UP


2 Select the current month.

Then press [B] to go to next step.

or

3 Select the current day.

Then press [B] to go to next step.

or

4 Select the current year.

Then press [B] to go to next step.

or

5 Select the current hour.

Then press [B] to go to next step.

or

6 Select the current minute.

Then press [B] to go to next step.

or

7 Select “AM” or “PM”.


CLOCK SET

MONTH DAY


YEAR

1 0

/

– –


– – – –

HOUR MINUTE

AM/PM

– –

:

– –


– –


CLOCK SET

MONTH DAY


YEAR

1 0

/

0 2


– – – –

HOUR MINUTE

AM/PM

– –

:

– –


– –


CLOCK SET

MONTH DAY


YEAR

1 0

/

0 2


2 0 0 6

HOUR MINUTE

AM/PM

– –

:

– –


– –


CLOCK SET

MONTH DAY


YEAR

1 0

/

0 2

MON 2 0 0 6

HOUR MINUTE

AM/PM

0 5

:

– –


– –


CLOCK SET

MONTH DAY


YEAR

1 0

/

0 2

MON 2 0 0 6

HOUR MINUTE

AM/PM

0 5

:

4 0


– –


CLOCK SET

or

3 Select the channel to be added or deleted.

MANUAL SET UP

CHANNEL 0 (CATV)

or

MONTH DAY


YEAR

1 0

/

0 2

MON 2 0 0 6

HOUR MINUTE

AM/PM

0 5

:

4 0


P M AM

BPM


or

4

Select “ADD” or “DELETE”.


or

5

To exit the menu

CLEAR/

C. RESET

ADD

MANUAL SET UP

CHANNEL 0 (CATV)

DELETE

8 To exit the CLOCK SET screen

To go back one step, press [s] (during steps 2 to 7).

Your clock setting will be lost if either there is a power failure or this unit has been unplugged for more than 0 seconds.

– 8 –

EN

Page 8
Image 8
Magnavox MWD2206A Preparation for Use, Turn On the Unit for the First Time, Clock Setup, To Add or Delete Channels

MWD2206A specifications

The Magnavox MWD2206A is a versatile and compact multimedia player designed to cater to various audiovisual needs. This device seamlessly combines capabilities of a DVD player with a CD player, making it an ideal choice for individuals looking to enjoy their favorite movies and music formats in one unit.

One of the primary features of the MWD2206A is its support for multiple disc formats, including DVD, DVD-R/RW, CD, CD-R/RW, and JPEG discs. This versatility allows users to not only play traditional DVDs but also enjoy personal media stored on CD-R and CD-RW formats. The player supports a wide range of audio and video file formats, ensuring compatibility with most media formats available.

User convenience is central to the design of the MWD2206A. The device boasts a user-friendly interface that makes navigation through menus easy and intuitive. It includes a remote control, allowing users to operate the player from a distance, enhancing the viewing experience. The large display screen provides clear feedback and status updates for ease of use.

Another highlight of the Magnavox MWD2206A is its exceptional video and audio quality. The player is engineered to deliver sharp visuals and crystal-clear sound, elevating the multimedia experience. With built-in Dolby Digital decoder, it can produce impressive audio quality for home entertainment setups.

The MWD2206A is designed with several connectivity options, including composite and S-video outputs, allowing for easy connections to TVs and audio systems. This flexibility enables users to integrate the player into their existing home entertainment systems without hassle.

Moreover, the compact design of the MWD2206A ensures that it can fit into various spaces, whether on a shelf, within a media cabinet, or even while traveling. Its lightweight construction adds to its portability, making it suitable for both home use and on-the-go entertainment.

In summary, the Magnavox MWD2206A stands out as a reliable multimedia player that combines versatility, user-friendliness, and quality performance. With its ability to handle various audio and video formats, coupled with easy connectivity options, this player is perfect for anyone looking to enjoy a range of entertainment options in a single device. Whether for movie nights or music playback, the MWD2206A is an excellent addition to any media collection.