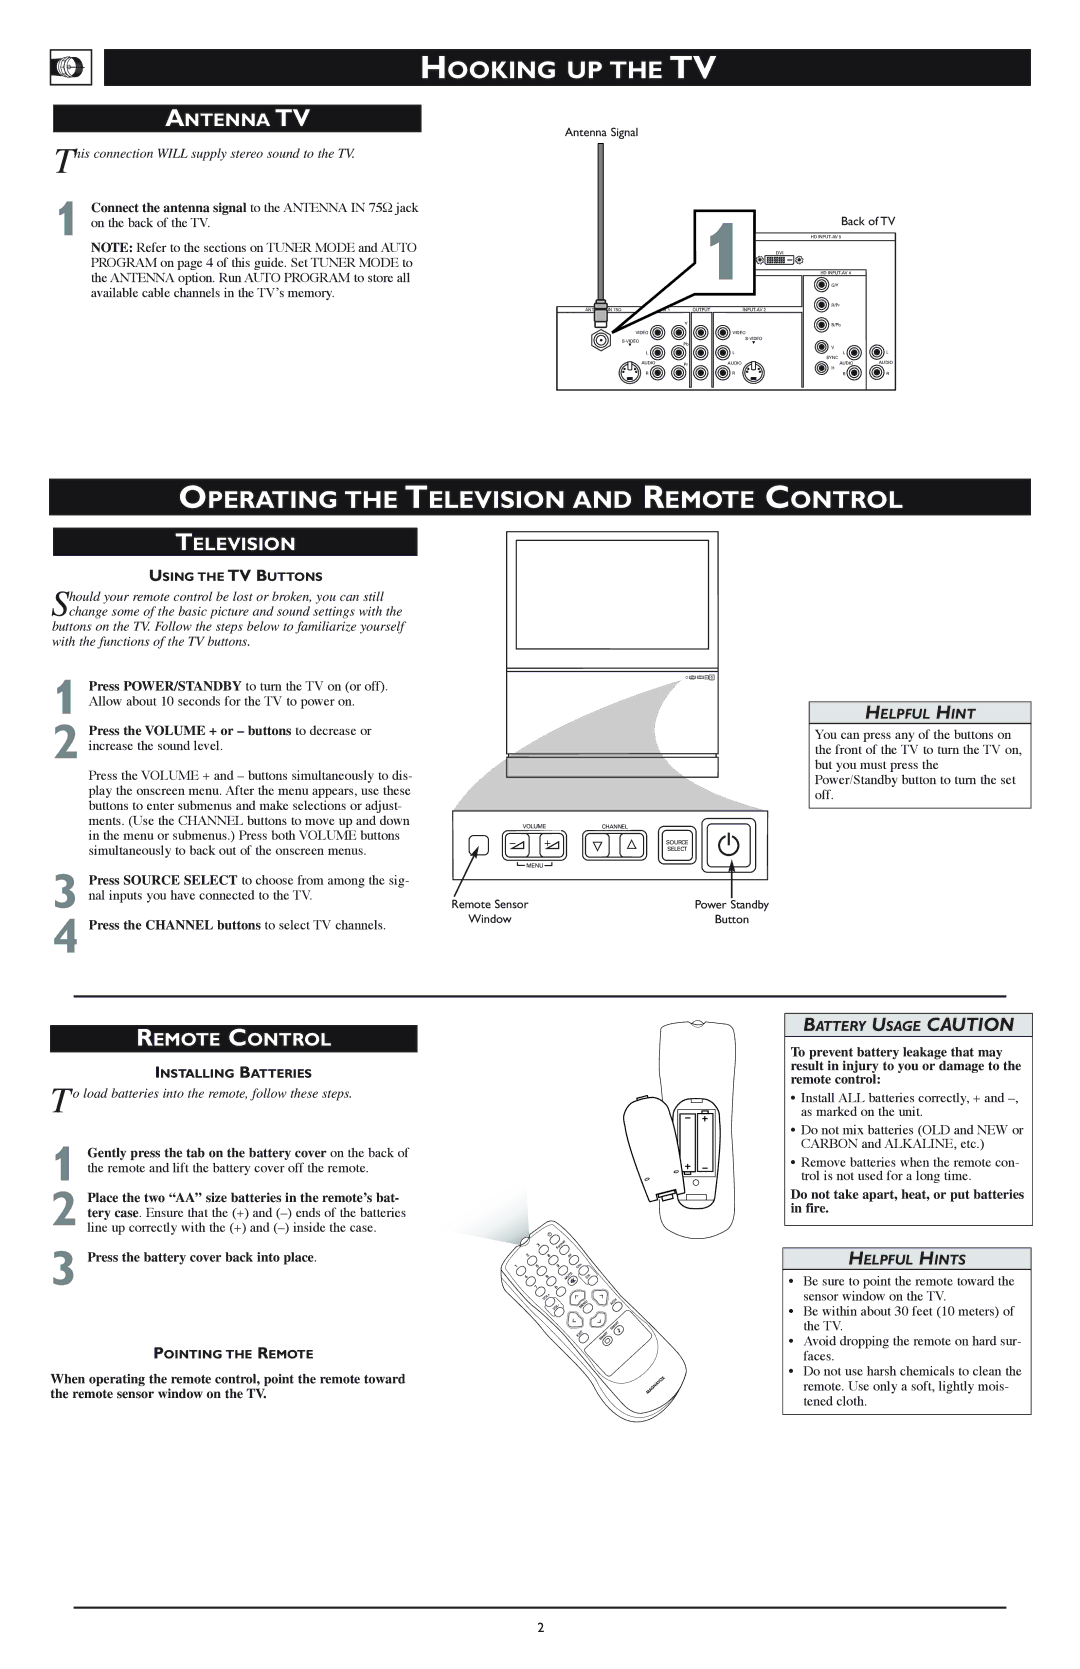
Gently press the tab on the battery cover on the back of the remote and lift the battery cover off the remote.

HOOKING UP THE TV

ANTENNA TV

Antenna Signal

This connection WILL supply stereo sound to the TV.

1 Connect the antenna signal to the ANTENNA IN 75Ω jack on the back of the TV.

NOTE: Refer to the sections on TUNER MODE and AUTO PROGRAM on page 4 of this guide. Set TUNER MODE to the ANTENNA option. Run AUTO PROGRAM to store all available cable channels in the TV’s memory.


1

Back of TV


HD INPUT-AV 5


DVI


HD INPUT-AV 4


G/Y


ANTENNA IN 75

1

OUTPUT

INPUT-AV 2

R/Pr


Y


B/Pb


VIDEO


VIDEO


S-VIDEO


S-VIDEO


Pb

L


L


V


L


L


L

L


SYNC


AUDIO

Pr

AUDIO

AUDIO

AUDIO


R


R

H


R

R

OPERATING THE TELEVISION AND REMOTE CONTROL

TELEVISION

USING THE TV BUTTONS

Should your remote control be lost or broken, you can still change some of the basic picture and sound settings with the

buttons on the TV. Follow the steps below to familiarize yourself with the functions of the TV buttons.

1 Press POWER/STANDBY to turn the TV on (or off). Allow about 10 seconds for the TV to power on.

2 Press the VOLUME + or – buttons to decrease or increase the sound level.

Press the VOLUME + and – buttons simultaneously to dis- play the onscreen menu. After the menu appears, use these buttons to enter submenus and make selections or adjust- ments. (Use the CHANNEL buttons to move up and down in the menu or submenus.) Press both VOLUME buttons simultaneously to back out of the onscreen menus.

3 Press SOURCE SELECT to choose from among the sig- nal inputs you have connected to the TV.

4 Press the CHANNEL buttons to select TV channels.

VOLUME

CHANNEL


A

A

?

>

SELECT

-

+


SOURCE


MENU


Remote Sensor


Power Standby

Window


Button

HELPFUL HINT

You can press any of the buttons on the front of the TV to turn the TV on, but you must press the Power/Standby button to turn the set off.

REMOTE CONTROL

INSTALLING BATTERIES

To load batteries into the remote, follow these steps.

1

2 Place the two “AA” size batteries in the remote’s bat- tery case. Ensure that the (+) and (–) ends of the batteries line up correctly with the (+) and (–) inside the case.

3 Press the battery cover back into place.

POINTING THE REMOTE

When operating the remote control, point the remote toward the remote sensor window on the TV.

BATTERY USAGE CAUTION

To prevent battery leakage that may result in injury to you or damage to the remote control:

Install ALL batteries correctly, + and –, as marked on the unit.

Do not mix batteries (OLD and NEW or CARBON and ALKALINE, etc.)

Remove batteries when the remote con- trol is not used for a long time.

Do not take apart, heat, or put batteries in fire.

HELPFUL HINTS

Be sure to point the remote toward the sensor window on the TV.

Be within about 30 feet (10 meters) of the TV.

Avoid dropping the remote on hard sur- faces.

Do not use harsh chemicals to clean the remote. Use only a soft, lightly mois- tened cloth.

2

Page 2
Image 2
Magnavox Rear-projection HDTV Monitor setup guide Operating the Television and Remote Control, Antenna TV

Rear-projection HDTV Monitor specifications

The Magnavox Rear-Projection HDTV Monitor is a standout in the realm of high-definition televisions, offering a blend of advanced technologies and user-friendly features. Designed to deliver spectacular picture quality and an immersive viewing experience, this monitor stands out for multiple reasons.

One of the primary features of the Magnavox Rear-Projection HDTV Monitor is its impressive display resolution. It supports high-definition 1080p resolution, ensuring that images are crisp, clear, and vividly detailed. This high resolution is complemented by a large screen size, typically ranging from 50 to 60 inches, making it ideal for home theater setups. Viewers can sink into a cinematic experience with bold colors and remarkable detail, whether they are watching movies, sports, or playing video games.

The rear-projection technology utilized in this monitor enhances its performance by utilizing a combination of optical systems to project images directly onto the screen. This method allows for a thinner design compared to traditional CRT TVs, while still providing deep contrast ratios and vibrant color saturation. Rear-projection monitors, like those offered by Magnavox, also tend to have wider viewing angles, ensuring that the picture remains clear and consistent from various positions in the room.

Another notable characteristic of the Magnavox Rear-Projection HDTV Monitor is its integration of advanced image processing technologies. Features such as 3D comb filters and noise reduction algorithms enhance the quality of standard definition content, significantly improving overall viewing pleasure. Additionally, the monitor often includes multiple HDMI inputs, allowing users to connect various devices such as streaming boxes, gaming consoles, and Blu-ray players seamlessly.

User-friendly functionalities are also a hallmark of the Magnavox experience. The monitor typically comes equipped with an intuitive remote control, which provides easy access to settings, channels, and inputs. The inclusion of features like Picture-in-Picture allows users to multitask by watching two programs simultaneously, enhancing the overall utility of the monitor.

In summary, the Magnavox Rear-Projection HDTV Monitor stands as a formidable choice in the competitive high-definition market. With its large screen size, stunning 1080p resolution, advanced processing technologies, and user-centric features, it appeals to those seeking a high-quality viewing experience at home. It combines innovation with practicality, making it a cherished addition to any entertainment setup.