Before turning on your VCR, make sure there are batteries in the remote control and the VCR and TV are connected correctly.

You can not program channels if you are using a Cable Box or a Direct Broadcast System.

If you are not using a Cable Box/DBS, the clock may set itself automatically after you connect the antenna/Cable signal to the VCR and plug in the power cord. The time will appear on the display panel.

Turning on Your VCR 11

2Turn on the TV.

1

POWER

VCR/TV

EJECT


VCR

TV

CBL/DBS

1

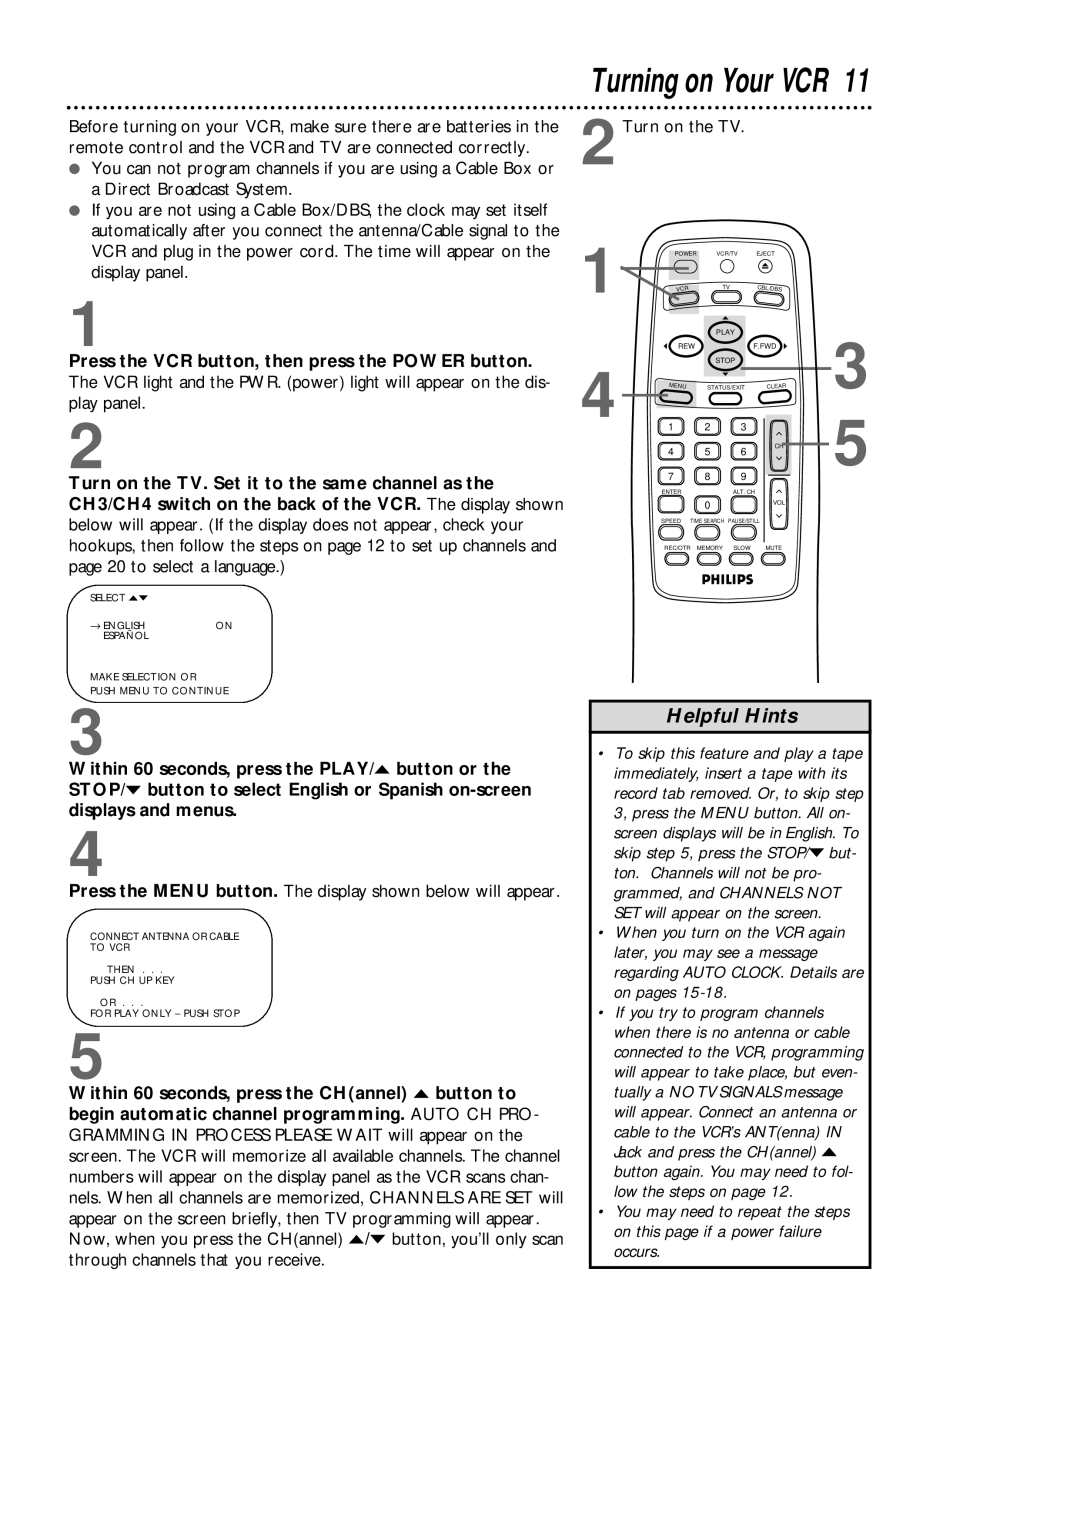
Press the VCR button, then press the POWER button.

The VCR light and the PWR. (power) light will appear on the dis- play panel.

2

Turn on the TV. Set it to the same channel as the CH3/CH4 switch on the back of the VCR. The display shown

4

REW

MENU

1

4

7

ENTER

PLAY


F.FWD

STOP


STATUS/EXIT

CLEAR

2

3


5

6

CH


8

9


ALT. CH


0


VOL


3

5

below will appear. (If the display does not appear, check your hookups, then follow the steps on page 12 to set up channels and page 20 to select a language.)

SPEED

TIME SEARCH

PAUSE/STILL


REC/OTR

MEMORY

SLOW

MUTE

SELECT op


ENGLISH

ON

ESPAÑOL


MAKE SELECTION OR

PUSH MENU TO CONTINUE

3

Within 60 seconds, press the PLAY/o button or the STOP/p button to select English or Spanish on-screen displays and menus.

4

Press the MENU button. The display shown below will appear.

CONNECT ANTENNA OR CABLE

TO VCR

THEN . . .

PUSH CH UP KEY

OR . . .

FOR PLAY ONLY – PUSH STOP

5

Within 60 seconds, press the CH(annel) o button to begin automatic channel programming. AUTO CH PRO- GRAMMING IN PROCESS PLEASE WAIT will appear on the screen. The VCR will memorize all available channels. The channel numbers will appear on the display panel as the VCR scans chan- nels. When all channels are memorized, CHANNELS ARE SET will appear on the screen briefly, then TV programming will appear. Now, when you press the CH(annel) o/p button, you’ll only scan through channels that you receive.

Helpful Hints

To skip this feature and play a tape immediately, insert a tape with its record tab removed. Or, to skip step 3, press the MENU button. All on- screen displays will be in English. To skip step 5, press the STOP/p but- ton. Channels will not be pro- grammed, and CHANNELS NOT SET will appear on the screen.

When you turn on the VCR again later, you may see a message regarding AUTO CLOCK. Details are on pages 15-18.

If you try to program channels when there is no antenna or cable connected to the VCR, programming will appear to take place, but even- tually a NO TV SIGNALS message will appear. Connect an antenna or cable to the VCR’s ANT(enna) IN Jack and press the CH(annel) o button again. You may need to fol- low the steps on page 12.

You may need to repeat the steps on this page if a power failure occurs.

Page 11
Image 11
Magnavox VRB611AT, VRB411AT Turning on Your VCR, 2Turn on the TV, Press the VCR button, then press the Power button

VRB611AT, VRB411AT specifications

The Magnavox VRB411AT and VRB611AT are two innovative DVD/VCR combo players that seamlessly blend modern technology with classic functionality. Designed to cater to a broad demographic of users, these devices provide the flexibility of enjoying VHS tapes alongside the convenience of DVD playback.

One of the standout features of both models is their ability to record directly from VHS to DVD. This functionality enables users to preserve their cherished home movies and favorite TV shows while transitioning to more modern media. The recording process is intuitive, allowing users to easily select titles for transfer, ensuring that memories aren't lost to time.

The VRB411AT and VRB611AT utilize high-quality playback technology to deliver excellent video and audio performance. They support a range of formats, accommodating diverse media preferences. With standard DVD format support, as well as the ability to play CD formats, these players enable users to enjoy a wide array of content.

In terms of connectivity, both models are equipped with multiple input and output options, including composite video outs and audio jacks, making it simple to connect to various televisions and audio systems. Some users may appreciate the inclusion of S-Video output for enhanced picture quality, elevating the viewing experience.

Another key feature of the Magnavox VRB411AT and VRB611AT is their user-friendly interface, which simplifies navigation through menus and settings. The on-screen displays are clear and concise, ensuring that users can easily adjust settings, program recordings, and select playback options.

Additionally, both models are compatible with a range of remote controls, allowing for easy operation from a distance. This is particularly useful for those who prefer to sit back and enjoy their shows without the hassle of manual adjustments.

Overall, the Magnavox VRB411AT and VRB611AT offer a perfect blend of nostalgia and modern convenience. They cater to both seasoned VCR users and newer audiences looking to explore classic media. With their reliable performance, versatile playback capabilities, and ease of use, these DVD/VCR combos are a noteworthy choice for anyone seeking to bridge the gap between vintage and contemporary entertainment formats.