P 11/ 14
 Repair
[[3] DISASSEMBLY/ASSEMBLY
[3] -8. Swash Bearing Section (cont.)
ASSEMBLING
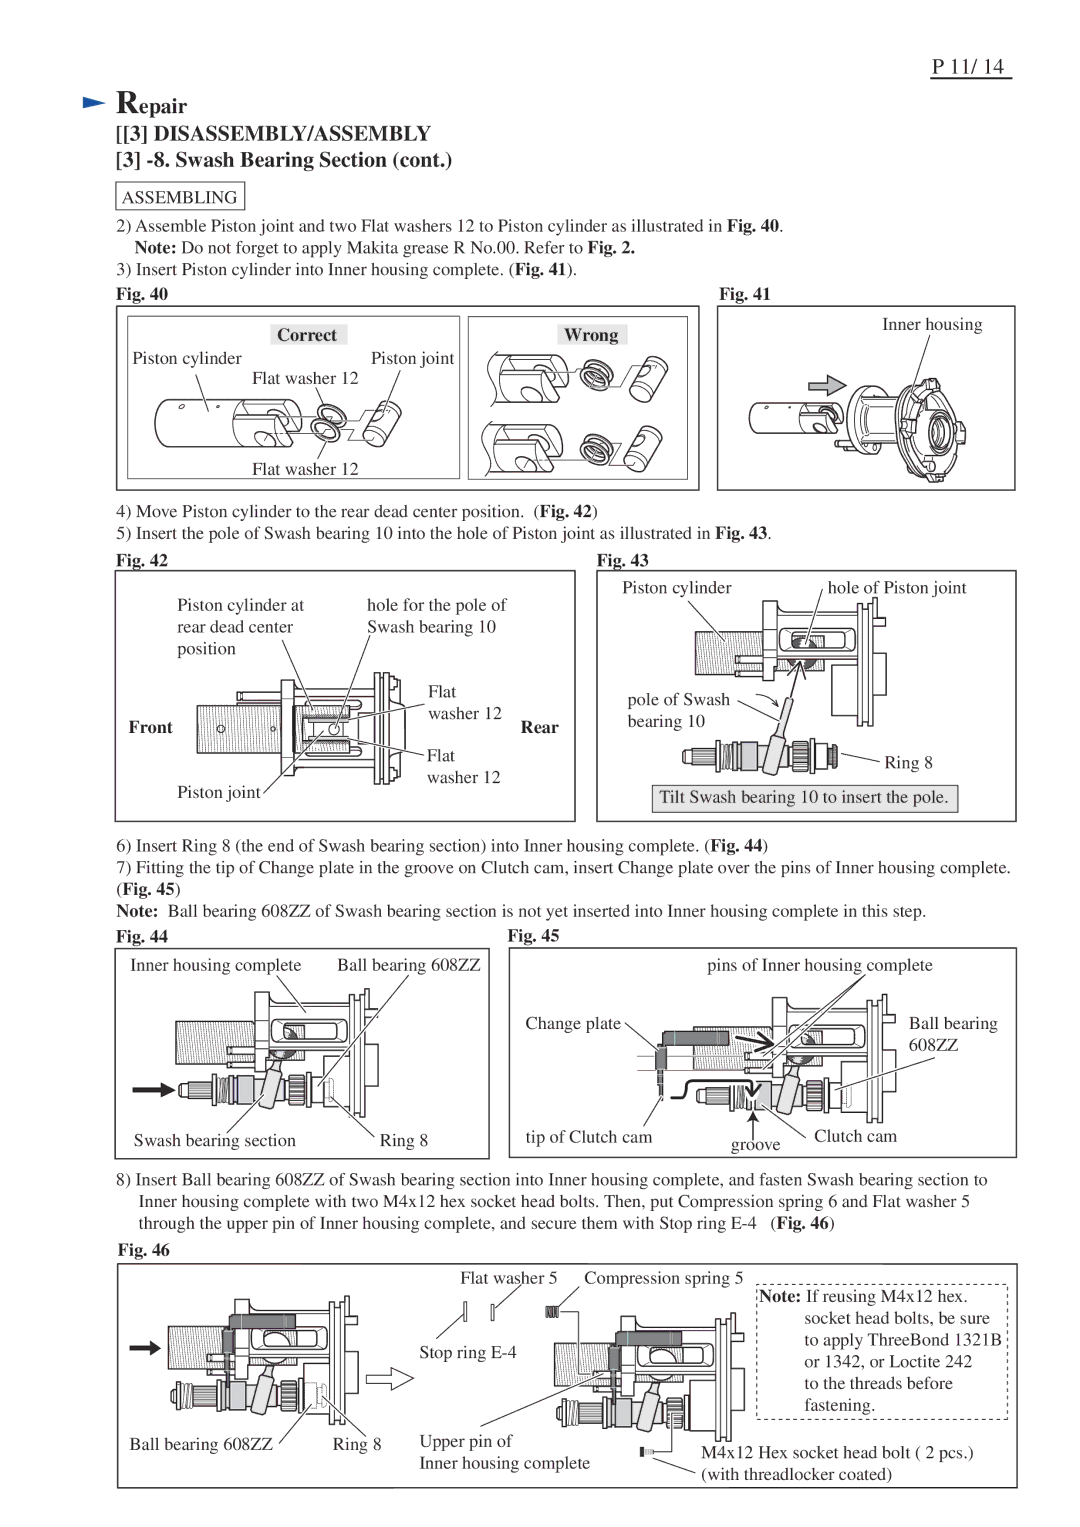
2)Assemble Piston joint and two Flat washers 12 to Piston cylinder as illustrated in Fig. 40. Note: Do not forget to apply Makita grease R No.00. Refer to Fig. 2.
3)Insert Piston cylinder into Inner housing complete. (Fig. 41).
Fig. 40
Correct | Wrong |
Piston cylinder | Piston joint |
Flat washer 12 |
|
Flat washer 12 |
|
Fig. 41
Inner housing
4)Move Piston cylinder to the rear dead center position. (Fig. 42)
5)Insert the pole of Swash bearing 10 into the hole of Piston joint as illustrated in Fig. 43.
Fig. 42
Piston cylinder at | hole for the pole of |
rear dead center | Swash bearing 10 |
position |
|
| Flat |
|
Front | washer 12 | Rear |
| Flat |
|
| washer 12 |
|
| Piston joint |
|
Fig. 43
Piston cylinder | hole of Piston joint | ||||
|
|
|
|
|
|
|
|
|
|
|
|
|
|
|
|
|
|
|
|
|
|
|
|
|
|
|
|
|
|
|
|
|
|
|
|
|
|
|
|
|
|
pole of Swash bearing 10
![]()
![]() Ring 8
Ring 8
Tilt Swash bearing 10 to insert the pole.
6)Insert Ring 8 (the end of Swash bearing section) into Inner housing complete. (Fig. 44)
7)Fitting the tip of Change plate in the groove on Clutch cam, insert Change plate over the pins of Inner housing complete. (Fig. 45)
Note: Ball bearing 608ZZ of Swash bearing section is not yet inserted into Inner housing complete in this step.
Fig. 44
Inner housing complete | Ball bearing 608ZZ | ||||||
|
|
|
|
|
|
|
|
|
|
|
|
|
|
|
|
|
|
|
|
|
|
|
|
|
|
|
|
|
|
|
|
|
|
|
|
|
|
|
|
|
|
|
|
|
|
|
|
|
|
|
|
|
|
|
|
|
|
|
|
|
|
|
|
|
|
|
|
|
|
|
|
Swash bearing section | Ring 8 |
| pins of Inner housing complete |
Change plate | Ball bearing |
| 608ZZ |
tip of Clutch cam |
|
| Clutch cam | |
groove | ||||
|
| |||
8)Insert Ball bearing 608ZZ of Swash bearing section into Inner housing complete, and fasten Swash bearing section to Inner housing complete with two M4x12 hex socket head bolts. Then, put Compression spring 6 and Flat washer 5
through the upper pin of Inner housing complete, and secure them with Stop ring
Fig. 46
Flat washer 5 Compression spring 5
|
|
| Note: If reusing M4x12 hex. |
|
|
| socket head bolts, be sure |
|
| Stop ring | to apply ThreeBond 1321B |
|
| or 1342, or Loctite 242 | |
|
|
| |
|
|
| to the threads before |
|
|
| fastening. |
Ball bearing 608ZZ | Ring 8 | Upper pin of | M4x12 Hex socket head bolt ( 2 pcs.) |
|
| Inner housing complete | |
|
| (with threadlocker coated) | |
|
|
|
