CHIMNEY CAP INSTALLATION

MODEL LC CHIMNEY CAP

SPECIAL NOTE: The proper height as previously explained is important to assure proper draft and safety. The chimney cap extends the flue outlet four inches above the top of the last section of chimney. This should be kept in mind when determining the proper height for the chimney. The chimney should not be extended more than 90 inches above the supporting roof structure without additional support. In the case of an “A” frame type construction or other steep pitch roofs that require more than 90 inches of chimney above the roof, a support should be attached to the chimney at the 90 inch level that is strong enough to support a wind load of 3-1/8 pounds for each inch the chimney extends above 90 inches. The flue outlet must be a minimum of three feet above the point where in penetrates the roof.

CAUTION: Be careful to avoid electrical shock hazard when contacting wires to the metal chimney components. 1. Extend the regular chimney sections until the top of the chimney is 4 inches below the total flue height desired. Do not snap the last section of inlet air duct or largest diameter pipe in place until Step 3 is

completed.

2. Remove the shingles from around the chimney so that the flashing may be installed, with the upper part of the flashing under the shingles.

3. Set the flashing on the roof. Hold a section of the outside pipe (13" diameter) on the flashing and scribe a line around the flashing, then cut the top off the flashing by cutting 1/4 inch below the scribed line. This should increase the diameter of the flashing outlet sufficiently to allow the flashing to be placed over the chimney. See Figure 21.

4. Snap the last section of inlet air duct in place and slide the flashing over the chimney. Adjust the chimney to assure that the proper minimum clearances are maintained.

5. Nail the flashing securely in place with eight nails.

6. Seal the crack between the top of the flashing and the chimney with mastic. Leave some excess mastic at this area to be used in step eight.

NOTE: Use pliers and wear gloves when performing step seven to minimize the danger of cutting your hands on the edge of the storm collar.

7. Place the storm collar around the chimney and put the collar together like a belt in belt loops. Slide the end of collar under the two loops on the other end with the loops facing up. Overlap the ends of the collar until it is tight against the chimney. Bend the free end of the collar back over the loops to hold the storm collar securely together. The excess end of the storm collar may be trimmed off.

8. Slide the storm collar down snugly against the flashing until the excess mastic left in step six is forced up into the crack between the storm collar and the chimney. This should make the joint between the flashing

and the chimney watertight.

16

53D9042. Rev 1 03/03

Page 17
Image 17
Martin Fireplaces 53D9042 manual Chimney CAP Installation

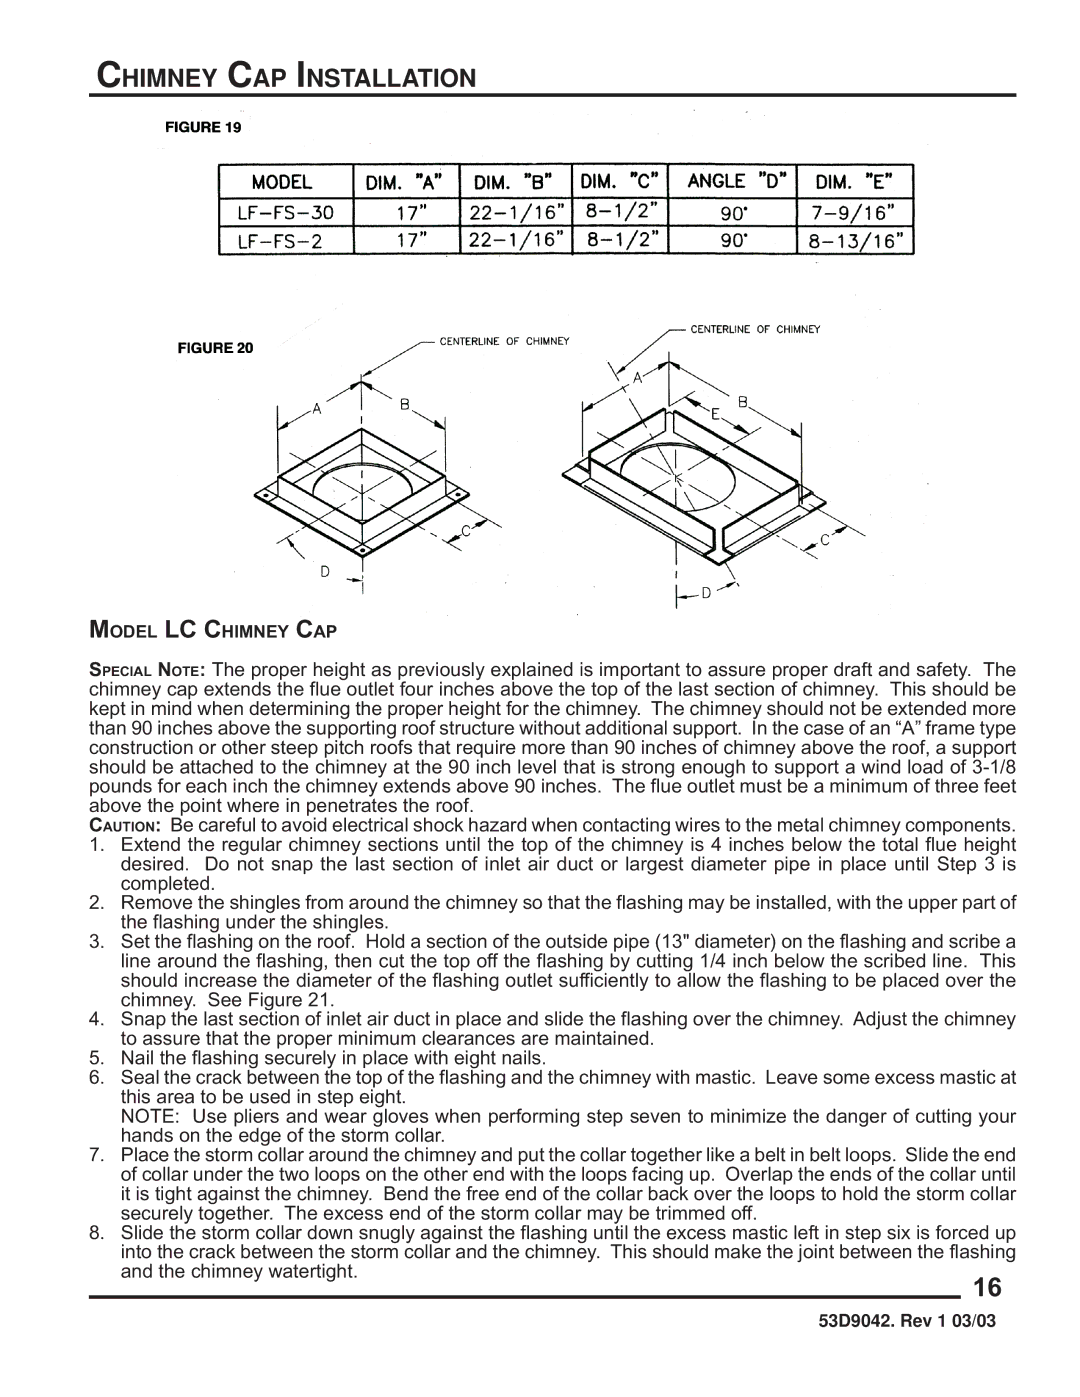
53D9042 specifications

The Martin Fireplaces 53D9042 is a stunning addition to any home, blending advanced technology with timeless design. This model is built to offer both aesthetic appeal and functional warmth, making it an ideal choice for homeowners seeking to enhance their living spaces.

One of the standout features of the Martin Fireplaces 53D9042 is its efficient heating capabilities. With a powerful output, this fireplace can heat large areas effectively, ensuring that your home remains comfortable even during the coldest months. The unit is designed with a high-efficiency combustion system that maximizes fuel usage, minimizing heat loss and helping to reduce energy bills.

In terms of design, the 53D9042 boasts a sleek, contemporary look that fits seamlessly into modern and traditional homes alike. The glass front enhances the visual appeal, providing a mesmerizing view of the flames while allowing for easy monitoring of the fire. The clean lines and polished finish make it a stunning focal point for any room.

The advanced technology incorporated into the Martin Fireplaces 53D9042 is another notable aspect. This model is equipped with an electronic ignition system, which allows for easy start-up and convenience. The adjustable flames can be tailored to create the perfect ambiance, while the remote control functionality provides added comfort, allowing users to control the fire from across the room.

Safety features are also prioritized in the design of the 53D9042. The fireplace incorporates a safety shut-off mechanism that activates if the unit overheats, providing peace of mind to homeowners, especially those with children or pets. The air intake system is designed to ensure proper ventilation, preventing the buildup of harmful gases within the home.

Overall, the Martin Fireplaces 53D9042 represents a perfect synergy of style, technology, and performance. Its blend of functionality and design makes it a superb choice for anyone looking to invest in a high-quality heating solution. With its efficient heating output, innovative technologies, and elegant appearance, the 53D9042 is sure to enhance both the warmth and ambiance of any living space, making it a worthwhile investment for the years to come.