HOW TO USE QUICK START IGNITION SYSTEM
ASSEMBLY INSTRUCTIONS
Read all instructions and warnings on charcoal bag and in manual before using.
1.Load three crumpled sheets of newspaper on top of grate inside ash can. Place ash can in position below grill.
2.Pile charcoal directly above ash can on charcoal grate. Open holes in bottom air damper, and ignite paper in ash can.
3.Spread charcoal out on grate and cook in as little as 20 minutes.
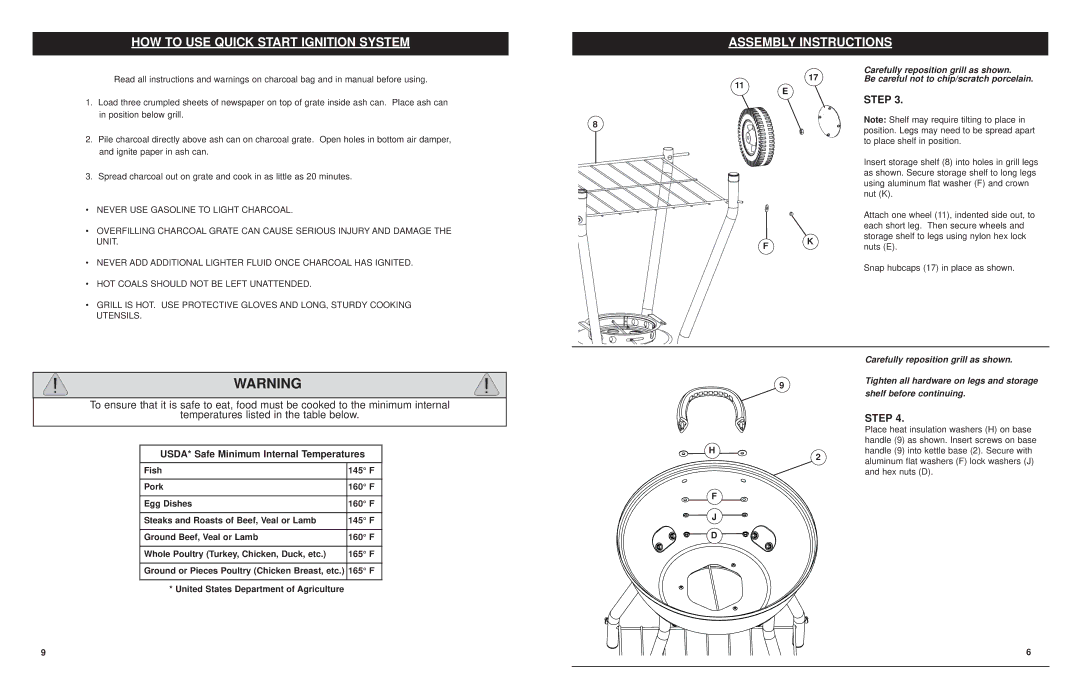
11 E
8
17
Carefully reposition grill as shown.
Be careful not to chip/scratch porcelain.
STEP 3.
Note: Shelf may require tilting to place in position. Legs may need to be spread apart to place shelf in position.
Insert storage shelf (8) into holes in grill legs as shown. Secure storage shelf to long legs using aluminum flat washer (F) and crown nut (K).
•NEVER USE GASOLINE TO LIGHT CHARCOAL.
•OVERFILLING CHARCOAL GRATE CAN CAUSE SERIOUS INJURY AND DAMAGE THE UNIT.
•NEVER ADD ADDITIONAL LIGHTER FLUID ONCE CHARCOAL HAS IGNITED.
•HOT COALS SHOULD NOT BE LEFT UNATTENDED.
•GRILL IS HOT. USE PROTECTIVE GLOVES AND LONG, STURDY COOKING UTENSILS.
F K
Attach one wheel (11), indented side out, to each short leg. Then secure wheels and storage shelf to legs using nylon hex lock nuts (E).
Snap hubcaps (17) in place as shown.
WARNING
To ensure that it is safe to eat, food must be cooked to the minimum internal
temperatures listed in the table below.
USDA* Safe Minimum Internal Temperatures
Fish | 145° F |
|
|
Pork | 160° F |
|
|
Egg Dishes | 160° F |
|
|
Steaks and Roasts of Beef, Veal or Lamb | 145° F |
|
|
Ground Beef, Veal or Lamb | 160° F |
|
|
Whole Poultry (Turkey, Chicken, Duck, etc.) | 165° F |
|
|
Ground or Pieces Poultry (Chicken Breast, etc.) | 165° F |
|
|
* United States Department of Agriculture |
|
|
|
| Carefully reposition grill as shown. |
| 9 |
| Tighten all hardware on legs and storage |
|
| shelf before continuing. | |
|
|
| |
|
|
| STEP 4. |
|
|
| Place heat insulation washers (H) on base |
H |
|
| handle (9) as shown. Insert screws on base |
| 2 | handle (9) into kettle base (2). Secure with | |
|
| aluminum flat washers (F) lock washers (J) | |
|
|
| |
|
|
| and hex nuts (D). |
F |
|
|
|
J |
|
|
|
D |
|
|
|
9 | 6 |
|
|