Mark Rear Wall

The microwave oven must be installed on a minimum of 1 wall stud, preferably 2, using a minimum of 1 lag screw, preferably 2.

1.Using measuring tape, find and clearly mark the vertical centerline of the opening.

A

A.Centerline

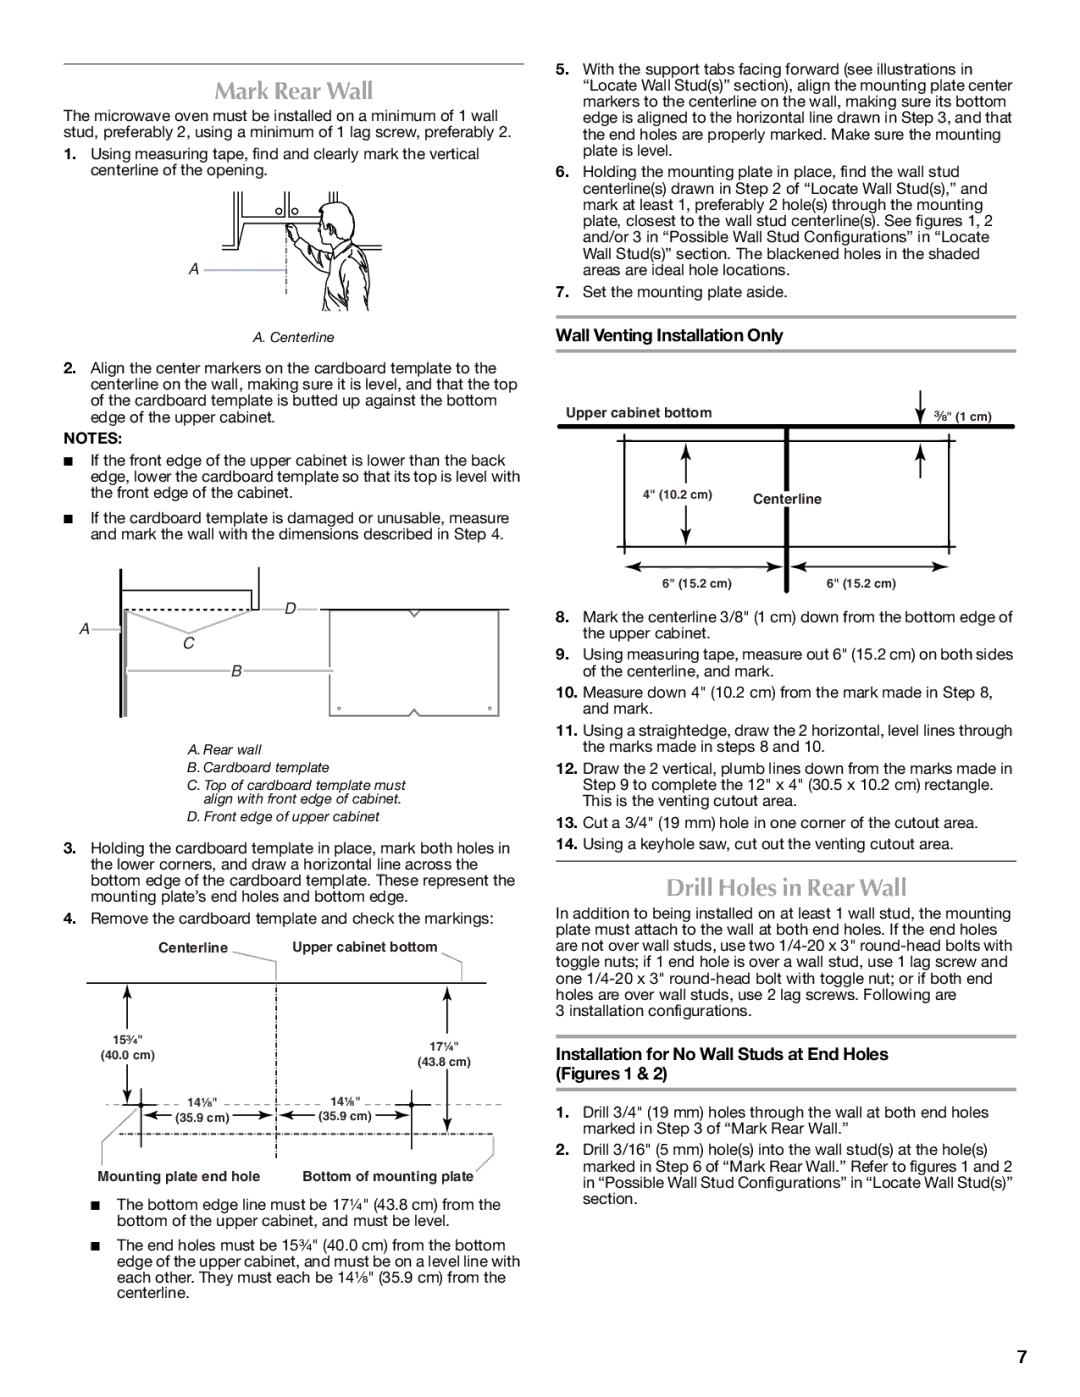
2.Align the center markers on the cardboard template to the centerline on the wall, making sure it is level, and that the top of the cardboard template is butted up against the bottom edge of the upper cabinet.

NOTES:

If the front edge of the upper cabinet is lower than the back edge, lower the cardboard template so that its top is level with the front edge of the cabinet.

If the cardboard template is damaged or unusable, measure and mark the wall with the dimensions described in Step 4.

D

A

C

B

A. Rear wall

B. Cardboard template

C. Top of cardboard template must align with front edge of cabinet.

D. Front edge of upper cabinet

3.Holding the cardboard template in place, mark both holes in the lower corners, and draw a horizontal line across the bottom edge of the cardboard template. These represent the mounting plate’s end holes and bottom edge.

4.Remove the cardboard template and check the markings:

Centerline

Upper cabinet bottom

15³⁄₄"

17¹⁄₄"

(40.0 cm)

(43.8 cm)


14¹⁄₈"

14¹⁄₈"

(35.9 cm)

(35.9 cm)

Mounting plate end hole

Bottom of mounting plate

The bottom edge line must be 17¹⁄₄" (43.8 cm) from the bottom of the upper cabinet, and must be level.

The end holes must be 15³⁄₄" (40.0 cm) from the bottom edge of the upper cabinet, and must be on a level line with each other. They must each be 14¹⁄₈" (35.9 cm) from the centerline.

5.With the support tabs facing forward (see illustrations in “Locate Wall Stud(s)” section), align the mounting plate center markers to the centerline on the wall, making sure its bottom edge is aligned to the horizontal line drawn in Step 3, and that the end holes are properly marked. Make sure the mounting plate is level.

6.Holding the mounting plate in place, find the wall stud centerline(s) drawn in Step 2 of “Locate Wall Stud(s),” and mark at least 1, preferably 2 hole(s) through the mounting plate, closest to the wall stud centerline(s). See figures 1, 2 and/or 3 in “Possible Wall Stud Configurations” in “Locate Wall Stud(s)” section. The blackened holes in the shaded areas are ideal hole locations.

7.Set the mounting plate aside.

Wall Venting Installation Only

Upper cabinet bottom


³⁄₈" (1 cm)


4" (10.2 cm)

Centerline

6" (15.2 cm)

6" (15.2 cm)

8.Mark the centerline 3/8" (1 cm) down from the bottom edge of the upper cabinet.

9.Using measuring tape, measure out 6" (15.2 cm) on both sides of the centerline, and mark.

10.Measure down 4" (10.2 cm) from the mark made in Step 8, and mark.

11.Using a straightedge, draw the 2 horizontal, level lines through the marks made in steps 8 and 10.

12.Draw the 2 vertical, plumb lines down from the marks made in Step 9 to complete the 12" x 4" (30.5 x 10.2 cm) rectangle. This is the venting cutout area.

13.Cut a 3/4" (19 mm) hole in one corner of the cutout area.

14.Using a keyhole saw, cut out the venting cutout area.

Drill Holes in Rear Wall

In addition to being installed on at least 1 wall stud, the mounting plate must attach to the wall at both end holes. If the end holes are not over wall studs, use two 1/4-20 x 3" round-head bolts with toggle nuts; if 1 end hole is over a wall stud, use 1 lag screw and one 1/4-20 x 3" round-head bolt with toggle nut; or if both end holes are over wall studs, use 2 lag screws. Following are

3 installation configurations.

Installation for No Wall Studs at End Holes (Figures 1 & 2)

1.Drill 3/4" (19 mm) holes through the wall at both end holes marked in Step 3 of “Mark Rear Wall.”

2.Drill 3/16" (5 mm) hole(s) into the wall stud(s) at the hole(s) marked in Step 6 of “Mark Rear Wall.” Refer to figures 1 and 2 in “Possible Wall Stud Configurations” in “Locate Wall Stud(s)” section.

7

Page 7
Image 7
Maytag MMV5208WS Mark Rear Wall, Drill Holes in Rear Wall, Installation for No Wall Studs at End Holes Figures 1

MMV5208WS specifications

The Maytag MMV5208WS is a powerful and versatile microwave that brings efficiency and practicality to your kitchen. With an array of features designed to enhance cooking performance, this model is an ideal companion for anyone looking to streamline meal preparation.

One of the standout characteristics of the MMV5208WS is its spacious 2.0 cubic foot capacity, which provides ample space for cooking a variety of dishes. This size makes it suitable for families or individuals who frequently prepare large portions or use oversized containers. The microwave has a robust 1000 watts of cooking power, ensuring that your food is heated evenly and quickly.

Equipped with an innovative sensor cooking technology, the MMV5208WS automatically detects the moisture level in food. This feature adjusts cooking times and power levels, eliminating the guesswork and ensuring perfectly cooked meals every time. Additionally, the microwave features a range of pre-programmed settings for tasks including popcorn, beverages, and baked potatoes, making meal prep even more straightforward.

Another key feature of this microwave is its easy-to-read digital controls. These controls simplify operation and allow users to input their desired settings efficiently. The brightly lit LED display enhances visibility, ensuring that you can track cooking times without any hassle.

The Maytag MMV5208WS also boasts a sleek stainless steel finish, enhancing the aesthetic appeal of your kitchen while ensuring durability and easy cleaning. The microwave’s design includes a quiet ventilation system that effectively removes smoke and odors from your kitchen without excessive noise, contributing to a more pleasant cooking environment.

Moreover, with its built-in invert technology, the MMV5208WS maintains consistent power levels, resulting in more thorough and even cooking. The microwave also includes a convenient microwave popcorn setting that allows you to enjoy perfectly popped corn without any burnt kernels.

In conclusion, the Maytag MMV5208WS is a reliable and efficient microwave oven that combines advanced technology, ample cooking capacity, and user-friendly features. It is designed to suit the demands of modern kitchens, making it an excellent choice for anyone looking to improve their cooking experience.