INSTALLATION

Built-In 30Electric

403 WEST FOURTH STREET, NORTH

INSTRUCTIONS

Combination Wall Ovens

NEWTON, IA 50208


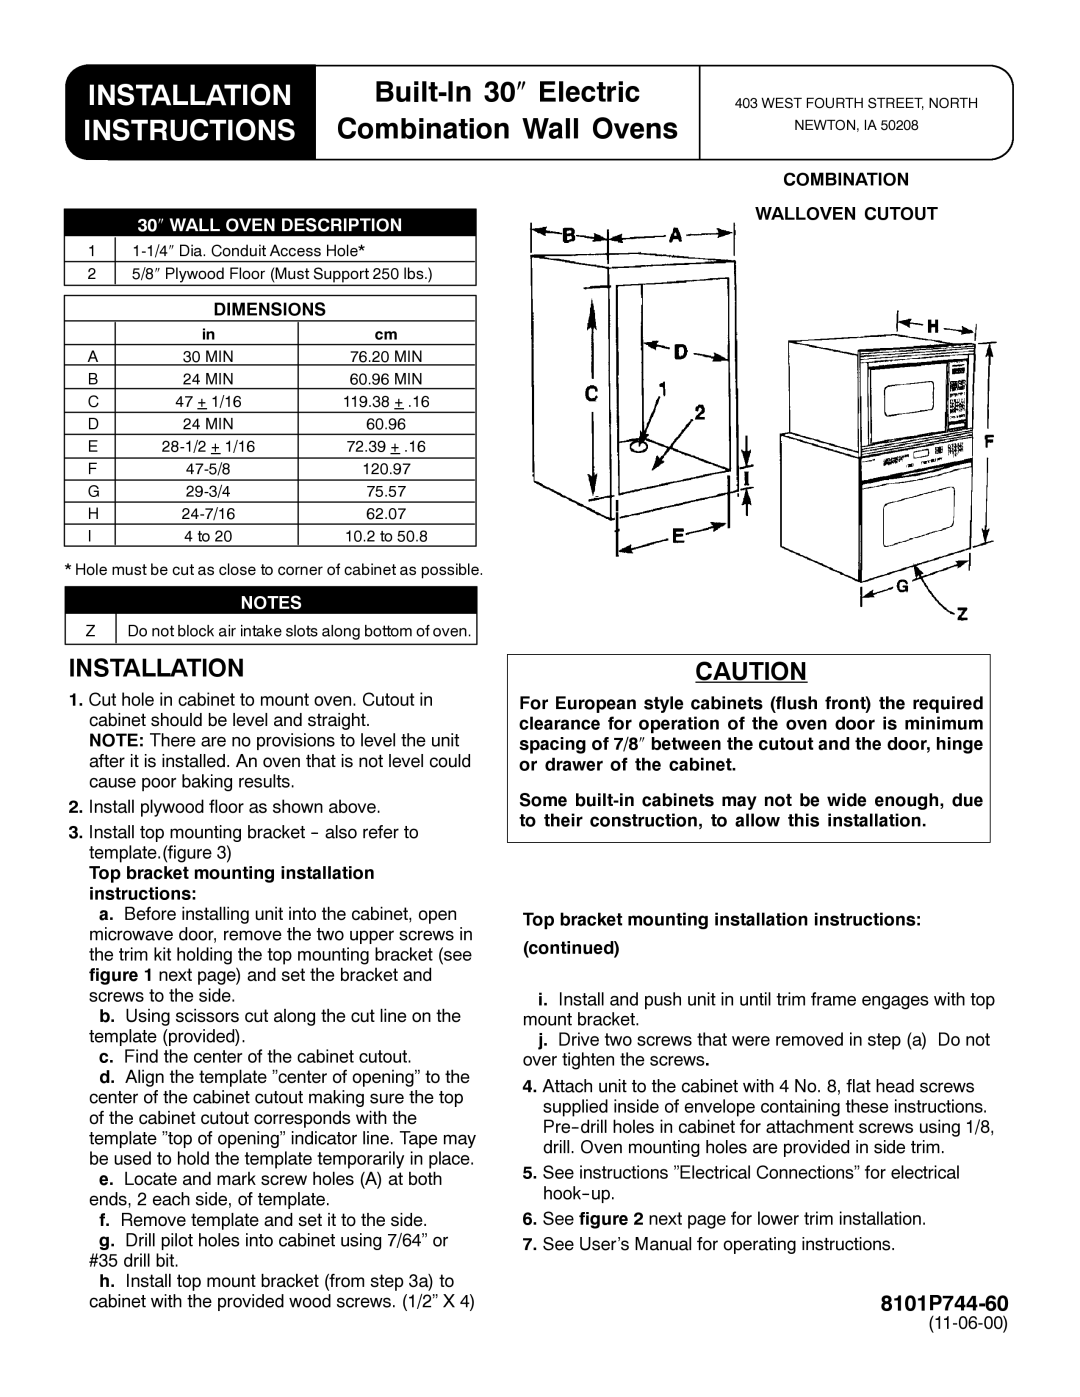
COMBINATION

30WALL OVEN DESCRIPTION

11-1/4Dia. Conduit Access Hole*

25/8Plywood Floor (Must Support 250 lbs.)

WALLOVEN CUTOUT

DIMENSIONS


in

cm

A

30 MIN

76.20 MIN

B

24 MIN

60.96 MIN

C

47 + 1/16

119.38 + .16

D

24 MIN

60.96

E

28-1/2 + 1/16

72.39 + .16


F

47-5/8

120.97

G

29-3/4

75.57

H

24-7/16

62.07

I

4 to 20

10.2 to 50.8

* Hole must be cut as close to corner of cabinet as possible.

NOTES

Z

Do not block air intake slots along bottom of oven.

INSTALLATION

1.Cut hole in cabinet to mount oven. Cutout in cabinet should be level and straight.

NOTE: There are no provisions to level the unit after it is installed. An oven that is not level could cause poor baking results.

2.Install plywood floor as shown above.

3.Install top mounting bracket -- also refer to template.(figure 3)

Top bracket mounting installation instructions:

a.Before installing unit into the cabinet, open microwave door, remove the two upper screws in the trim kit holding the top mounting bracket (see figure 1 next page) and set the bracket and screws to the side.

b.Using scissors cut along the cut line on the template (provided).

c.Find the center of the cabinet cutout.

d.Align the template ”center of opening” to the center of the cabinet cutout making sure the top of the cabinet cutout corresponds with the template ”top of opening” indicator line. Tape may be used to hold the template temporarily in place.

e.Locate and mark screw holes (A) at both ends, 2 each side, of template.

f.Remove template and set it to the side.

g.Drill pilot holes into cabinet using 7/64” or #35 drill bit.

h.Install top mount bracket (from step 3a) to cabinet with the provided wood screws. (1/2” X 4)

CAUTION

For European style cabinets (flush front) the required clearance for operation of the oven door is minimum spacing of 7/8between the cutout and the door, hinge or drawer of the cabinet.

Some built-in cabinets may not be wide enough, due to their construction, to allow this installation.

Top bracket mounting installation instructions: (continued)

i.Install and push unit in until trim frame engages with top mount bracket.

j.Drive two screws that were removed in step (a) Do not over tighten the screws.

4.Attach unit to the cabinet with 4 No. 8, flat head screws supplied inside of envelope containing these instructions. Pre--drill holes in cabinet for attachment screws using 1/8, drill. Oven mounting holes are provided in side trim.

5.See instructions ”Electrical Connections” for electrical hook--up.

6.See figure 2 next page for lower trim installation.

7.See User’s Manual for operating instructions.

8101P744-60

(11-06-00)

Page 1
Image 1
Maytag 11-06-00 installation instructions Installation, Built-In 30″ Electric, Instructions, Combination Wall Ovens

8101P744-60, 11-06-00, MMW5530DAB specifications

The Maytag MMW5530DAB is a sophisticated and reliable over-the-range microwave that combines modern technology with user-friendly features. This appliance is designed for those who value efficiency without sacrificing style in their kitchen. With its sleek black finish, it not only looks great but also fits seamlessly into various kitchen décors.

One of the primary features of the MMW5530DAB is its spacious 2.1 cubic feet capacity. This ample interior size allows users to accommodate large dishes and containers with ease. It also includes a powerful 1000-watt cooking power, ensuring that food heats evenly and efficiently, making meal preparation quicker without compromising quality.

The microwave is equipped with a range of convenient cooking presets that cater to diverse culinary needs. These presets allow users to cook popcorn, reheat leftovers, and defrost frozen items with a simple push of a button. With the sensor cooking technology, the MMW5530DAB can automatically adjust cooking times based on the moisture released from the food, providing optimal results without the guesswork.

The Maytag MMW5530DAB features a user-friendly digital display and control panel, which makes navigation straightforward. The extensive keypad layout allows for quick programming and offers options for programming and cooking multiple items simultaneously. Another noteworthy feature is the hidden vent design, which helps maintain a clean and polished look while minimizing grease and smoke buildup in the kitchen.

For added versatility, this microwave also includes a two-speed ventilation system designed to effectively eliminate smoke, odors, and steam from the kitchen. This ventilation feature can be a significant advantage in maintaining a fresh and pleasant cooking environment.

Furthermore, the dishwasher-safe turntable provides easy cleanup, simplifying cooking and maintenance. The charcoal filter ensures that air recirculated back into the kitchen is clean and free from unwanted odors.

In summary, the Maytag MMW5530DAB is an exemplary over-the-range microwave offering advanced features, reliable performance, and stylish design. With its combination of generous capacity, robust cooking power, and innovative technologies, it solidifies its place as a valuable addition to any modern kitchen, making meal prep a seamless experience.