Adjust the Door

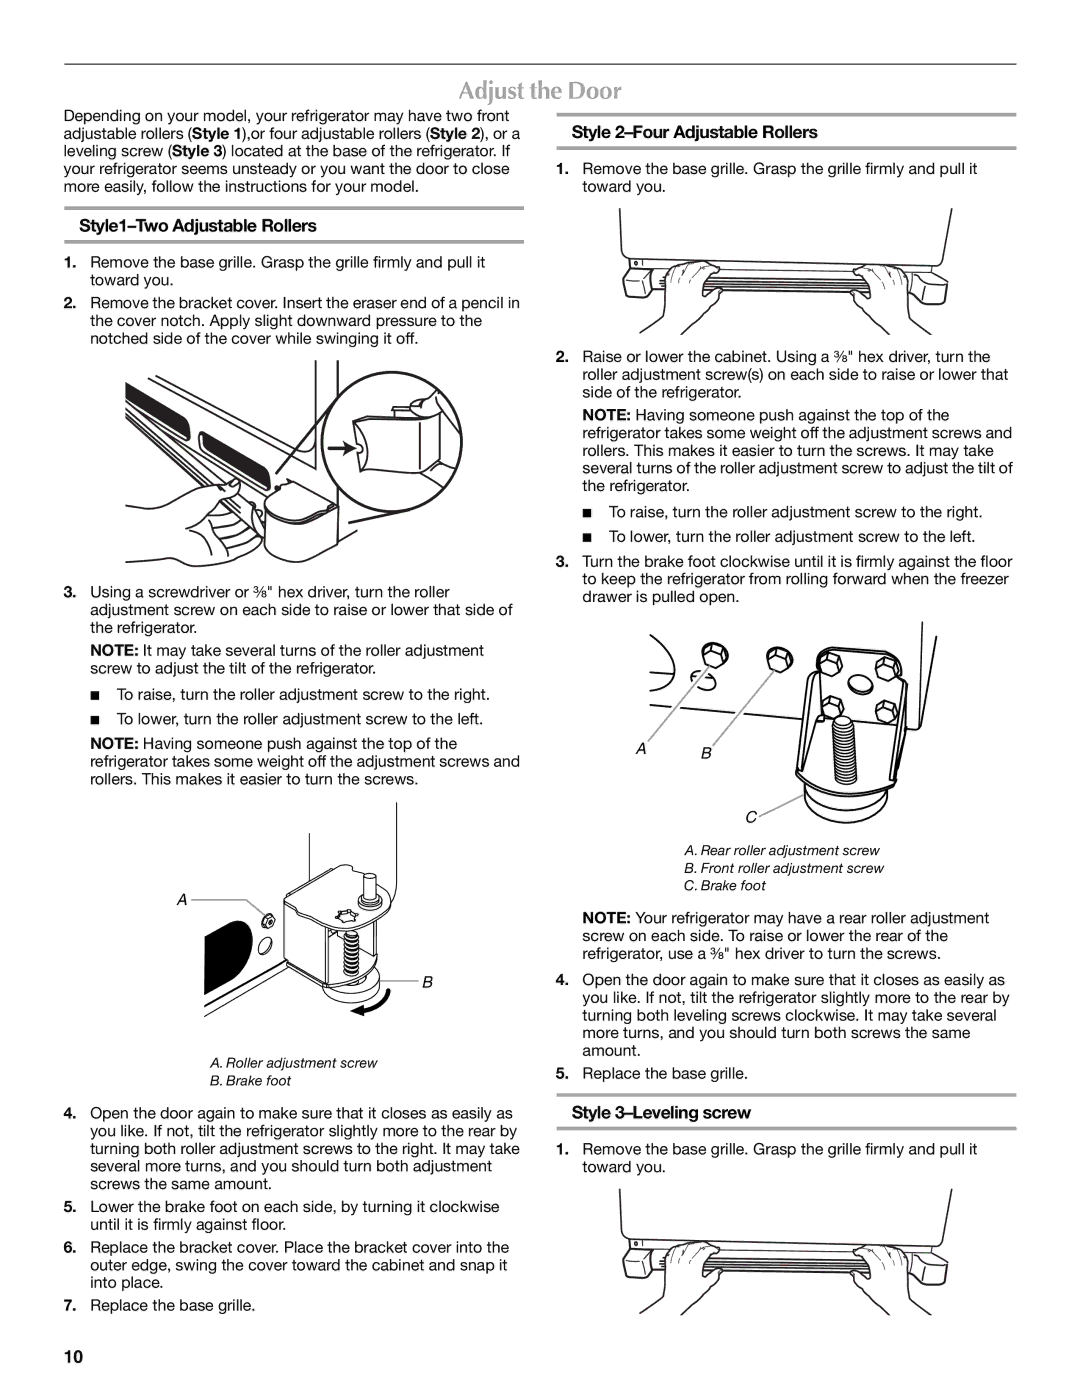
Depending on your model, your refrigerator may have two front adjustable rollers (Style 1),or four adjustable rollers (Style 2), or a leveling screw (Style 3) located at the base of the refrigerator. If your refrigerator seems unsteady or you want the door to close more easily, follow the instructions for your model.

Style 2–Four Adjustable Rollers

1.Remove the base grille. Grasp the grille firmly and pull it toward you.

Style1–Two Adjustable Rollers

1.Remove the base grille. Grasp the grille firmly and pull it toward you.

2.Remove the bracket cover. Insert the eraser end of a pencil in the cover notch. Apply slight downward pressure to the notched side of the cover while swinging it off.

3.Using a screwdriver or ³⁄₈" hex driver, turn the roller adjustment screw on each side to raise or lower that side of the refrigerator.

NOTE: It may take several turns of the roller adjustment screw to adjust the tilt of the refrigerator.

To raise, turn the roller adjustment screw to the right.

To lower, turn the roller adjustment screw to the left.

NOTE: Having someone push against the top of the refrigerator takes some weight off the adjustment screws and rollers. This makes it easier to turn the screws.

A

B

A. Roller adjustment screw

B. Brake foot

4.Open the door again to make sure that it closes as easily as you like. If not, tilt the refrigerator slightly more to the rear by turning both roller adjustment screws to the right. It may take several more turns, and you should turn both adjustment screws the same amount.

5.Lower the brake foot on each side, by turning it clockwise until it is firmly against floor.

6.Replace the bracket cover. Place the bracket cover into the outer edge, swing the cover toward the cabinet and snap it into place.

7.Replace the base grille.

2.Raise or lower the cabinet. Using a ³⁄₈" hex driver, turn the roller adjustment screw(s) on each side to raise or lower that side of the refrigerator.

NOTE: Having someone push against the top of the refrigerator takes some weight off the adjustment screws and rollers. This makes it easier to turn the screws. It may take several turns of the roller adjustment screw to adjust the tilt of the refrigerator.

To raise, turn the roller adjustment screw to the right.

To lower, turn the roller adjustment screw to the left.

3.Turn the brake foot clockwise until it is firmly against the floor to keep the refrigerator from rolling forward when the freezer drawer is pulled open.

A B

C

A. Rear roller adjustment screw

B. Front roller adjustment screw

C. Brake foot

NOTE: Your refrigerator may have a rear roller adjustment screw on each side. To raise or lower the rear of the refrigerator, use a ³⁄₈" hex driver to turn the screws.

4.Open the door again to make sure that it closes as easily as you like. If not, tilt the refrigerator slightly more to the rear by turning both leveling screws clockwise. It may take several more turns, and you should turn both screws the same amount.

5.Replace the base grille.

Style 3–Leveling screw

1.Remove the base grille. Grasp the grille firmly and pull it toward you.

10

Page 10
Image 10
Maytag W10175486A Adjust the Door, Style 2-Four Adjustable Rollers, Style1-Two Adjustable Rollers, Style 3-Leveling screw

W10175486A specifications

The Maytag W10175486A is a high-quality replacement part designed specifically for Maytag appliances, particularly focused on enhancing the performance of dishwashers. This part, often referred to as a dishwasher door latch, plays a crucial role in ensuring that the dishwasher door securely closes during operation, thus preventing leaks and ensuring that the cleaning process is efficient.

One of the main features of the Maytag W10175486A is its robust construction. Made from durable materials, it is designed to withstand the rigors of regular use without succumbing to wear and tear. This durability translates into longevity, making it a worthwhile investment for homeowners looking to maintain the functionality of their dishwashers.

The W10175486A incorporates a user-friendly installation design. This ease of installation means that homeowners can replace their dishwasher door latch without needing to hire a professional, which can save both time and money. With just a few simple steps, users can ensure their dishwasher operates safely and efficiently once again.

In terms of technology, the Maytag W10175486A is designed to meet rigorous safety and performance standards. It is engineered to work with a variety of Maytag dishwasher models, ensuring compatibility and seamless integration into existing systems. This versatility is a significant advantage, as it means that many Maytag users can benefit from this quality part without worrying about compatibility issues.

Another important characteristic of the W10175486A is its role in enhancing the overall efficiency of the dishwasher. A properly functioning door latch ensures that the door remains sealed during wash cycles, which is vital for effective cleaning. This sealing prevents water leaks, thus improving the machine's energy efficiency and reducing water wastage.

Additionally, the Maytag W10175486A is backed by Maytag's reputation for quality and reliability. As a brand known for its robust and dependable appliances, Maytag ensures that every part meets high standards, providing consumers with peace of mind. In summary, the Maytag W10175486A is an essential part that combines durability, ease of installation, and superb compatibility, making it a smart choice for anyone looking to repair or maintain their Maytag dishwasher.