NOTE: Tighten the nut by hand. Then tighten it with a wrench two more turns. Do not overtighten.

A

B

C

D

E F G

A. Refrigerator water tubing


E. Ferrule (purchased)

B. Nut (provided)


F. Nut (purchased)

C. Bulb


G. Household water line

D. Coupling (purchased)


4.Turn shutoff valve ON.

5.Check for leaks. Tighten any nuts or connections (including connections at the valve) that leak.

Style 3

1.Unplug refrigerator or disconnect power.

2.Remove and discard the cap from the gray water tube.

A B

A.Cap

B.Inlet

3.Using a compression nut and sleeve, attach the copper tube to the water inlet.

4.Once secured, tighten the compression nut. Do not overtighten.

5.Check the connection by pulling on the copper tubing. Turn on water supply to refrigerator. Check for leaks. Tighten any nuts or connections that leak.

Complete the Installation

WARNING

Electrical Shock Hazard

Plug into a grounded 3 prong outlet.

Do not remove ground prong.

Do not use an adapter.

Do not use an extension cord.

Failure to follow these instructions can result in death, fire, or electrical shock.

1.Plug into a grounded 3 prong outlet.

2.Flush the water system. See “Prepare the Water System” or “Water and Ice Dispensers.”

NOTE: Allow 24 hours to produce the first batch of ice. Allow 3 days to completely fill ice container.

REFRIGERATOR USE

Using the Controls

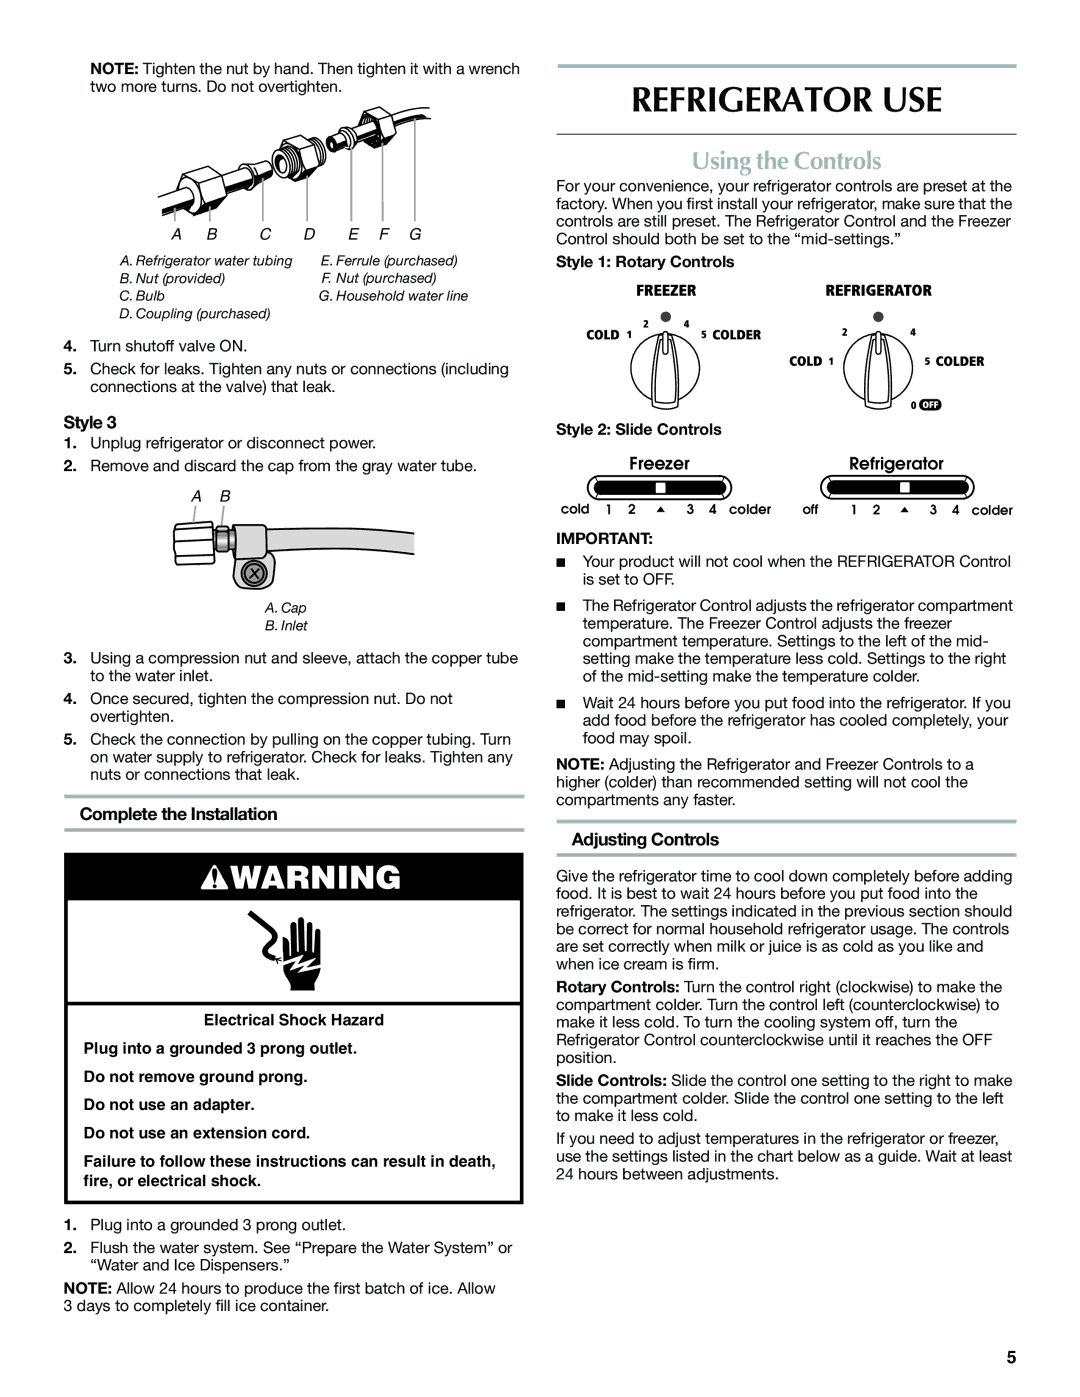
For your convenience, your refrigerator controls are preset at the factory. When you first install your refrigerator, make sure that the controls are still preset. The Refrigerator Control and the Freezer Control should both be set to the “mid-settings.”

Style 1: Rotary Controls

Style 2: Slide Controls


Freezer


Refrigerator

cold 1 2

3 4 colder

off

1 2

3 4 colder

IMPORTANT:

Your product will not cool when the REFRIGERATOR Control is set to OFF.

The Refrigerator Control adjusts the refrigerator compartment temperature. The Freezer Control adjusts the freezer compartment temperature. Settings to the left of the mid- setting make the temperature less cold. Settings to the right of the mid-setting make the temperature colder.

Wait 24 hours before you put food into the refrigerator. If you add food before the refrigerator has cooled completely, your food may spoil.

NOTE: Adjusting the Refrigerator and Freezer Controls to a higher (colder) than recommended setting will not cool the compartments any faster.

Adjusting Controls

Give the refrigerator time to cool down completely before adding food. It is best to wait 24 hours before you put food into the refrigerator. The settings indicated in the previous section should be correct for normal household refrigerator usage. The controls are set correctly when milk or juice is as cold as you like and when ice cream is firm.

Rotary Controls: Turn the control right (clockwise) to make the compartment colder. Turn the control left (counterclockwise) to make it less cold. To turn the cooling system off, turn the Refrigerator Control counterclockwise until it reaches the OFF position.

Slide Controls: Slide the control one setting to the right to make the compartment colder. Slide the control one setting to the left to make it less cold.

If you need to adjust temperatures in the refrigerator or freezer, use the settings listed in the chart below as a guide. Wait at least 24 hours between adjustments.

5

Page 5
Image 5
Maytag W10321475A Refrigerator USE, Using the Controls, Complete the Installation, Adjusting Controls

W10321475A specifications

The Maytag W10321475A is a highly efficient and versatile refrigerator designed to meet the needs of modern households, offering a perfect balance of style, durability, and advanced features. This appliance is known for its elegant design and adaptability, making it a reliable addition to any kitchen.

One of the standout features of the Maytag W10321475A is its spacious interior, which provides ample storage for all your groceries. The refrigerator is equipped with adjustable shelves that can be customized to fit items of various sizes, allowing for maximum flexibility. Whether you need to store large party platters or tall bottles, this refrigerator can accommodate your needs with ease.

Energy efficiency is a crucial aspect of the Maytag W10321475A. It is designed with Energy Star certification, which means it meets strict energy efficiency guidelines. This not only helps reduce electricity bills but also minimizes your environmental footprint, making it a smart choice for eco-conscious consumers.

The cooling technology employed in the Maytag W10321475A ensures that food stays fresh for longer periods. The Precision Cooling system monitors the temperature and humidity levels to provide a stable environment for your food items. This feature is particularly important for maintaining the quality of perishable goods and preventing spoilage.

Additionally, this refrigerator features a built-in ice maker, providing a constant supply of ice for your beverages. The easy access to ice, combined with a water dispenser, enhances the overall convenience of the appliance. You can enjoy cold drinks without the hassle of filling ice trays manually.

Another notable characteristic of the Maytag W10321475A is its robust build quality. Constructed with stainless steel, the refrigerator not only looks sleek but is also resistant to fingerprints and smudges. This makes cleaning easier and keeps the appliance looking new for longer.

For those who appreciate organization, the Maytag W10321475A comes with multiple storage compartments, including crispers for fruits and vegetables, door bins, and even dedicated areas for dairy products. This thoughtful layout makes it easy to find what you need quickly.

In summary, the Maytag W10321475A combines style, efficiency, and advanced technology to deliver an exceptional refrigeration experience. Its spacious interior, energy-efficient operation, and innovative cooling features make it a suitable choice for diverse households seeking reliability and performance in their kitchen appliances.