3 - ASSEMBLY INSTRUCTIONS

3 - ASSEMBLY INSTRUCTIONS

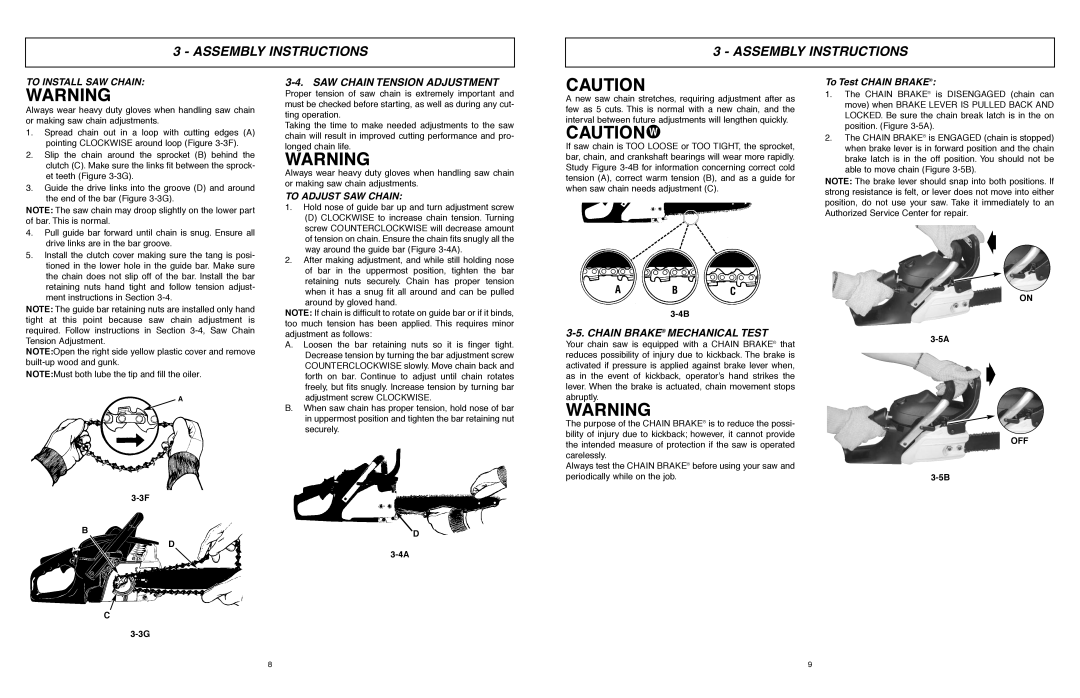
TO INSTALL SAW CHAIN:

WARNING

Always wear heavy duty gloves when handling saw chain or making saw chain adjustments.

1.Spread chain out in a loop with cutting edges (A) pointing CLOCKWISE around loop (Figure 3-3F).

2.Slip the chain around the sprocket (B) behind the clutch (C). Make sure the links fit between the sprock- et teeth (Figure 3-3G).

3.Guide the drive links into the groove (D) and around the end of the bar (Figure 3-3G).

NOTE: The saw chain may droop slightly on the lower part of bar. This is normal.

3-4. SAW CHAIN TENSION ADJUSTMENT

Proper tension of saw chain is extremely important and must be checked before starting, as well as during any cut- ting operation.

Taking the time to make needed adjustments to the saw chain will result in improved cutting performance and pro- longed chain life.

WARNING

Always wear heavy duty gloves when handling saw chain or making saw chain adjustments.

TO ADJUST SAW CHAIN:

1. Hold nose of guide bar up and turn adjustment screw

(D) CLOCKWISE to increase chain tension. Turning

CAUTION

A new saw chain stretches, requiring adjustment after as few as 5 cuts. This is normal with a new chain, and the interval between future adjustments will lengthen quickly.

CAUTION

If saw chain is TOO LOOSE or TOO TIGHT, the sprocket, bar, chain, and crankshaft bearings will wear more rapidly. Study Figure 3-4B for information concerning correct cold tension (A), correct warm tension (B), and as a guide for when saw chain needs adjustment (C).

To Test CHAIN BRAKE®:

1.The CHAIN BRAKE® is DISENGAGED (chain can move) when BRAKE LEVER IS PULLED BACK AND LOCKED. Be sure the chain break latch is in the on position. (Figure 3-5A).

2.The CHAIN BRAKE® is ENGAGED (chain is stopped) when brake lever is in forward position and the chain brake latch is in the off position. You should not be able to move chain (Figure 3-5B).

NOTE: The brake lever should snap into both positions. If strong resistance is felt, or lever does not move into either position, do not use your saw. Take it immediately to an Authorized Service Center for repair.

4.Pull guide bar forward until chain is snug. Ensure all drive links are in the bar groove.

5.Install the clutch cover making sure the tang is posi- tioned in the lower hole in the guide bar. Make sure the chain does not slip off of the bar. Install the bar retaining nuts hand tight and follow tension adjust- ment instructions in Section 3-4.

NOTE: The guide bar retaining nuts are installed only hand tight at this point because saw chain adjustment is required. Follow instructions in Section 3-4, Saw Chain Tension Adjustment.

NOTE:Open the right side yellow plastic cover and remove built-up wood and gunk.

NOTE:Must both lube the tip and fill the oiler.

A

3-3F

B

D

C

3-3G

screw COUNTERCLOCKWISE will decrease amount

of tension on chain. Ensure the chain fits snugly all the

way around the guide bar (Figure 3-4A).

2. After making adjustment, and while still holding nose

of bar in the uppermost position, tighten the bar

retaining nuts securely. Chain has proper tension

when it has a snug fit all around and can be pulled

around by gloved hand.

NOTE: If chain is difficult to rotate on guide bar or if it binds, too much tension has been applied. This requires minor adjustment as follows:

A.Loosen the bar retaining nuts so it is finger tight. Decrease tension by turning the bar adjustment screw COUNTERCLOCKWISE slowly. Move chain back and forth on bar. Continue to adjust until chain rotates freely, but fits snugly. Increase tension by turning bar adjustment screw CLOCKWISE.

B.When saw chain has proper tension, hold nose of bar in uppermost position and tighten the bar retaining nut securely.

D

3-4A

A B C

3-4B

3-5. CHAIN BRAKE® MECHANICAL TEST

Your chain saw is equipped with a CHAIN BRAKE® that reduces possibility of injury due to kickback. The brake is activated if pressure is applied against brake lever when, as in the event of kickback, operator’s hand strikes the lever. When the brake is actuated, chain movement stops abruptly.

WARNING

The purpose of the CHAIN BRAKE® is to reduce the possi- bility of injury due to kickback; however, it cannot provide the intended measure of protection if the saw is operated carelessly.

Always test the CHAIN BRAKE® before using your saw and periodically while on the job.

ON

3-5A

OFF

3-5B

8

9

Page 5
Image 5
McCulloch MCC1635A SAW Chain Tension Adjustment, Chain Brake Mechanical Test, To Install SAW Chain, To Adjust SAW Chain

MCC1635AK-CA, MCC1435A, MCC1635A-CA, MCC1435A-CA, MCC1635A specifications

The McCulloch MCC1435A, MCC1435A-CA, MCC1635A, MCC1635A-CA, and MCC1635AK-CA are powerful and versatile handheld steam cleaners that exemplify efficiency and ease of use in the realm of home cleaning solutions. These steam cleaners are designed to tackle various household tasks by utilizing the natural cleaning power of steam, making them effective for sanitizing surfaces while avoiding the use of harsh chemicals.

Among the key features of the McCulloch steam cleaner line is the impressive heat-up time. The MCC1435A and its variants are equipped with a fast heating system that allows the device to be ready for use in as little as 3 to 5 minutes. This rapid response time enhances the user's cleaning experience, ensuring minimal downtime during tasks, which is especially useful for busy households.

These models boast a large water tank capacity, typically around 48 ounces, enabling extended cleaning sessions without frequent refills. The steam pressure can reach up to 43 PSI, which is potent enough to tackle tough stains and grime across various surfaces, including tiles, carpets, stovetops, and even bathroom fixtures.

The versatility of the McCulloch MCC line is further emphasized by the range of attachments included with each model. Each steam cleaner comes with multiple accessories such as nozzles, brushes, and extension wands that assist in reaching difficult areas and accommodate various cleaning tasks, from detailed upholstery cleaning to large surface areas.

Safety is a priority in the design of these steam cleaners. They feature an integrated safety cap, which prevents accidental steam release, ensuring that users can operate them with peace of mind. Additionally, the indicator light alerts users when the steam cleaner is heating up, providing clear communication throughout the cleaning process.

Environmentally conscious consumers will appreciate the eco-friendly nature of steam cleaning, as it significantly reduces the need for chemical cleaners. The MCC1435A and its variants are perfect for households with children and pets, as they effectively sanitize surfaces without leaving harmful residues behind.

In conclusion, the McCulloch MCC1435A, MCC1435A-CA, MCC1635A, MCC1635A-CA, and MCC1635AK-CA offer outstanding performance with their quick heat-up time, large tank capacity, high steam pressure, and versatile cleaning accessories. Ideal for modern households seeking efficient and safe cleaning solutions, these steam cleaners prove that powerful performance can also respect the environment.