3 - ASSEMBLY INSTRUCTIONS
3 - ASSEMBLY INSTRUCTIONS
3-4. SAW CHAIN TENSION ADJUSTMENT
Proper tension of the saw chain is extremely important and must be checked before starting, as well as during, any cut- ting operation. Taking the time to make needed adjust- ments to the saw chain will result in improved cutting per- formance and prolonged chain life.
NOTE: A new chain and bar will need readjustment after as few as 5 cuts. This is normal during the
CAUTION
If a chain is TOO LOOSE or TOO TIGHT, the bar chain and saw bearings will wear more rapidly. Study Figure
TO ADJUST SAW CHAIN TENSION:
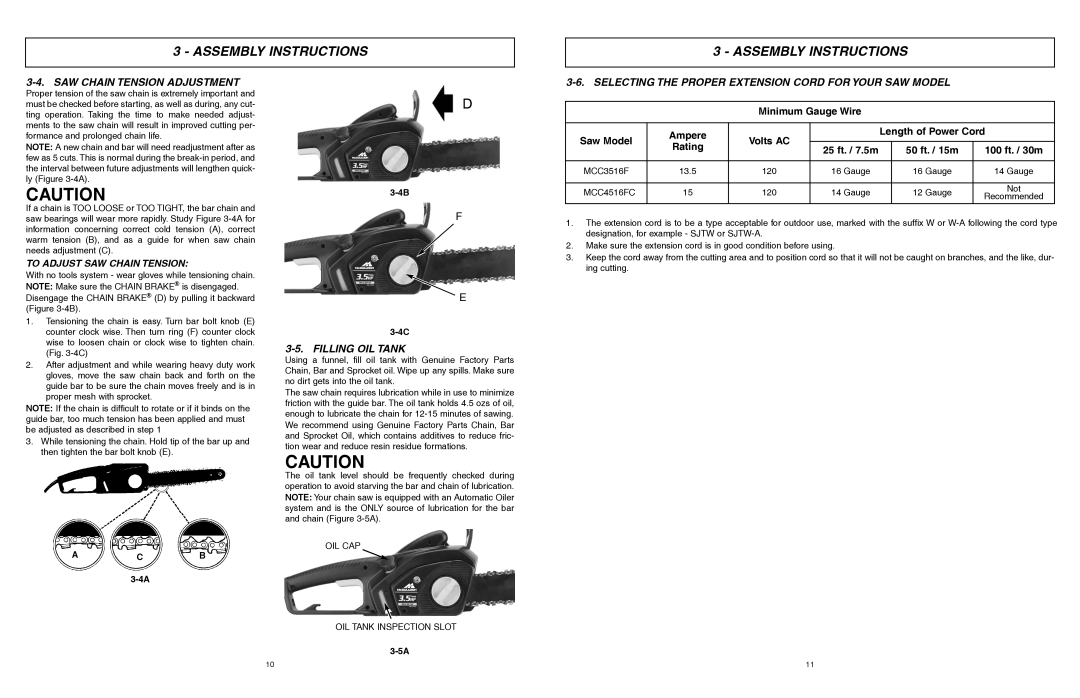
With no tools system - wear gloves while tensioning chain. NOTE: Make sure the CHAIN BRAKE® is disengaged. Disengage the CHAIN BRAKE® (D) by pulling it backward (Figure
1.Tensioning the chain is easy. Turn bar bolt knob (E) counter clock wise. Then turn ring (F) counter clock wise to loosen chain or clock wise to tighten chain. (Fig.
2.After adjustment and while wearing heavy duty work gloves, move the saw chain back and forth on the guide bar to be sure the chain moves freely and is in proper mesh with sprocket.
NOTE: If the chain is difficult to rotate or if it binds on the guide bar, too much tension has been applied and must be adjusted as described in step 1
3.While tensioning the chain. Hold tip of the bar up and then tighten the bar bolt knob (E).
D
F
![]() E
E
3-5. FILLING OIL TANK
Using a funnel, fill oil tank with Genuine Factory Parts Chain, Bar and Sprocket oil. Wipe up any spills. Make sure no dirt gets into the oil tank.
The saw chain requires lubrication while in use to minimize friction with the guide bar. The oil tank holds 4.5 ozs of oil, enough to lubricate the chain for
CAUTION
The oil tank level should be frequently checked during operation to avoid starving the bar and chain of lubrication. NOTE: Your chain saw is equipped with an Automatic Oiler system and is the ONLY source of lubrication for the bar and chain (Figure
3-6. SELECTING THE PROPER EXTENSION CORD FOR YOUR SAW MODEL
Minimum Gauge Wire
Saw Model | Ampere | Volts AC |
| Length of Power Cord | ||
|
|
|
| |||
Rating | 25 ft. / 7.5m |
| 50 ft. / 15m | 100 ft. / 30m | ||
|
|
| ||||
|
|
|
| |||
|
|
|
|
|
|
|
MCC3516F | 13.5 | 120 | 16 Gauge |
| 16 Gauge | 14 Gauge |
|
|
|
|
|
|
|
MCC4516FC | 15 | 120 | 14 Gauge |
| 12 Gauge | Not |
| Recommended | |||||
|
|
|
|
|
| |
1.The extension cord is to be a type acceptable for outdoor use, marked with the suffix W or
2.Make sure the extension cord is in good condition before using.
3.Keep the cord away from the cutting area and to position cord so that it will not be caught on branches, and the like, dur- ing cutting.
OIL CAP
ACB
OIL TANK INSPECTION SLOT
10
11