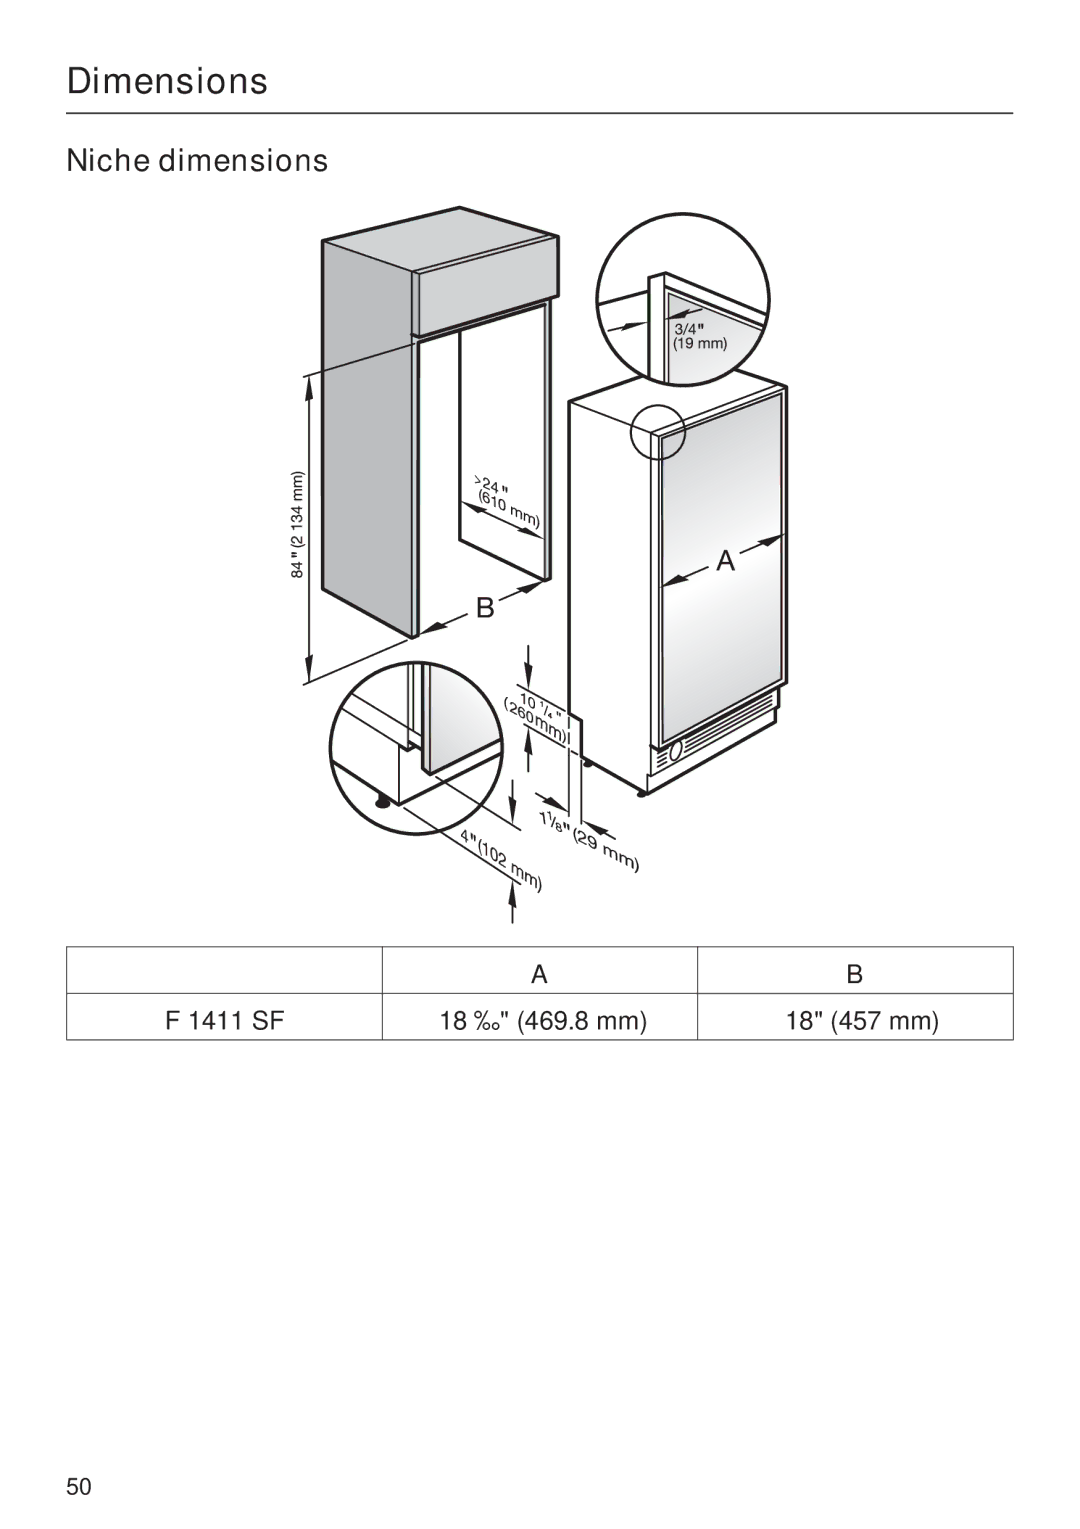
Manuals
/
Miele
/
Kitchen Appliance
/
Freezer
Miele
F 1411 SF installation instructions Dimensions, Niche dimensions
Models:
F 1411 SF
1
50
72
72
Download
72 pages
39.41 Kb
47
48
49
50
51
52
53
54
<
>
Install
FAQ
Performance Data Sheet For Filter Model
Dimension
Connecting the water supply
General problems
Possible fault
Sensor button for the temperature and door alarm
Door shelves height adjustable
Settings
Page 50
Image 50
Dimensions
Niche dimensions
A
B
F 1411 SF
18 ½" (469.8 mm)
18" (457 mm)
50
Page 49
Page 51
Page 50
Image 50
Page 49
Page 51
Contents
en - US, CA
Operating and Installation Instructions Freezer
with Ice Maker F 1411 SF
Contents
Contents
IMPORTANT SAFETY INSTRUCTIONS
Electrical Safety
Installation
IMPORTANT SAFETY INSTRUCTIONS
Do not deactivate the water filter display
IMPORTANT SAFETY INSTRUCTIONS
SAVE THESE INSTRUCTIONS
Disposal of your old appliance
Shelves height adjustable Ice cube maker
Guide to the freezer
Door shelves height adjustable
Main switch to turn the appliance On/Off
Temperature display colder; warmer
Control panel
Access button
Sensor button for the temperature and door alarm
Turning the appliance On/Off
Before using for the first time
Before use
Additional settings
Settings
Using the settings
Turning the button sound On/Off
Settings
Turning off for longer periods of time
Settings
Door alarm
Temperature and door alarm
Temperature alarm
Setting the temperature
Temperature unit Fahrenheit/Celsius
Using the freezer efficiently
Freezing food
Using the freezer efficiently
Defrosting
Cooling drinks quickly
Packing tips Unsuitable packing material
Using the freezer efficiently
Freezing tips
Suitable packing material
SuperCool
SuperCool
Turning off the ice cube maker
Ice cube maker
Turning on the ice cube maker
Automatic defrost
Moving the shelves
Adjusting the interior fittings
Adjusting the door shelves
Top shelf
Replacing the ice cube container
Ice cube container
Adjusting the interior fittings
Cleaning and care
Remove the cleaner promptly
Appliance door
Before cleaning
Cleaning the interior and accessories
Cleaning and care
Door seals
After cleaning
Ventilation slits
Cleaning and care
Upper lighting
Changing the light bulb
Cleaning and care
Side lighting
Cleaning and care
Restore power to the appliance
Never touch a halogen bulb with bare fingers
Water filter change indicator
Water filter
Exchanging the water filter
Water filter
Water filter
Using an external water filter
Confirming the filter change
Certificate Number
Water filter
Water Treatment Device
06 -
Water filter
Performance Data Sheet For Filter Model
Using Replacement Cartridge
To a capacity of 739.68 gallons 2800 liters
D-33332Gütersloh
Lead free certificate
Miele & Cie. KG Carl-Miele-Straße29
Frequently asked questions
General problems
Frequently asked questions
Alarm / Indicator warnings
Issue
Frequently asked questions
Problems with the ice maker
Possible fault
Issue
Frequently asked questions
Problems with the ice maker
Possible fault
Frequently asked questions
Problems with the ice maker
After sales service
MieleCare
Installation Instructions
Disposal of an old appliance
Caring for the environment
Disposal of packing materials
Installation
Installation site
Installation
Important! When there is high humidity a build-upof condensation on the outer surfaces of the appliance can occur.This can cause the surfaces to corrode.To prevent this, it is advisable to install the appliance in a dry and/or an air-conditionedroom with sufficient ventilation.Please ensure that doors close and seal properly after installation and that the appliance is installed in accordance with these installation instructions and and with the required ventilation openings
Furniture/fixtures
Installation niche
Base
Ventilation
Single column
Installation options
Stainless steel panels
Side-by-side
Installation with partition using the Merging Kit
Side panels
Installation
from 5/8 16 mm to 6 5/16 160 mm
Dimensions
Niche dimensions
F 1411 SF
Power supply and water connection
Dimensions
9 229 mm
525 mm
Door dimensions open
Dimensions
234 mm
Installing the appliance
Before you begin
Before installation
Aligning the housing unit
Check the installation niche
Installing the appliance
RemoteVision module installation
Installing the appliance
Preparing the installation niche
Installing the appliance
Anti-tipbrackets
Mounting Accessories
Installing the appliance
Now attach the installation niche to the wall
Installing the appliance
Securing an alternative anti-tipdevice
Sliding the appliance into the installation niche
Installing the appliance
Aligning the appliance
Installing the appliance
Attaching the appliance to the installation niche
Installing the appliance
Attaching the toe-kickcover
Installing the appliance
Mounting the air separator
Installing the appliance
Plumbing
Preparing the water connection
Plumbing
Connecting the water supply
Plumbing
Electrical connection
RemoteVision optional accessory
Accessing the RemoteVision control panel
RemoteVision optional accessory
Status indicators
MasterCool control panel options for RemoteVision
RemoteVision optional accessory
Description of function
Alteration rights reserved /
M.-Nr.09 743 950 /