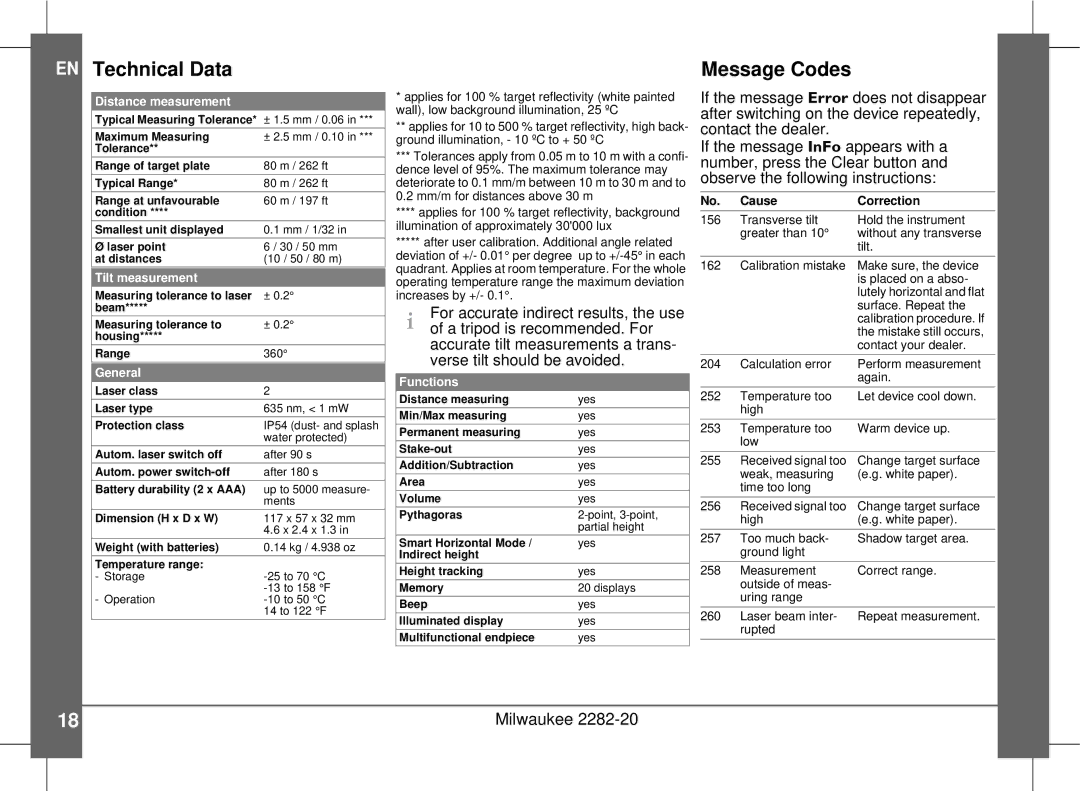
EN Technical Data

Distance measurement

Typical Measuring Tolerance* ± 1.5 mm / 0.06 in ***

Maximum Measuring

± 2.5 mm / 0.10 in ***

Tolerance**


Range of target plate

80 m / 262 ft

Typical Range*

80 m / 262 ft

Range at unfavourable

60 m / 197 ft

condition ****


Smallest unit displayed

0.1 mm / 1/32 in

Ø laser point

6 / 30 / 50 mm

at distances

(10 / 50 / 80 m)

Tilt measurement

Measuring tolerance to laser

± 0.2°

beam*****


Measuring tolerance to

± 0.2°

housing*****


Range

360°

General

Laser class

2

Laser type

635 nm, < 1 mW

Protection class

IP54 (dust- and splash


water protected)

Autom. laser switch off

after 90 s

Autom. power switch-off

after 180 s

Battery durability (2 x AAA)

up to 5000 measure-


ments

Dimension (H x D x W)

117 x 57 x 32 mm


4.6 x 2.4 x 1.3 in

Weight (with batteries)

0.14 kg / 4.938 oz

Temperature range:

-25 to 70 °C

- Storage

- Operation

-13 to 158 °F

-10 to 50 °C


14 to 122 °F

*applies for 100 % target reflectivity (white painted wall), low background illumination, 25 ºC

**applies for 10 to 500 % target reflectivity, high back- ground illumination, - 10 ºC to + 50 ºC

***Tolerances apply from 0.05 m to 10 m with a confi- dence level of 95%. The maximum tolerance may deteriorate to 0.1 mm/m between 10 m to 30 m and to 0.2 mm/m for distances above 30 m

****applies for 100 % target reflectivity, background illumination of approximately 30'000 lux

*****after user calibration. Additional angle related deviation of +/- 0.01° per degree up to +/-45° in each quadrant. Applies at room temperature. For the whole operating temperature range the maximum deviation increases by +/- 0.1°.

i For accurate indirect results, the use of a tripod is recommended. For accurate tilt measurements a trans- verse tilt should be avoided.

Functions

Distance measuring

yes

Min/Max measuring

yes

Permanent measuring

yes

Stake-out

yes

Addition/Subtraction

yes

Area

yes

Volume

yes

Pythagoras

2-point, 3-point,


partial height

Smart Horizontal Mode /

yes

Indirect height


Height tracking

yes

Memory

20 displays

Beep

yes

Illuminated display

yes

Multifunctional endpiece

yes

Message Codes

If the message Error does not disappear after switching on the device repeatedly, contact the dealer.

If the message InFo appears with a number, press the Clear button and observe the following instructions:

No.

Cause

Correction

156

Transverse tilt

Hold the instrument


greater than 10°

without any transverse


tilt.

162

Calibration mistake

Make sure, the device


is placed on a abso-


lutely horizontal and flat


surface. Repeat the


calibration procedure. If


the mistake still occurs,


contact your dealer.

204

Calculation error

Perform measurement


again.

252

Temperature too

Let device cool down.


high


253

Temperature too

Warm device up.


low


255

Received signal too

Change target surface


weak, measuring

(e.g. white paper).


time too long


256

Received signal too

Change target surface


high

(e.g. white paper).

257

Too much back-

Shadow target area.


ground light


258

Measurement

Correct range.


outside of meas-


uring range


260Laser beam inter- Repeat measurement. rupted

18

Milwaukee 2282-20

Page 18
Image 18
Milwaukee 2282-20 manual EN Technical Data, Message Codes

2282-20 specifications

The Milwaukee 2282-20 is a cutting-edge thermal imager designed for professionals in the electrical, HVAC, plumbing, and building inspection industries. Known for its durability and precision, the 2282-20 combines advanced technology with user-friendly features, making it an essential tool for diagnosing heat-related issues, evaluating building performance, or spotting potential problems before they escalate.

One of the standout features of the Milwaukee 2282-20 is its high-resolution thermal imaging capability. With a resolution of 160 x 120 pixels, the device captures detailed thermal images, allowing users to identify temperature variations with great accuracy. This feature is vital for pinpointing issues such as energy loss, electrical faults, and moisture intrusion, ensuring that professionals can make informed decisions.

The thermal imager is equipped with Milwaukee's Continuous Temperature Monitoring technology, which provides real-time temperature readings and alerts users to sudden changes. This functionality is invaluable during inspections, as it promotes proactive maintenance and enhances overall efficiency.

The Milwaukee 2282-20 also boasts a user-friendly design, featuring a bright and intuitive display that makes navigating the interface easy, even in challenging lighting conditions. The lightweight construction ensures that users can operate the device comfortably for extended periods. Additionally, it is built to withstand tough job site conditions, featuring a rugged enclosure that resists impacts and environmental factors.

Another significant aspect of the 2282-20 is its compatibility with Milwaukee's One-Key technology. This allows users to track and manage their devices through the Milwaukee app, providing additional functionalities like customizable settings and secure job site management. Users can save thermal images and data directly to their mobile devices, simplifying documentation and reporting processes.

In conclusion, the Milwaukee 2282-20 thermal imager is an impressive tool that offers professional-grade features and technologies aimed at enhancing efficiency and accuracy in diagnostics. Its combination of high-resolution imaging, Continuous Temperature Monitoring, rugged design, and smart connectivity makes it an indispensable asset for various trades. Whether it’s for residential inspections or large-scale industrial applications, the Milwaukee 2282-20 is engineered to meet the demanding needs of professionals everywhere.