•Use power tools only with specifically desig- nated battery packs. Use of any other battery packs may create a risk of injury and fire.
•When battery pack is not in use, keep it away from other metal objects like paper clips, coins, keys, nails, screws, or other small metal objects that can make a connection from one terminal to another. Shorting the battery termi- nals together may cause burns or a fire.
•Under abusive conditions, liquid may be eject- ed from the battery; avoid contact. If contact accidentally occurs, flush with water. If liquid contacts eyes, additionally seek medical help. Liquid ejected from the battery may cause irritation or burns.
SERVICE
•Have your power tool serviced by a qualified repair person using only identical replacement parts. This will ensure that the safety of the power tool is maintained.
SPECIFIC SAFETY RULES
•Hold power tool by insulated gripping surfaces, when performing an operation where the cutting accessory may contact hidden wiring or its own cord. Cutting accessory contacting a "live" wire may make exposed metal parts of the power tool "live" and could give the operator an electric shock.
•Use clamps or another practical way to secure and support the workpiece to a stable platform. Holding the work by hand or against your body leaves it unstable and may lead to loss of control.
•To reduce the risk of explosion, electric shock and property damage, always check the work area for hidden gas pipes, electrical wires or wa- ter pipes when making blind or plunge cuts.
•Keep hands away from all cutting edges and moving parts. Do not reach underneath the workpiece.
•Do not use dull or damaged blade, which can cause excessive friction, blade binding and kick- back.
•Know your workpiece. Remove nail and screw heads before scraping. Hitting hard objects with blade may cause the tool to kick back.
•Maintain labels and nameplates. These carry important information. If unreadable or missing, contact a MILWAUKEE service facility for a free replacement.
•WARNING: Some dust created by power sanding, sawing, grinding, drilling, and other construction activities contains chemicals known to cause cancer, birth defects or other reproductive harm. Some examples of these chemicals are:
•lead from lead-based paint
•crystalline silica from bricks and cement and other masonry products, and
•arsenic and chromium from chemically-treated lumber.
Your risk from these exposures varies, depending on how often you do this type of work. To reduce your exposure to these chemicals: work in a well ventilated area, and work with approved safety equipment, such as those dust masks that are spe- cially designed to filter out microscopic particles.
SPECIFICATIONS
Cat. No. Volts DC No load OPM Hex Wrench
2426-20 | 12 | 5000 - 20,000 | 5 mm |
SYMBOLOGY
Direct Current
Underwriters Laboratories, Inc.
United States and Canada
FUNCTIONAL DESCRIPTION
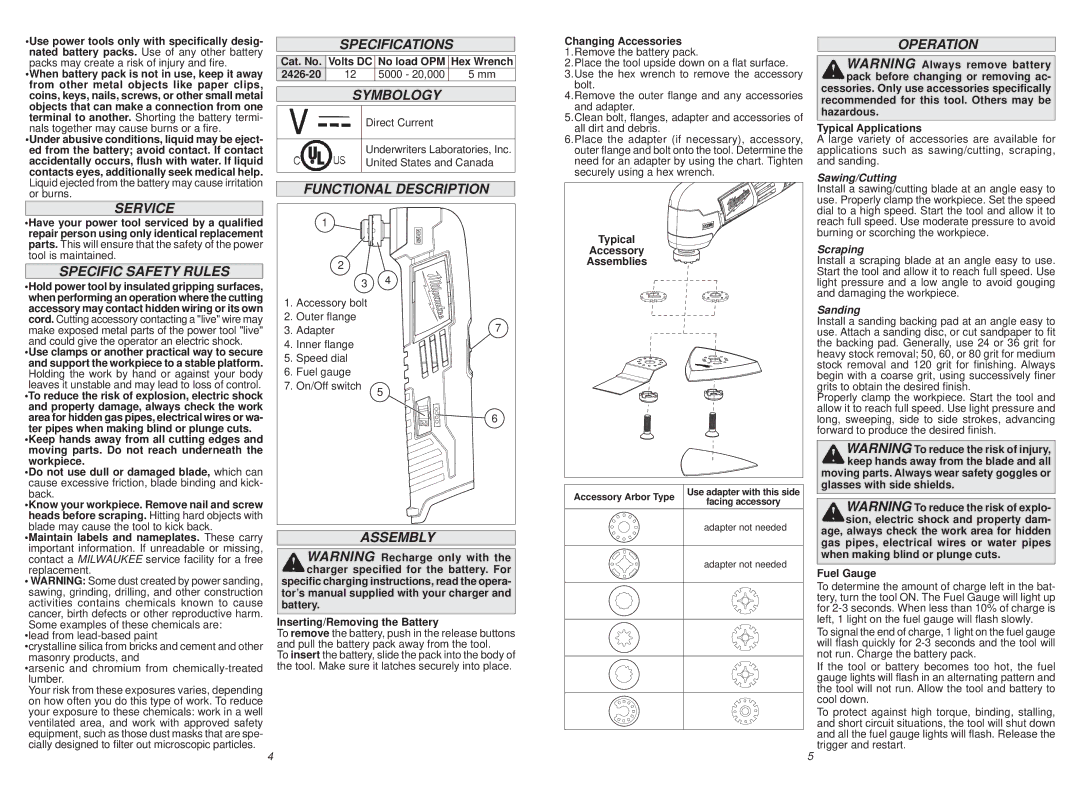
| 1 | |
| 2 | |
| 3 | 4 |
1. | Accessory bolt | |
2. | Outer flange | 7 |
3. | Adapter |
4. | Inner flange | |
5. | Speed dial | |
6. | Fuel gauge | |
7. | On/Off switch | 5 |
| |
| | 6 |
| ASSEMBLY |
WARNING Recharge only with the charger specified for the battery. For specific charging instructions, read the opera- tor’s manual supplied with your charger and
battery.
Inserting/Removing the Battery
To remove the battery, push in the release buttons and pull the battery pack away from the tool.
To insert the battery, slide the pack into the body of the tool. Make sure it latches securely into place.
Changing Accessories
1.Remove the battery pack.
2.Place the tool upside down on a flat surface.
3.Use the hex wrench to remove the accessory bolt.
4.Remove the outer flange and any accessories and adapter.
5.Clean bolt, flanges, adapter and accessories of all dirt and debris.
6.Place the adapter (if necessary), accessory, outer flange and bolt onto the tool. Determine the need for an adapter by using the chart. Tighten securely using a hex wrench.
Typical |
Accessory |
Assemblies |
| Accessory Arbor Type | Use adapter with this side |
| facing accessory |
| |
| | adapter not needed |
| | adapter not needed |
OPERATION
WARNING Always remove battery pack before changing or removing ac- cessories. Only use accessories specifically recommended for this tool. Others may be
hazardous.
Typical Applications
A large variety of accessories are available for applications such as sawing/cutting, scraping, and sanding.
Sawing/Cutting
Install a sawing/cutting blade at an angle easy to use. Properly clamp the workpiece. Set the speed dial to a high speed. Start the tool and allow it to reach full speed. Use moderate pressure to avoid burning or scorching the workpiece.
Scraping
Install a scraping blade at an angle easy to use. Start the tool and allow it to reach full speed. Use light pressure and a low angle to avoid gouging and damaging the workpiece.
Sanding
Install a sanding backing pad at an angle easy to use. Attach a sanding disc, or cut sandpaper to fit the backing pad. Generally, use 24 or 36 grit for heavy stock removal; 50, 60, or 80 grit for medium stock removal and 120 grit for finishing. Always begin with a coarse grit, using successively finer grits to obtain the desired finish.
Properly clamp the workpiece. Start the tool and allow it to reach full speed. Use light pressure and long, sweeping, side to side strokes, advancing forward to produce the desired finish.
WARNING To reduce the risk of injury, keep hands away from the blade and all moving parts. Always wear safety goggles or
glasses with side shields.
WARNING To reduce the risk of explo- sion, electric shock and property dam- age, always check the work area for hidden gas pipes, electrical wires or water pipes
when making blind or plunge cuts.
Fuel Gauge
To determine the amount of charge left in the bat- tery, turn the tool ON. The Fuel Gauge will light up for 2-3 seconds. When less than 10% of charge is left, 1 light on the fuel gauge will flash slowly.
To signal the end of charge, 1 light on the fuel gauge will flash quickly for 2-3 seconds and the tool will not run. Charge the battery pack.
If the tool or battery becomes too hot, the fuel gauge lights will flash in an alternating pattern and the tool will not run. Allow the tool and battery to cool down.
To protect against high torque, binding, stalling, and short circuit situations, the tool will shut down and all the fuel gauge lights will flash. Release the trigger and restart.