FUNCTIONAL DESCRIPTION
MILWAUKEE
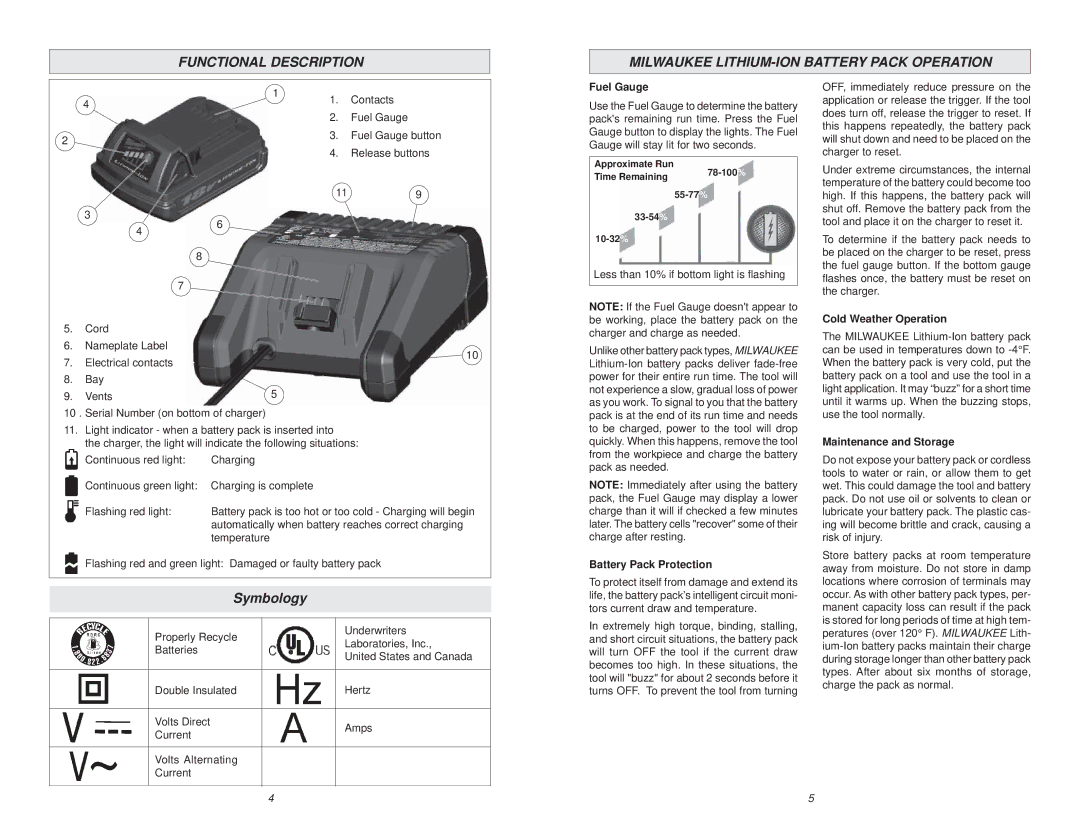
| 4 | 1 | 1. | Contacts |
|
| |||
|
| 2. | Fuel Gauge | |
|
|
| ||
2 |
|
| 3. | Fuel Gauge button |
|
| 4. | Release buttons | |
|
|
| ||
|
|
| 11 | 9 |
| 3 | 6 |
|
|
| 4 |
|
| |
|
|
|
| |
|
| 8 |
|
|
|
| 7 |
|
|
5. | Cord |
|
|
|
6. | Nameplate Label |
|
| 10 |
7. | Electrical contacts |
|
| |
|
|
| ||
8. | Bay |
|
|
|
9. | Vents | 5 |
|
|
10 . Serial Number (on bottom of charger)
11.Light indicator - when a battery pack is inserted into
the charger, the light will indicate the following situations:
Continuous red light: | Charging |
Continuous green light: | Charging is complete |
Flashing red light: | Battery pack is too hot or too cold - Charging will begin |
| automatically when battery reaches correct charging |
| temperature |
Flashing red and green light: Damaged or faulty battery pack | |
Symbology
| Properly Recycle |
| Underwriters |
|
| Laboratories, Inc., | |
| Batteries |
| |
|
| United States and Canada | |
|
|
| |
|
|
|
|
| Double Insulated |
| Hertz |
|
|
|
|
| Volts Direct |
| Amps |
| Current |
| |
|
|
| |
|
|
|
|
| Volts Alternating |
|
|
| Current |
|
|
|
|
|
|
Fuel Gauge
Use the Fuel Gauge to determine the battery pack's remaining run time. Press the Fuel Gauge button to display the lights. The Fuel Gauge will stay lit for two seconds.
Approximate Run
Time Remaining | |
| |
| |
| |
|
Less than 10% if bottom light is flashing
NOTE: If the Fuel Gauge doesn't appear to be working, place the battery pack on the charger and charge as needed.
Unlike other battery pack types, MILWAUKEE
NOTE: Immediately after using the battery pack, the Fuel Gauge may display a lower charge than it will if checked a few minutes later. The battery cells "recover" some of their charge after resting.
Battery Pack Protection
To protect itself from damage and extend its life, the battery pack’s intelligent circuit moni- tors current draw and temperature.
In extremely high torque, binding, stalling, and short circuit situations, the battery pack will turn OFF the tool if the current draw becomes too high. In these situations, the tool will "buzz" for about 2 seconds before it turns OFF. To prevent the tool from turning
OFF, immediately reduce pressure on the application or release the trigger. If the tool does turn off, release the trigger to reset. If this happens repeatedly, the battery pack will shut down and need to be placed on the charger to reset.
Under extreme circumstances, the internal temperature of the battery could become too high. If this happens, the battery pack will shut off. Remove the battery pack from the tool and place it on the charger to reset it.
To determine if the battery pack needs to be placed on the charger to be reset, press the fuel gauge button. If the bottom gauge flashes once, the battery must be reset on the charger.
Cold Weather Operation
The MILWAUKEE
Maintenance and Storage
Do not expose your battery pack or cordless tools to water or rain, or allow them to get wet. This could damage the tool and battery pack. Do not use oil or solvents to clean or lubricate your battery pack. The plastic cas- ing will become brittle and crack, causing a risk of injury.
Store battery packs at room temperature away from moisture. Do not store in damp locations where corrosion of terminals may occur. As with other battery pack types, per- manent capacity loss can result if the pack is stored for long periods of time at high tem- peratures (over 120° F). MILWAUKEE Lith-
4 |
5
