3 INSTALLATION UND ANSCHLUß

Auf der Rückseite des Monitors befinden sich vier Anschlüsse: Die Netzanschlußbuchse für den Netzanschluß, zwei DB9-15P-Buchsen zum Anschluß der Videosignale und ein USB-Upstream-Anschluß für die Monitor-Einstell-Software.

3.1Anschluß des Netzkabels

Stecken Sie das eine Ende des Netzkabels in die dafür vorgesehene Buchse auf dem Anschlußfeld auf der Rückseite des Monitors und das andere in eine ordnungsgemäß geerdete Netzsteckdose. Das automatische Schaltnetzteil des Monitors stellt sich selbständig auf die Netzspannung von entweder 100-120V AC oder 220-240V AC, 50 oder 60Hz ein.

3.2Anschluß des Signalkabels

Das beigefügte Signalkabel ist mit einem DB9-15P Stecker für den Anschluß an die VGA-kompatiblen RGB-Ausgänge Ihres PC ausgestattet. APPLE Macintosh Computer können unter Verwendung des optional erhältlichen Mitsubishi Macintosh Adapters angeschlossen werden.

3.2.1 Anschluß an ein PC-System

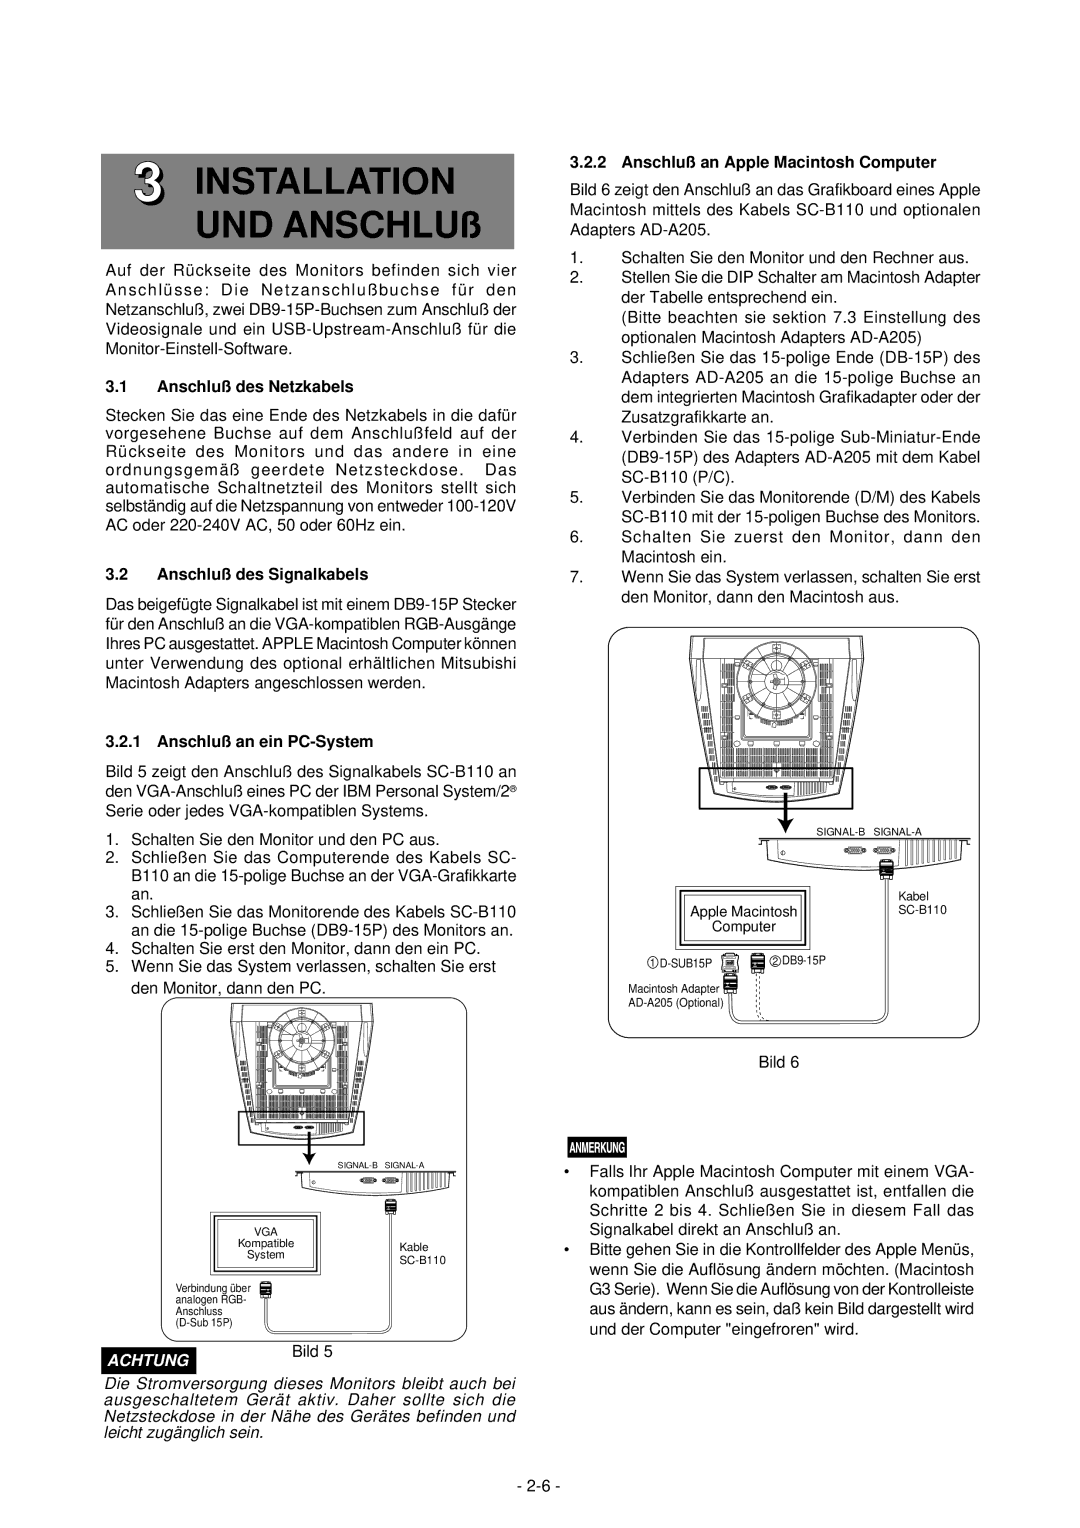
Bild 5 zeigt den Anschluß des Signalkabels SC-B110 an den VGA-Anschluß eines PC der IBM Personal System/2 ® Serie oder jedes VGA-kompatiblen Systems.

1.Schalten Sie den Monitor und den PC aus.

2.Schließen Sie das Computerende des Kabels SC- B110 an die 15-polige Buchse an der VGA-Grafikkarte an.

3.Schließen Sie das Monitorende des Kabels SC-B110 an die 15-polige Buchse (DB9-15P) des Monitors an.

4.Schalten Sie erst den Monitor, dann den ein PC.

5.Wenn Sie das System verlassen, schalten Sie erst den Monitor, dann den PC.

3.2.2 Anschluß an Apple Macintosh Computer

Bild 6 zeigt den Anschluß an das Grafikboard eines Apple Macintosh mittels des Kabels SC-B110 und optionalen Adapters AD-A205.

1.Schalten Sie den Monitor und den Rechner aus.

2.Stellen Sie die DIP Schalter am Macintosh Adapter der Tabelle entsprechend ein.

(Bitte beachten sie sektion 7.3 Einstellung des optionalen Macintosh Adapters AD-A205)

3.Schließen Sie das 15-polige Ende (DB-15P) des Adapters AD-A205 an die 15-polige Buchse an dem integrierten Macintosh Grafikadapter oder der Zusatzgrafikkarte an.

4.Verbinden Sie das 15-polige Sub-Miniatur-Ende (DB9-15P) des Adapters AD-A205 mit dem Kabel SC-B110 (P/C).

5.Verbinden Sie das Monitorende (D/M) des Kabels SC-B110 mit der 15-poligen Buchse des Monitors.

6.Schalten Sie zuerst den Monitor, dann den Macintosh ein.

7.Wenn Sie das System verlassen, schalten Sie erst den Monitor, dann den Macintosh aus.


SIGNAL-B SIGNAL-A


Kabel

Apple Macintosh

SC-B110

Computer


1D-SUB15P 2 DB9-15P

Macintosh Adapter

AD-A205 (Optional)

Bild 6

SIGNAL-B SIGNAL-A


VGA


Kompatible


Kable


System


SC-B110


Verbindung über analogen RGB- Anschluss (D-Sub 15P)

Falls lhr Apple Macintosh Computer mit einem VGA- kompatiblen Anschluß ausgestattet ist, entfallen die Schritte 2 bis 4. Schließen Sie in diesem Fall das Signalkabel direkt an Anschluß an.

Bitte gehen Sie in die Kontrollfelder des Apple Menüs, wenn Sie die Auflösung ändern möchten. (Macintosh G3 Serie). Wenn Sie die Auflösung von der Kontrolleiste aus ändern, kann es sein, daß kein Bild dargestellt wird und der Computer "eingefroren" wird.

ACHTUNG

Bild 5

Die Stromversorgung dieses Monitors bleibt auch bei ausgeschaltetem Gerät aktiv. Daher sollte sich die Netzsteckdose in der Nähe des Gerätes befinden und leicht zugänglich sein.

- 2-6 -

Page 25
Image 25
Mitsubishi Electronics 2060U manual Anschluß des Netzkabels, Anschluß des Signalkabels, Anschluß an ein PC-System

2060U specifications

Mitsubishi Electronics, a prominent name in the world of technology and innovation, has made significant strides in the projector market with its latest model, the 2060U. This advanced projector boasts a range of features and cutting-edge technologies that cater to both professional and home entertainment needs.

One of the standout characteristics of the Mitsubishi 2060U is its impressive resolution. The projector supports 4K UHD resolution, delivering sharp and vibrant images that bring content to life. With a brightness rating of 6,000 lumens, it offers high visibility even in well-lit environments, making it an ideal choice for business presentations, classrooms, and larger venues. The high contrast ratio ensures that black levels are deep and colors are vivid, enhancing the overall viewing experience.

The 2060U also features advanced projection technologies such as laser light source. This technology not only increases the longevity of the projector but also provides consistent brightness and color accuracy over time. The instant-on feature allows users to start their presentations without waiting for warm-up time, enhancing efficiency during crucial moments.

Connectivity is another area where the Mitsubishi 2060U excels. It includes multiple input options such as HDMI, VGA, and USB ports, allowing for seamless integration with various devices, from laptops to media players. Wireless connectivity options further enhance usability, enabling users to present content wirelessly from smartphones and tablets.

Audio performance is not overlooked, as the projector comes equipped with built-in speakers that deliver clear sound. For those seeking higher audio fidelity, there is an option for external audio integration.

The projector's design is both sleek and functional, featuring a compact footprint that allows for easy installation in various settings. The user-friendly interface simplifies navigation through menus and settings, making it accessible for users of all technical backgrounds.

In conclusion, the Mitsubishi Electronics 2060U stands out as a versatile and powerful projector that meets the demands of modern users. Its blend of high-resolution imaging, advanced projection technologies, robust connectivity options, and user-friendly design positions it as an excellent choice for anyone in need of a reliable projection solution. Whether for business, education, or entertainment, the 2060U promises to deliver a captivating viewing experience.