3INSTALLATION AND CONNECTION

On the back of the monitor three kinds of plug-in connec- tions are provided: AC power connector for the AC input, two DB9-15P connectors for video signal input, and USB ports for USB communication.

3.1AC Power Connection

One end of the AC power cord is connected to the AC power connector on the back of the monitor. The other end is plugged into a properly grounded three-prong AC outlet. The monitor’s auto-sensing power supply can automati- cally detect 100-120V AC or 220-240V AC and 50 or 60Hz.

3.2Signal Cable Connection

The DB9-15P(VGA) connector is provided for compatible analog RGB outputs from your computer. Apple Macintosh computers can also be interfaced with using the optional Mitsubishi Macintosh adapter AD-A205.

3.2.1Connecting to Any IBM VGA Compatible Sys- tem

Figure 5 shows the SC-B110 cable connection to the Video Graphics Array (VGA) port in an IBM Personal System/2® series, or any VGA compatible system.

1.Power off, both the monitor and the computer.

2.Connect the one end of the SC-B110 cable to the DB9-15P connector on the VGA controller card.

3.Connect the other end of the SC-B110 cable to the DB9-15P receptacle on the back of the monitor.

4.Power on the monitor, then the computer.

5.After using the system, power off the monitor, then the computer.

SIGNAL-B SIGNAL-A


VGA


Compatible


Cable


System


SC-B110


Connect to Analog RGB

Connector (D-Sub 15P)

Figure 5

CAUTION

The socket-outlet shall be installed near the equipment and shall be easily accessible. During servicing, discon- nect the plug from the socket-outlet.

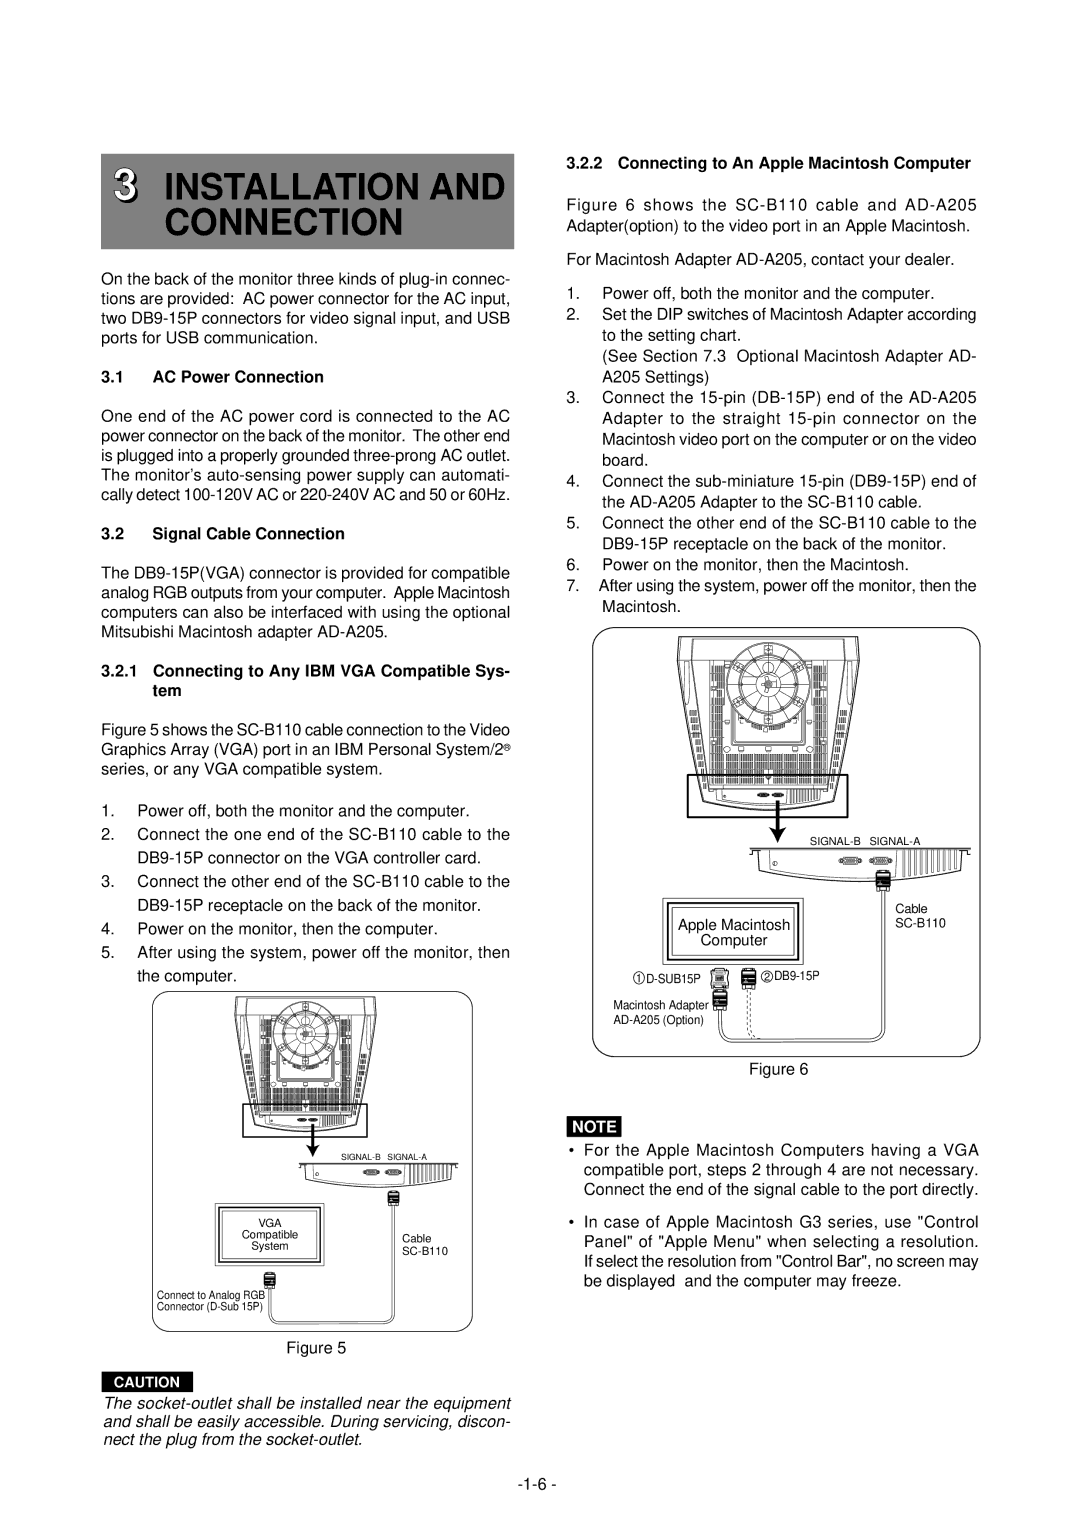
3.2.2 Connecting to An Apple Macintosh Computer

Figure 6 shows the SC-B110 cable and AD-A205 Adapter(option) to the video port in an Apple Macintosh.

For Macintosh Adapter AD-A205, contact your dealer.

1.Power off, both the monitor and the computer.

2.Set the DIP switches of Macintosh Adapter according to the setting chart.

(See Section 7.3 Optional Macintosh Adapter AD- A205 Settings)

3.Connect the 15-pin (DB-15P) end of the AD-A205 Adapter to the straight 15-pin connector on the Macintosh video port on the computer or on the video board.

4.Connect the sub-miniature 15-pin (DB9-15P) end of the AD-A205 Adapter to the SC-B110 cable.

5.Connect the other end of the SC-B110 cable to the DB9-15P receptacle on the back of the monitor.

6.Power on the monitor, then the Macintosh.

7.After using the system, power off the monitor, then the Macintosh.


SIGNAL-B SIGNAL-A


Cable

Apple Macintosh

SC-B110

Computer


1D-SUB15P 2 DB9-15P

Macintosh Adapter

AD-A205 (Option)

Figure 6

NOTE

For the Apple Macintosh Computers having a VGA compatible port, steps 2 through 4 are not necessary. Connect the end of the signal cable to the port directly.

In case of Apple Macintosh G3 series, use "Control Panel" of "Apple Menu" when selecting a resolution. If select the resolution from "Control Bar", no screen may be displayed and the computer may freeze.

-1-6 -

Page 9
Image 9
Mitsubishi Electronics 2060U manual Installation and Connection, AC Power Connection, Signal Cable Connection

2060U specifications

Mitsubishi Electronics, a prominent name in the world of technology and innovation, has made significant strides in the projector market with its latest model, the 2060U. This advanced projector boasts a range of features and cutting-edge technologies that cater to both professional and home entertainment needs.

One of the standout characteristics of the Mitsubishi 2060U is its impressive resolution. The projector supports 4K UHD resolution, delivering sharp and vibrant images that bring content to life. With a brightness rating of 6,000 lumens, it offers high visibility even in well-lit environments, making it an ideal choice for business presentations, classrooms, and larger venues. The high contrast ratio ensures that black levels are deep and colors are vivid, enhancing the overall viewing experience.

The 2060U also features advanced projection technologies such as laser light source. This technology not only increases the longevity of the projector but also provides consistent brightness and color accuracy over time. The instant-on feature allows users to start their presentations without waiting for warm-up time, enhancing efficiency during crucial moments.

Connectivity is another area where the Mitsubishi 2060U excels. It includes multiple input options such as HDMI, VGA, and USB ports, allowing for seamless integration with various devices, from laptops to media players. Wireless connectivity options further enhance usability, enabling users to present content wirelessly from smartphones and tablets.

Audio performance is not overlooked, as the projector comes equipped with built-in speakers that deliver clear sound. For those seeking higher audio fidelity, there is an option for external audio integration.

The projector's design is both sleek and functional, featuring a compact footprint that allows for easy installation in various settings. The user-friendly interface simplifies navigation through menus and settings, making it accessible for users of all technical backgrounds.

In conclusion, the Mitsubishi Electronics 2060U stands out as a versatile and powerful projector that meets the demands of modern users. Its blend of high-resolution imaging, advanced projection technologies, robust connectivity options, and user-friendly design positions it as an excellent choice for anyone in need of a reliable projection solution. Whether for business, education, or entertainment, the 2060U promises to deliver a captivating viewing experience.