Controlling the camera

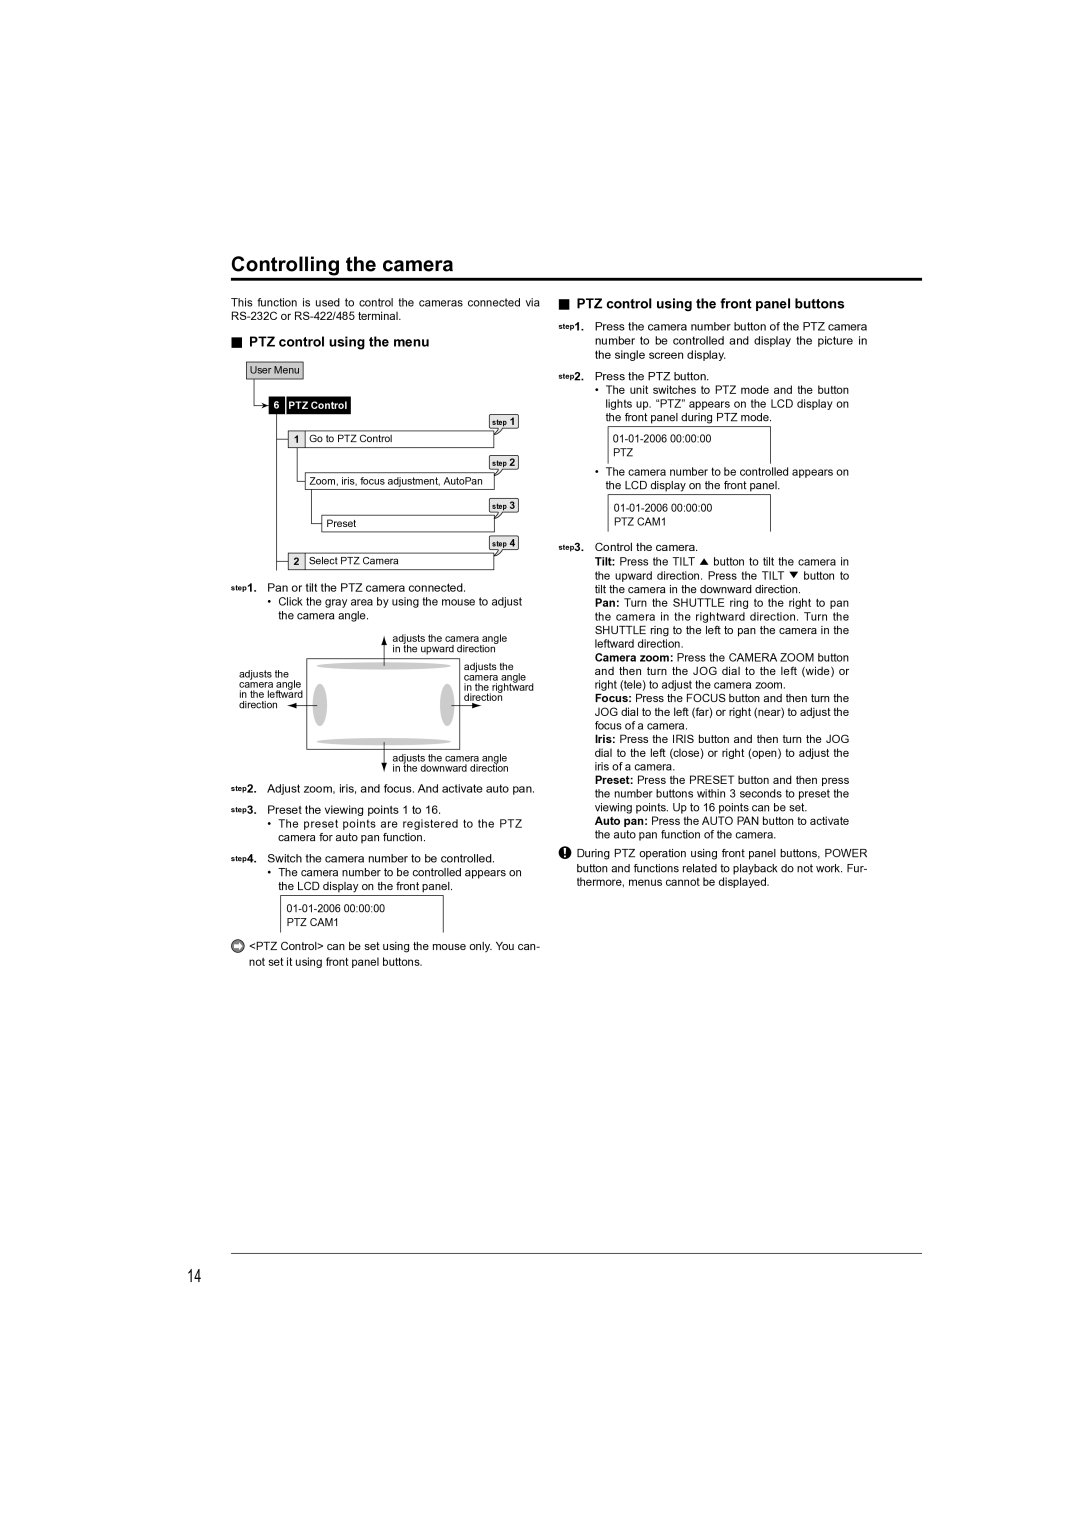
This function is used to control the cameras connected via RS-232C or RS-422/485 terminal.

PTZ control using the menu

User Menu

6 PTZ Control

step 1

1 Go to PTZ Control

step 2

Zoom, iris, focus adjustment, AutoPan

step 3

Preset

step 4

2 Select PTZ Camera

step1. Pan or tilt the PTZ camera connected.

Click the gray area by using the mouse to adjust the camera angle.


adjusts the camera angle


in the upward direction

adjusts the


adjusts the


camera angle

camera angle


in the rightward

in the leftward


direction

direction


adjusts the camera angle


in the downward direction

step2. Adjust zoom, iris, and focus. And activate auto pan.

step3. Preset the viewing points 1 to 16.

The preset points are registered to the PTZ camera for auto pan function.

step4. Switch the camera number to be controlled.

The camera number to be controlled appears on the LCD display on the front panel.

01-01-2006 00:00:00

PTZ CAM1

<PTZ Control> can be set using the mouse only. You can- not set it using front panel buttons.

PTZ control using the front panel buttons

step1. Press the camera number button of the PTZ camera number to be controlled and display the picture in the single screen display.

step2. Press the PTZ button.

The unit switches to PTZ mode and the button lights up. “PTZ” appears on the LCD display on the front panel during PTZ mode.

01-01-2006 00:00:00

PTZ

The camera number to be controlled appears on the LCD display on the front panel.

01-01-2006 00:00:00

PTZ CAM1

step3. Control the camera.

Tilt: Press the TILT button to tilt the camera in the upward direction. Press the TILT button to tilt the camera in the downward direction.

Pan: Turn the SHUTTLE ring to the right to pan the camera in the rightward direction. Turn the SHUTTLE ring to the left to pan the camera in the leftward direction.

Camera zoom: Press the CAMERA ZOOM button and then turn the JOG dial to the left (wide) or right (tele) to adjust the camera zoom.

Focus: Press the FOCUS button and then turn the JOG dial to the left (far) or right (near) to adjust the focus of a camera.

Iris: Press the IRIS button and then turn the JOG dial to the left (close) or right (open) to adjust the iris of a camera.

Preset: Press the PRESET button and then press the number buttons within 3 seconds to preset the viewing points. Up to 16 points can be set.

Auto pan: Press the AUTO PAN button to activate the auto pan function of the camera.

During PTZ operation using front panel buttons, POWER button and functions related to playback do not work. Fur- thermore, menus cannot be displayed.

14

Page 18
Image 18
Mitsubishi Electronics DX-TL4709U instruction manual Controlling the camera, PTZ control using the menu

DX-TL4709U specifications

The Mitsubishi Electronics DX-TL4709U is a high-performance digital video recorder (DVR) designed for advanced surveillance applications. It stands out as a robust solution for both commercial and industrial environments, providing superior functionality and ease of use. With its capacity to manage multiple camera inputs, the DX-TL4709U is ideal for comprehensive security monitoring.

One of the key features of the DX-TL4709U is its ability to support up to 9 camera inputs simultaneously. This allows users to monitor multiple locations or angles in real-time, enhancing the overall effectiveness of security surveillance. The device is equipped with advanced video compression technology, which optimizes storage by reducing file sizes without compromising video quality. This feature is crucial for extended recording periods, allowing for months of continuous surveillance on a single hard drive.

In terms of connectivity, the DX-TL4709U comes with various ports, including USB and network interfaces, facilitating easy integration into existing security systems. The device supports both wired and wireless camera setups, providing flexibility tailored to specific needs. Additionally, the unit is compatible with a variety of monitoring software, further enhancing its functionality.

User experience is a priority with the DX-TL4709U, featuring a user-friendly interface that simplifies operation and access to recordings. This DVR includes remote viewing capabilities, allowing users to access live video feeds and recorded footage from smartphones, tablets, or computers. This ensures that security can be maintained even when personnel are off-site.

Another notable characteristic is its ability to perform advanced motion detection and recording. Users can set specific zones within the camera's field of view where motion detection is active, minimizing false alarms and optimizing storage use. The intelligent search feature also allows for quick retrieval of specific footage based on motion events.

Built with reliability in mind, the DX-TL4709U is designed for 24/7 operation in challenging environments. The unit offers a durable construction suited for rack mounting, making it an ideal choice for businesses focused on providing a secure atmosphere.

Overall, the Mitsubishi Electronics DX-TL4709U combines advanced technology, user-friendly features, and reliable performance, making it an excellent choice for any security-conscious organization. Its versatility and robust feature set position it as a leader in the domain of digital video recording solutions.