Warnings and CALL OUT output

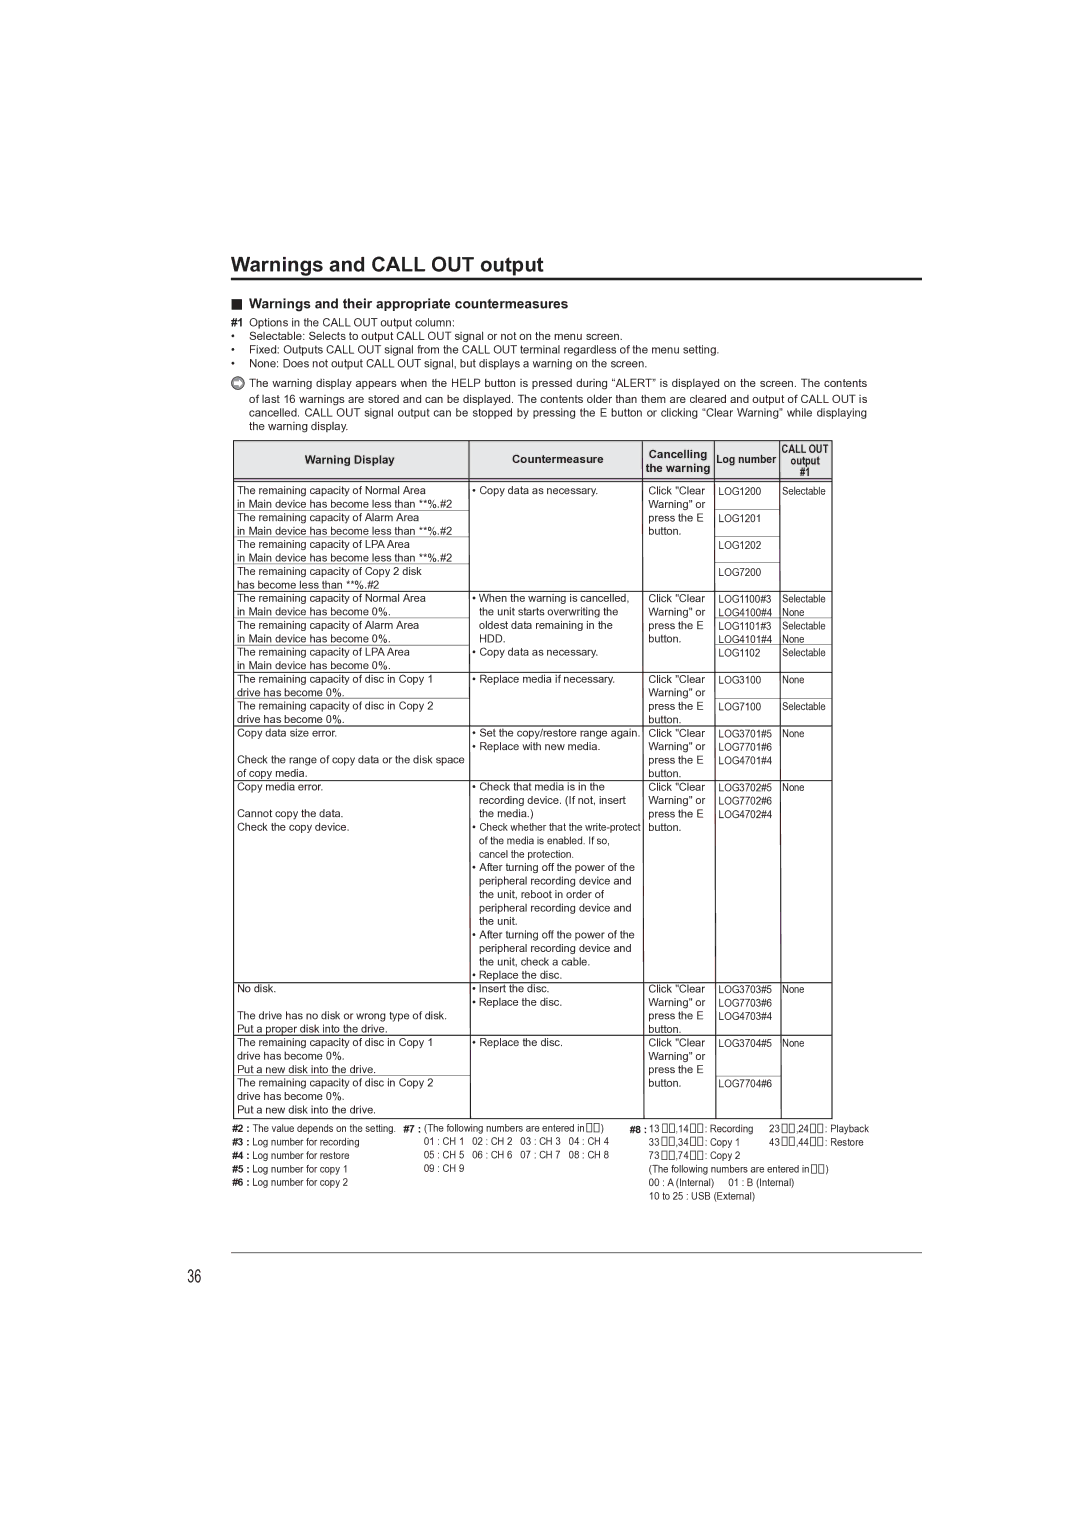
Warnings and their appropriate countermeasures

#1 Options in the CALL OUT output column:

Selectable: Selects to output CALL OUT signal or not on the menu screen.

Fixed: Outputs CALL OUT signal from the CALL OUT terminal regardless of the menu setting.

None: Does not output CALL OUT signal, but displays a warning on the screen.

The warning display appears when the HELP button is pressed during “ALERT” is displayed on the screen. The contents

of last 16 warnings are stored and can be displayed. The contents older than them are cleared and output of CALL OUT is cancelled. CALL OUT signal output can be stopped by pressing the E button or clicking “Clear Warning” while displaying the warning display.

Warning Display

Countermeasure

Cancelling

Log number


CALL OUT


output


the warning


#1


The remaining capacity of Normal Area

• Copy data as necessary.

Click "Clear

LOG1200


Selectable

in Main device has become less than **%.#2


Warning" or


The remaining capacity of Alarm Area


press the E

LOG1201


in Main device has become less than **%.#2


button.


The remaining capacity of LPA Area


LOG1202


in Main device has become less than **%.#2


The remaining capacity of Copy 2 disk


LOG7200


has become less than **%.#2


The remaining capacity of Normal Area

• When the warning is cancelled,

Click "Clear

LOG1100#3


Selectable

in Main device has become 0%.

the unit starts overwriting the

Warning" or

LOG4100#4


None

The remaining capacity of Alarm Area

oldest data remaining in the

press the E

LOG1101#3


Selectable

in Main device has become 0%.

HDD.

button.

LOG4101#4


None

The remaining capacity of LPA Area

• Copy data as necessary.


LOG1102


Selectable

in Main device has become 0%.


The remaining capacity of disc in Copy 1

• Replace media if necessary.

Click "Clear

LOG3100


None

drive has become 0%.


Warning" or


The remaining capacity of disc in Copy 2


press the E

LOG7100


Selectable

drive has become 0%.


button.


Copy data size error.

• Set the copy/restore range again.

Click "Clear

LOG3701#5


None


• Replace with new media.

Warning" or

LOG7701#6


Check the range of copy data or the disk space


press the E

LOG4701#4


of copy media.


button.


Copy media error.

• Check that media is in the

Click "Clear

LOG3702#5


None


recording device. (If not, insert

Warning" or

LOG7702#6


Cannot copy the data.

the media.)

press the E

LOG4702#4


Check the copy device.

• Check whether that the write-protect

button.


of the media is enabled. If so,


cancel the protection.


• After turning off the power of the


peripheral recording device and


the unit, reboot in order of


peripheral recording device and


the unit.


• After turning off the power of the


peripheral recording device and


the unit, check a cable.


• Replace the disc.


No disk.

• Insert the disc.

Click "Clear

LOG3703#5


None


• Replace the disc.

Warning" or

LOG7703#6


The drive has no disk or wrong type of disk.


press the E

LOG4703#4


Put a proper disk into the drive.


button.


The remaining capacity of disc in Copy 1

• Replace the disc.

Click "Clear

LOG3704#5


None

drive has become 0%.


Warning" or


Put a new disk into the drive.


press the E


The remaining capacity of disc in Copy 2


button.

LOG7704#6


drive has become 0%.


Put a new disk into the drive.


#2 : The value depends on the setting.

#3 : Log number for recording

#4 : Log number for restore

#5 : Log number for copy 1

#6 : Log number for copy 2

#7 : (The following numbers are entered in ) 01 : CH 1 02 : CH 2 03 : CH 3 04 : CH 4

05 : CH 5 06 : CH 6 07 : CH 7 08 : CH 8

09 : CH 9

#8 : 13

,14

: Recording

23

,24

: Playback

33

,34

: Copy 1

43

,44

: Restore

73

,74

: Copy 2


(The following numbers are entered in

)

00

: A (Internal) 01 : B (Internal)


10 to 25 : USB (External)


36

Page 40
Image 40
Mitsubishi Electronics DX-TL4709U instruction manual Countermeasure Cancelling, Hdd

DX-TL4709U specifications

The Mitsubishi Electronics DX-TL4709U is a high-performance digital video recorder (DVR) designed for advanced surveillance applications. It stands out as a robust solution for both commercial and industrial environments, providing superior functionality and ease of use. With its capacity to manage multiple camera inputs, the DX-TL4709U is ideal for comprehensive security monitoring.

One of the key features of the DX-TL4709U is its ability to support up to 9 camera inputs simultaneously. This allows users to monitor multiple locations or angles in real-time, enhancing the overall effectiveness of security surveillance. The device is equipped with advanced video compression technology, which optimizes storage by reducing file sizes without compromising video quality. This feature is crucial for extended recording periods, allowing for months of continuous surveillance on a single hard drive.

In terms of connectivity, the DX-TL4709U comes with various ports, including USB and network interfaces, facilitating easy integration into existing security systems. The device supports both wired and wireless camera setups, providing flexibility tailored to specific needs. Additionally, the unit is compatible with a variety of monitoring software, further enhancing its functionality.

User experience is a priority with the DX-TL4709U, featuring a user-friendly interface that simplifies operation and access to recordings. This DVR includes remote viewing capabilities, allowing users to access live video feeds and recorded footage from smartphones, tablets, or computers. This ensures that security can be maintained even when personnel are off-site.

Another notable characteristic is its ability to perform advanced motion detection and recording. Users can set specific zones within the camera's field of view where motion detection is active, minimizing false alarms and optimizing storage use. The intelligent search feature also allows for quick retrieval of specific footage based on motion events.

Built with reliability in mind, the DX-TL4709U is designed for 24/7 operation in challenging environments. The unit offers a durable construction suited for rack mounting, making it an ideal choice for businesses focused on providing a secure atmosphere.

Overall, the Mitsubishi Electronics DX-TL4709U combines advanced technology, user-friendly features, and reliable performance, making it an excellent choice for any security-conscious organization. Its versatility and robust feature set position it as a leader in the domain of digital video recording solutions.