Menu operation (continued)

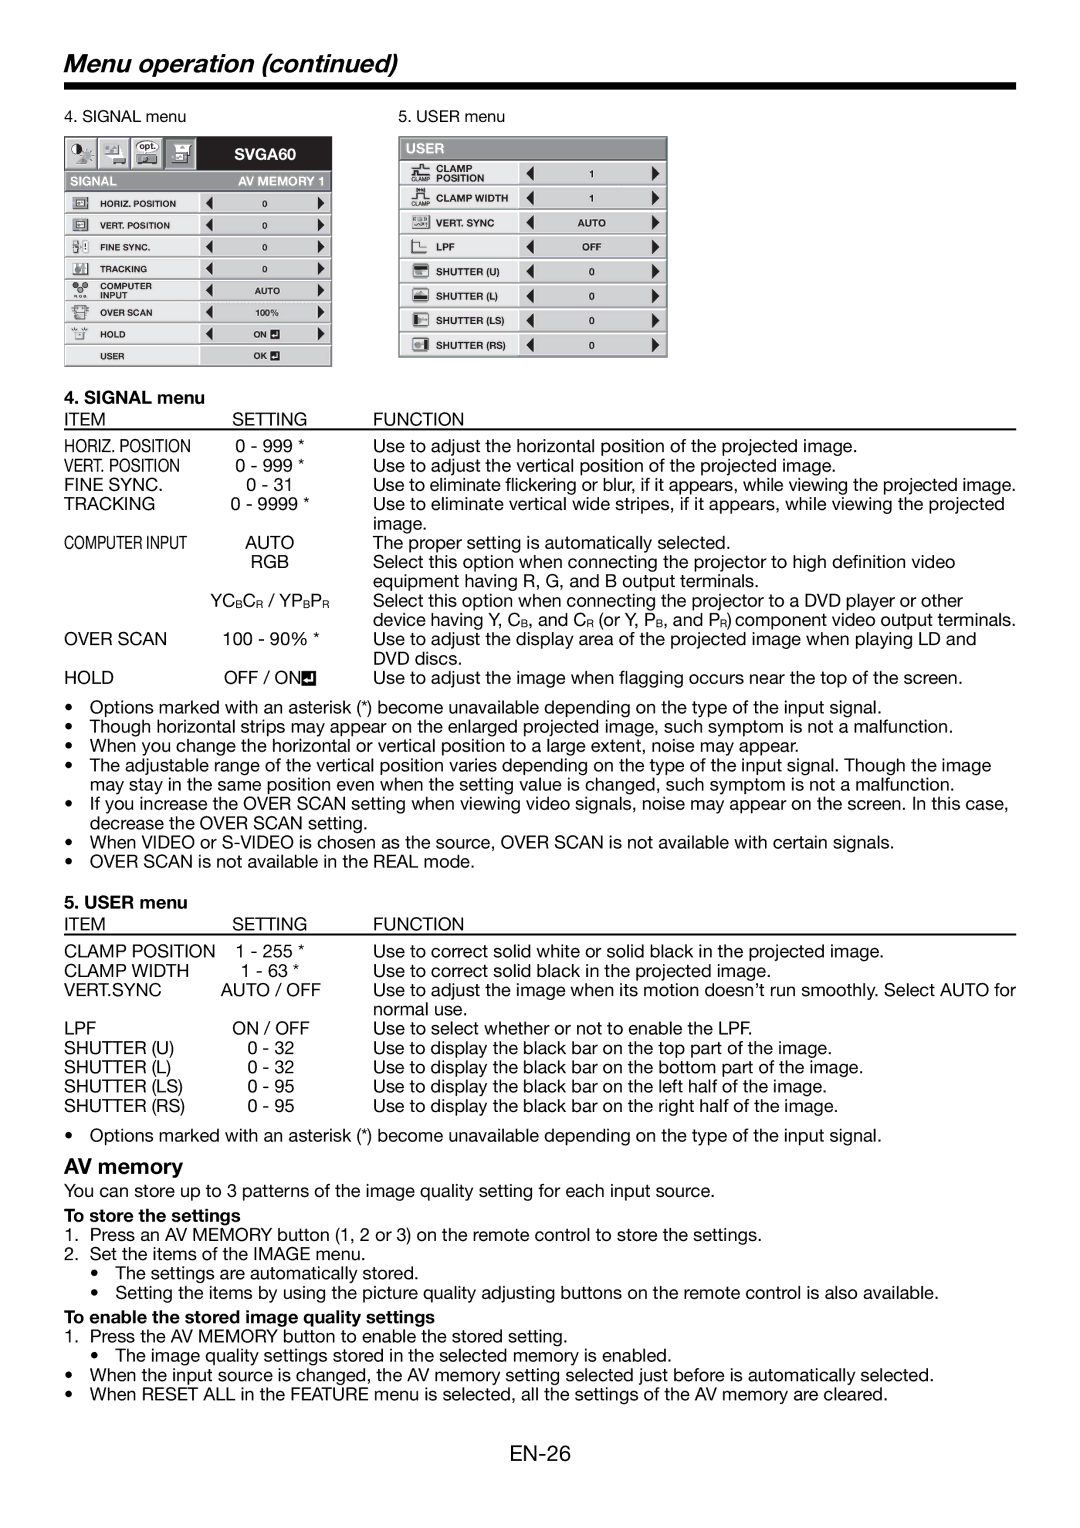
4. SIGNAL menu

opt.

SVGA60

SIGNAL

AV MEMORY 1


HORIZ. POSITION


0


VERT. POSITION


0


FINE SYNC.


0


TRACKING


0


COMPUTER

AUTO


RRGGBB INPUT


OVER SCAN


100%


HOLD


ON


USER


OK


5. USER menu

USER


CLAMP

1


POSITION


CLAMP WIDTH

1


VERT. SYNC

AUTO


LPF

OFF


SHUTTER (U)

0


SHUTTER (L)

0


SHUTTER (LS)

0


SHUTTER (RS)

0


4. SIGNAL menu


ITEM

SETTING

FUNCTION

HORIZ. POSITION

0 - 999 *


Use to adjust the horizontal position of the projected image.

VERT. POSITION

0 - 999 *


Use to adjust the vertical position of the projected image.

FINE SYNC.

0 - 31


Use to eliminate flickering or blur, if it appears, while viewing the projected image.

TRACKING

0 - 9999 *


Use to eliminate vertical wide stripes, if it appears, while viewing the projected


image.

COMPUTER INPUT

AUTO

The proper setting is automatically selected.


RGB

Select this option when connecting the projector to high definition video


equipment having R, G, and B output terminals.


YCBCR / YPBPR

Select this option when connecting the projector to a DVD player or other


device having Y, CB, and CR (or Y, PB, and PR) component video output terminals.

OVER SCAN

100 - 90% *

Use to adjust the display area of the projected image when playing LD and


DVD discs.

HOLD

OFF / ON


Use to adjust the image when flagging occurs near the top of the screen.


Options marked with an asterisk (*) become unavailable depending on the type of the input signal.

Though horizontal strips may appear on the enlarged projected image, such symptom is not a malfunction.

When you change the horizontal or vertical position to a large extent, noise may appear.

The adjustable range of the vertical position varies depending on the type of the input signal. Though the image may stay in the same position even when the setting value is changed, such symptom is not a malfunction.

If you increase the OVER SCAN setting when viewing video signals, noise may appear on the screen. In this case, decrease the OVER SCAN setting.

When VIDEO or S-VIDEO is chosen as the source, OVER SCAN is not available with certain signals.

OVER SCAN is not available in the REAL mode.

5. USER menu


ITEM

SETTING

FUNCTION

CLAMP POSITION

1 - 255 *

Use to correct solid white or solid black in the projected image.

CLAMP WIDTH

1 - 63 *

Use to correct solid black in the projected image.

VERT.SYNC

AUTO / OFF

Use to adjust the image when its motion doesn’t run smoothly. Select AUTO for


normal use.

LPF

ON / OFF

Use to select whether or not to enable the LPF.

SHUTTER (U)

0 - 32

Use to display the black bar on the top part of the image.

SHUTTER (L)

0 - 32

Use to display the black bar on the bottom part of the image.

SHUTTER (LS)

0 - 95

Use to display the black bar on the left half of the image.

SHUTTER (RS)

0 - 95

Use to display the black bar on the right half of the image.

• Options marked with an asterisk (*) become unavailable depending on the type of the input signal.

AV memory

You can store up to 3 patterns of the image quality setting for each input source.

To store the settings

1.Press an AV MEMORY button (1, 2 or 3) on the remote control to store the settings.

2.Set the items of the IMAGE menu.

The settings are automatically stored.

Setting the items by using the picture quality adjusting buttons on the remote control is also available.

To enable the stored image quality settings

1.Press the AV MEMORY button to enable the stored setting.

• The image quality settings stored in the selected memory is enabled.

When the input source is changed, the AV memory setting selected just before is automatically selected.

When RESET ALL in the FEATURE menu is selected, all the settings of the AV memory are cleared.

EN-26

Page 26
Image 26
Mitsubishi Electronics HC1600 user manual AV memory, Signal menu, User menu, To store the settings

HC1600 specifications

Mitsubishi Electronics HC1600 is a powerful projector that combines cutting-edge technology with user-friendly features, making it a popular choice for both home entertainment and professional presentations. This model is designed to deliver impressive image quality, versatility, and reliable performance.

One of the standout features of the HC1600 is its high brightness level, which reaches up to 3,000 lumens. This substantial brightness allows the projector to perform well even in well-lit environments, ensuring that images remain clear and vibrant. Coupled with a high contrast ratio, the HC1600 produces sharp images with excellent color reproduction, enhancing the viewing experience for movies, games, and presentations.

The HC1600 employs advanced DLP (Digital Light Processing) technology, which contributes to its reliability and longevity. DLP projectors are known for their ability to produce smooth, detailed images, minimizing the occurrence of motion blur. This makes the HC1600 an excellent choice for fast-paced content, such as sports or action films.

In terms of resolution, the HC1600 offers a native resolution of 1920 x 1080 pixels, providing full HD clarity. This level of detail allows users to appreciate every intricate aspect of their content, whether it's the subtle textures in a film or the fine print in a presentation. For added convenience, the projector also supports a variety of input formats and resolutions, making it flexible for different multimedia needs.

Connectivity options are abundant in the HC1600. It features multiple HDMI ports, USB connections, and composite video inputs, enabling seamless integration with a range of devices including laptops, gaming consoles, and media players. The inclusion of these connectivity choices enhances its versatility as a multimedia projector.

Additionally, the HC1600 includes a built-in speaker, which, while may not replace a dedicated sound system, offers decent audio quality for less complex presentations or casual movie viewing. For those who desire an immersive audio experience, external audio devices can easily be connected, elevating the overall viewing experience.

The design of the HC1600 is also worth noting. It is lightweight and compact, making it suitable for both stationary setups and portable use. Users can easily transport it to different locations, whether for business meetings, classrooms, or home movie nights.

In summary, the Mitsubishi Electronics HC1600 is a well-rounded projector that brings together brightness, resolution, and connectivity into one package. Its DLP technology ensures high quality images while its diverse input options guarantee compatibility with many devices. Whether for casual viewing or professional presentations, the HC1600 stands out as a reliable option for all multimedia needs.