3)Control sequence
(1)Send the command from the personal computer to the projector.
(2)The projector will send a return command after it receives an end code. If the command is not received correctly, the projector will not send the return command.
(3)The personal computer checks the command and confirms if the sent command has been executed or not.
(4)This projector sends various codes other than the return code. When having a control sequence by RS- 232C, reject other codes from the personal computer.
•During signal switching, the command may not take effect even when the projector sends the return command. After signal switching completes, wait for the mode indication to disappear before sending the next command.
•When sending commands successively, wait to receive the return command of the current command before sending a next command.
•Keep intervals of at least 400 ms between receipt of a return command and sending of a next command.
•Any commands will not be executed for 10 seconds after the power is turned on.
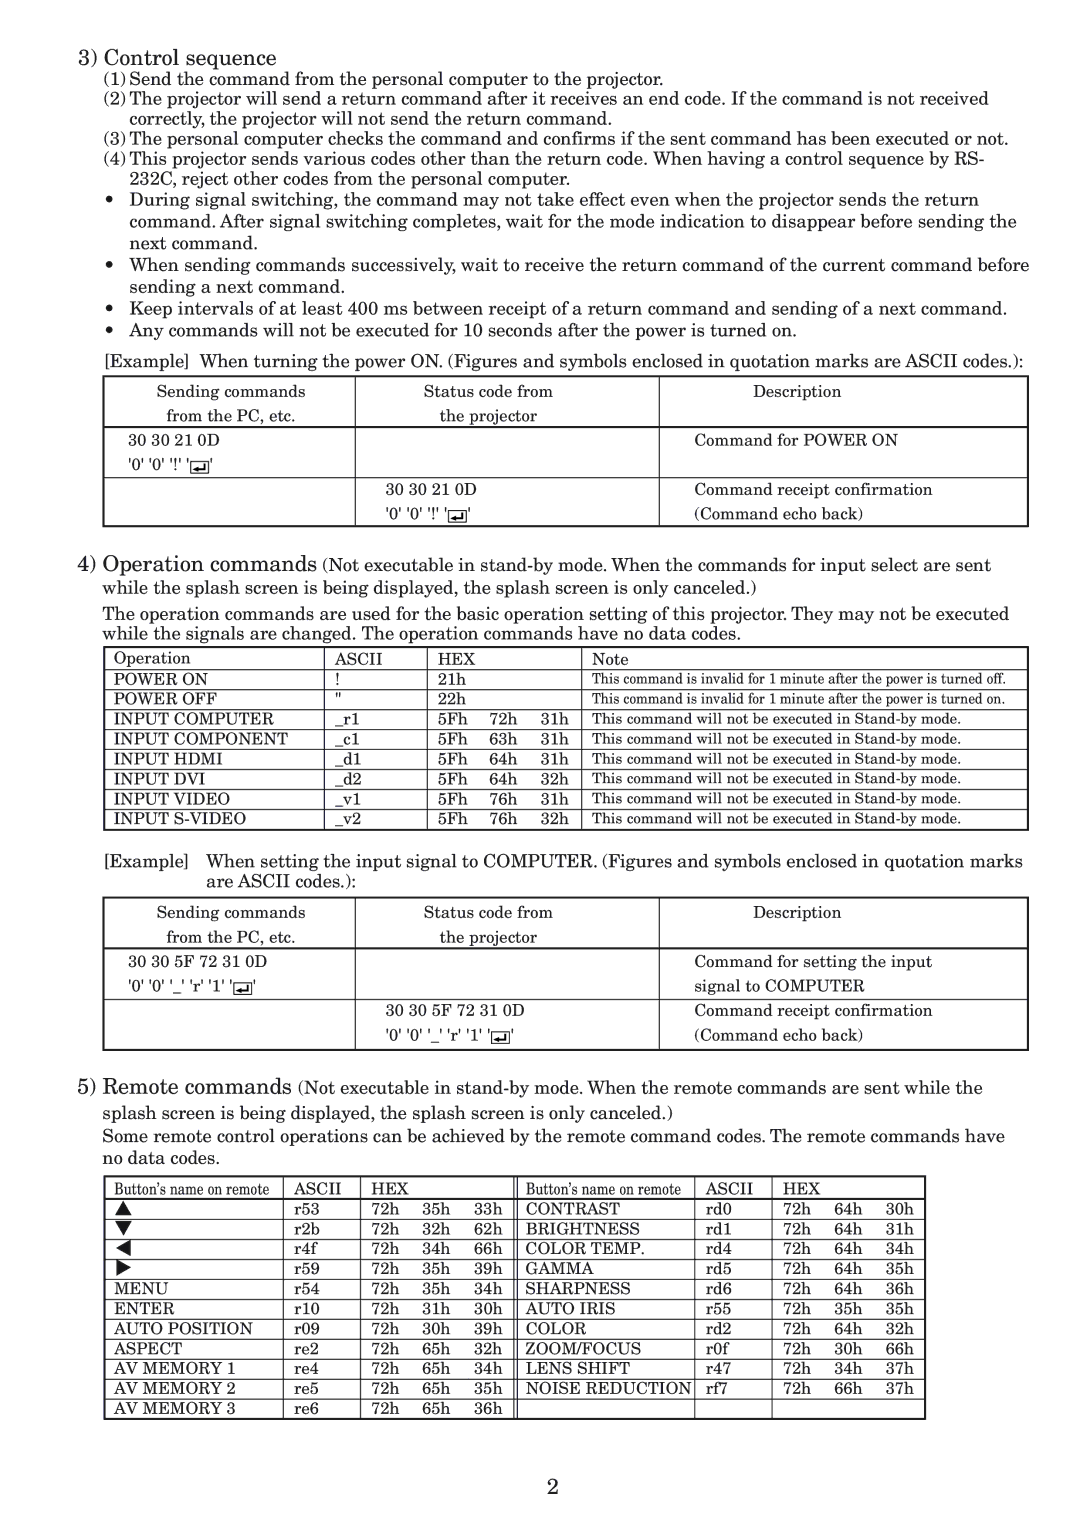
[Example] When turning the power ON. (Figures and symbols enclosed in quotation marks are ASCII codes.):
Sending commands | Status code from | Description |
from the PC, etc. | the projector |
|
30 30 21 0D |
| Command for POWER ON |
'0' '0' '!' ' ' |
|
|
|
|
|
| 30 30 21 0D | Command receipt confirmation |
| '0' '0' '!' ' ' | (Command echo back) |
4)Operation commands (Not executable in
The operation commands are used for the basic operation setting of this projector. They may not be executed while the signals are changed. The operation commands have no data codes.
Operation | ASCII | HEX |
|
| Note |
POWER ON | ! | 21h |
|
| This command is invalid for 1 minute after the power is turned off. |
POWER OFF | " | 22h |
|
| This command is invalid for 1 minute after the power is turned on. |
INPUT COMPUTER | _r1 | 5Fh | 72h | 31h | This command will not be executed in |
INPUT COMPONENT | _c1 | 5Fh | 63h | 31h | This command will not be executed in |
INPUT HDMI | _d1 | 5Fh | 64h | 31h | This command will not be executed in |
INPUT DVI | _d2 | 5Fh | 64h | 32h | This command will not be executed in |
INPUT VIDEO | _v1 | 5Fh | 76h | 31h | This command will not be executed in |
INPUT | _v2 | 5Fh | 76h | 32h | This command will not be executed in |
[Example] When setting the input signal to COMPUTER. (Figures and symbols enclosed in quotation marks are ASCII codes.):
Sending commands | Status code from | Description |
from the PC, etc. | the projector |
|
30 30 5F 72 31 0D |
| Command for setting the input |
'0' '0' '_' 'r' '1' ' ' |
| signal to COMPUTER |
|
|
|
| 30 30 5F 72 31 0D | Command receipt confirmation |
| '0' '0' '_' 'r' '1' ' ' | (Command echo back) |
|
|
|
5)Remote commands (Not executable in
Some remote control operations can be achieved by the remote command codes. The remote commands have no data codes.
Button’s name on remote | ASCII | HEX |
|
| Button’s name on remote | ASCII | HEX |
|
|
{ | r53 | 72h | 35h | 33h | CONTRAST | rd0 | 72h | 64h | 30h |
} | r2b | 72h | 32h | 62h | BRIGHTNESS | rd1 | 72h | 64h | 31h |
$ | r4f | 72h | 34h | 66h | COLOR TEMP. | rd4 | 72h | 64h | 34h |
% | r59 | 72h | 35h | 39h | GAMMA | rd5 | 72h | 64h | 35h |
MENU | r54 | 72h | 35h | 34h | SHARPNESS | rd6 | 72h | 64h | 36h |
ENTER | r10 | 72h | 31h | 30h | AUTO IRIS | r55 | 72h | 35h | 35h |
AUTO POSITION | r09 | 72h | 30h | 39h | COLOR | rd2 | 72h | 64h | 32h |
ASPECT | re2 | 72h | 65h | 32h | ZOOM/FOCUS | r0f | 72h | 30h | 66h |
AV MEMORY 1 | re4 | 72h | 65h | 34h | LENS SHIFT | r47 | 72h | 34h | 37h |
AV MEMORY 2 | re5 | 72h | 65h | 35h | NOISE REDUCTION | rf7 | 72h | 66h | 37h |
AV MEMORY 3 | re6 | 72h | 65h | 36h |
|
|
|
|
|
2