Viewing computer images (continued)
Setting the aspect ratio
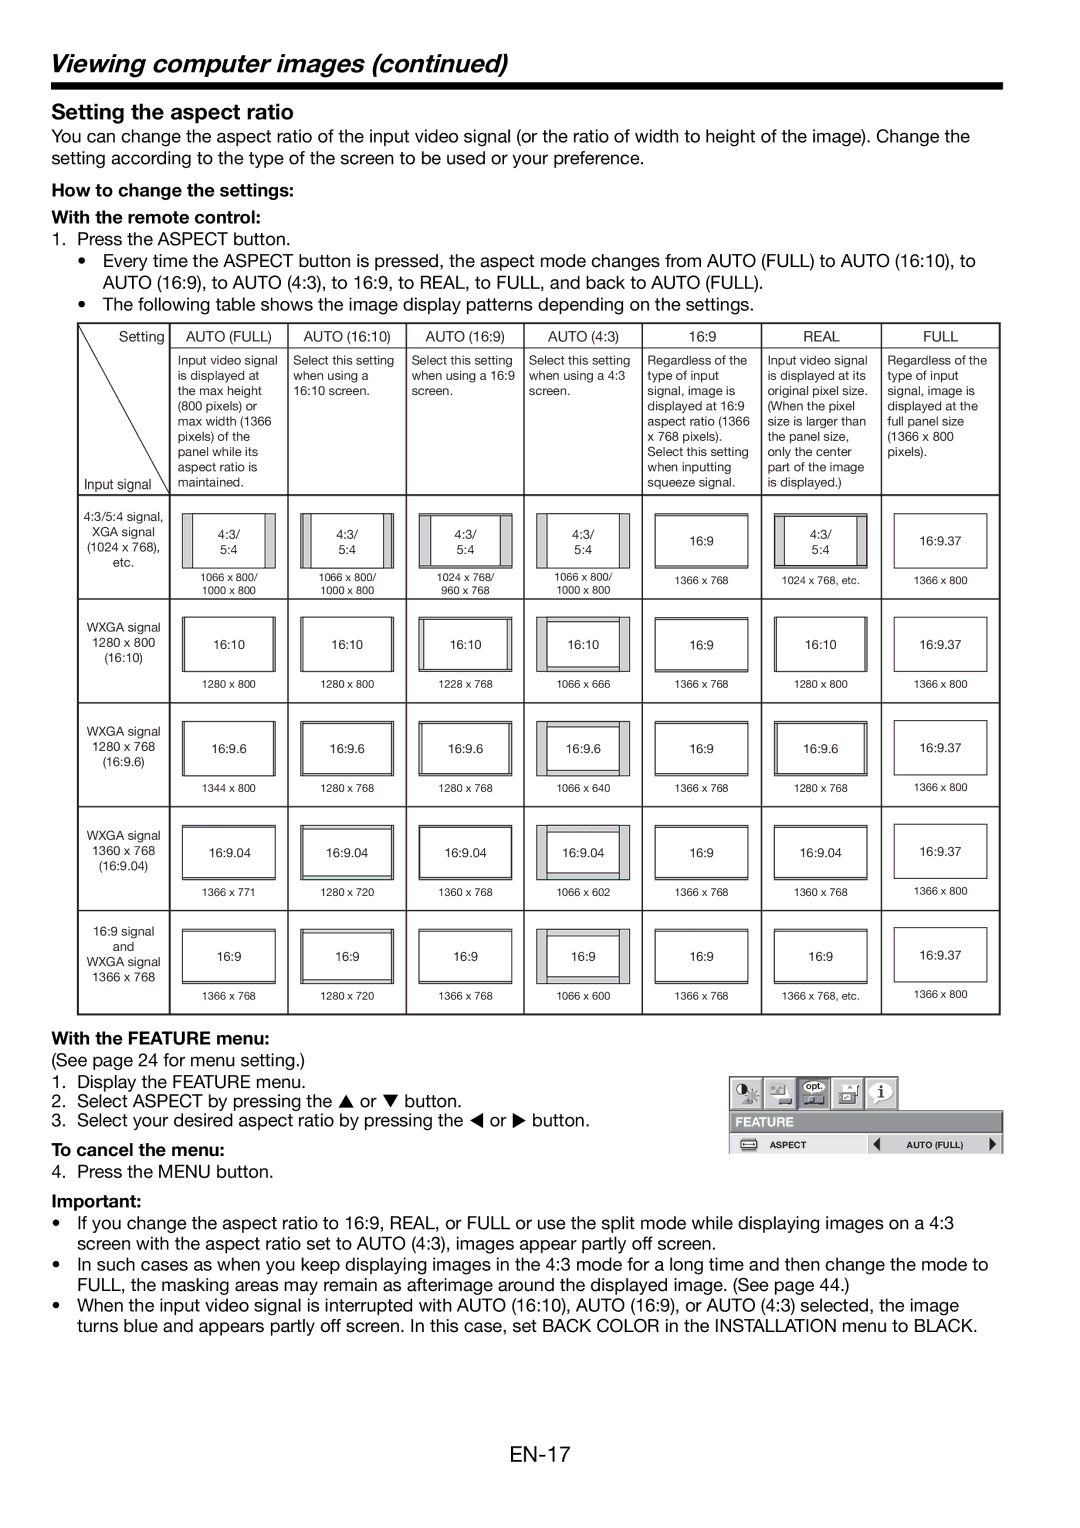
You can change the aspect ratio of the input video signal (or the ratio of width to height of the image). Change the setting according to the type of the screen to be used or your preference.
How to change the settings:
With the remote control:
1.Press the ASPECT button.
•Every time the ASPECT button is pressed, the aspect mode changes from AUTO (FULL) to AUTO (16:10), to AUTO (16:9), to AUTO (4:3), to 16:9, to REAL, to FULL, and back to AUTO (FULL).
•The following table shows the image display patterns depending on the settings.
Setting | AUTO (FULL) | AUTO (16:10) | AUTO (16:9) | AUTO (4:3) | 16:9 | REAL | FULL |
| Input video signal | Select this setting | Select this setting | Select this setting | Regardless of the | Input video signal | Regardless of the |
| is displayed at | when using a | when using a 16:9 | when using a 4:3 | type of input | is displayed at its | type of input |
| the max height | 16:10 screen. | screen. | screen. | signal, image is | original pixel size. | signal, image is |
| (800 pixels) or |
|
|
| displayed at 16:9 | (When the pixel | displayed at the |
| max width (1366 |
|
|
| aspect ratio (1366 | size is larger than | full panel size |
| pixels) of the |
|
|
| x 768 pixels). | the panel size, | (1366 x 800 |
| panel while its |
|
|
| Select this setting | only the center | pixels). |
| aspect ratio is |
|
|
| when inputting | part of the image |
|
Input signal | maintained. |
|
|
| squeeze signal. | is displayed.) |
|
4:3/5:4 signal, |
|
|
|
|
|
|
| |
XGA signal | 4:3/ | 4:3/ | 4:3/ | 4:3/ | 16:9 | 4:3/ | 16:9.37 | |
(1024 x 768), | 5:4 | 5:4 | 5:4 | 5:4 | 5:4 | |||
|
| |||||||
etc. |
|
|
|
|
|
|
| |
| 1066 x 800/ | 1066 x 800/ | 1024 x 768/ | 1066 x 800/ | 1366 x 768 | 1024 x 768, etc. | 1366 x 800 | |
| 1000 x 800 | 1000 x 800 | 960 x 768 | 1000 x 800 |
|
|
| |
WXGA signal |
|
|
|
|
|
|
| |
1280 x 800 | 16:10 | 16:10 | 16:10 | 16:10 | 16:9 | 16:10 | 16:9.37 | |
(16:10) |
|
|
|
|
|
|
| |
| 1280 x 800 | 1280 x 800 | 1228 x 768 | 1066 x 666 | 1366 x 768 | 1280 x 800 | 1366 x 800 | |
WXGA signal |
|
|
|
|
|
|
| |
1280 x 768 | 16:9.6 | 16:9.6 | 16:9.6 | 16:9.6 | 16:9 | 16:9.6 | 16:9.37 | |
(16:9.6) |
|
|
|
|
|
|
| |
| 1344 x 800 | 1280 x 768 | 1280 x 768 | 1066 x 640 | 1366 x 768 | 1280 x 768 | 1366 x 800 | |
WXGA signal |
|
|
|
|
|
|
| |
1360 x 768 | 16:9.04 | 16:9.04 | 16:9.04 | 16:9.04 | 16:9 | 16:9.04 | 16:9.37 | |
(16:9.04) |
|
|
|
|
|
|
| |
| 1366 x 771 | 1280 x 720 | 1360 x 768 | 1066 x 602 | 1366 x 768 | 1360 x 768 | 1366 x 800 | |
16:9 signal |
|
|
|
|
|
|
| |
and | 16:9 | 16:9 | 16:9 | 16:9 | 16:9 | 16:9 | 16:9.37 | |
WXGA signal | ||||||||
|
|
|
|
|
|
| ||
1366 x 768 |
|
|
|
|
|
|
| |
| 1366 x 768 | 1280 x 720 | 1366 x 768 | 1066 x 600 | 1366 x 768 | 1366 x 768, etc. | 1366 x 800 |
With the FEATURE menu: |
|
|
|
|
|
|
|
|
|
| |
(See page 24 for menu setting.) |
|
|
|
|
|
|
|
|
|
| |
1. | Display the FEATURE menu. |
|
|
|
|
|
|
|
|
|
|
|
|
|
| opt. |
|
|
|
|
| ||
2. | Select ASPECT by pressing the S or T button. |
|
|
|
|
|
|
|
|
|
|
|
|
|
|
|
|
|
|
|
| ||
3. | Select your desired aspect ratio by pressing the W or X button. | FEATURE |
| ||||||||
To cancel the menu: |
|
| ASPECT |
| AUTO (FULL) | ||||||
|
|
|
|
|
|
|
|
|
| ||
4. | Press the MENU button. |
|
|
|
|
|
|
|
|
|
|
Important:
•If you change the aspect ratio to 16:9, REAL, or FULL or use the split mode while displaying images on a 4:3 screen with the aspect ratio set to AUTO (4:3), images appear partly off screen.
•In such cases as when you keep displaying images in the 4:3 mode for a long time and then change the mode to FULL, the masking areas may remain as afterimage around the displayed image. (See page 44.)
•When the input video signal is interrupted with AUTO (16:10), AUTO (16:9), or AUTO (4:3) selected, the image turns blue and appears partly off screen. In this case, set BACK COLOR in the INSTALLATION menu to BLACK.