Manuals
/
Mitsubishi Electronics
/
Computer Equipment
/
Projector
Mitsubishi Electronics
XD60U
user manual
Cabinet Dimensions, E-63, Menu, Quick, Auto, Standby
Models:
XD60U
1
64
65
65
Download
65 pages
53.82 Kb
58
59
60
61
62
63
64
65
Troubleshooting
Specs
Install
Projecting component signals
Password
Timer settings display
Normal STATUS indicator is off
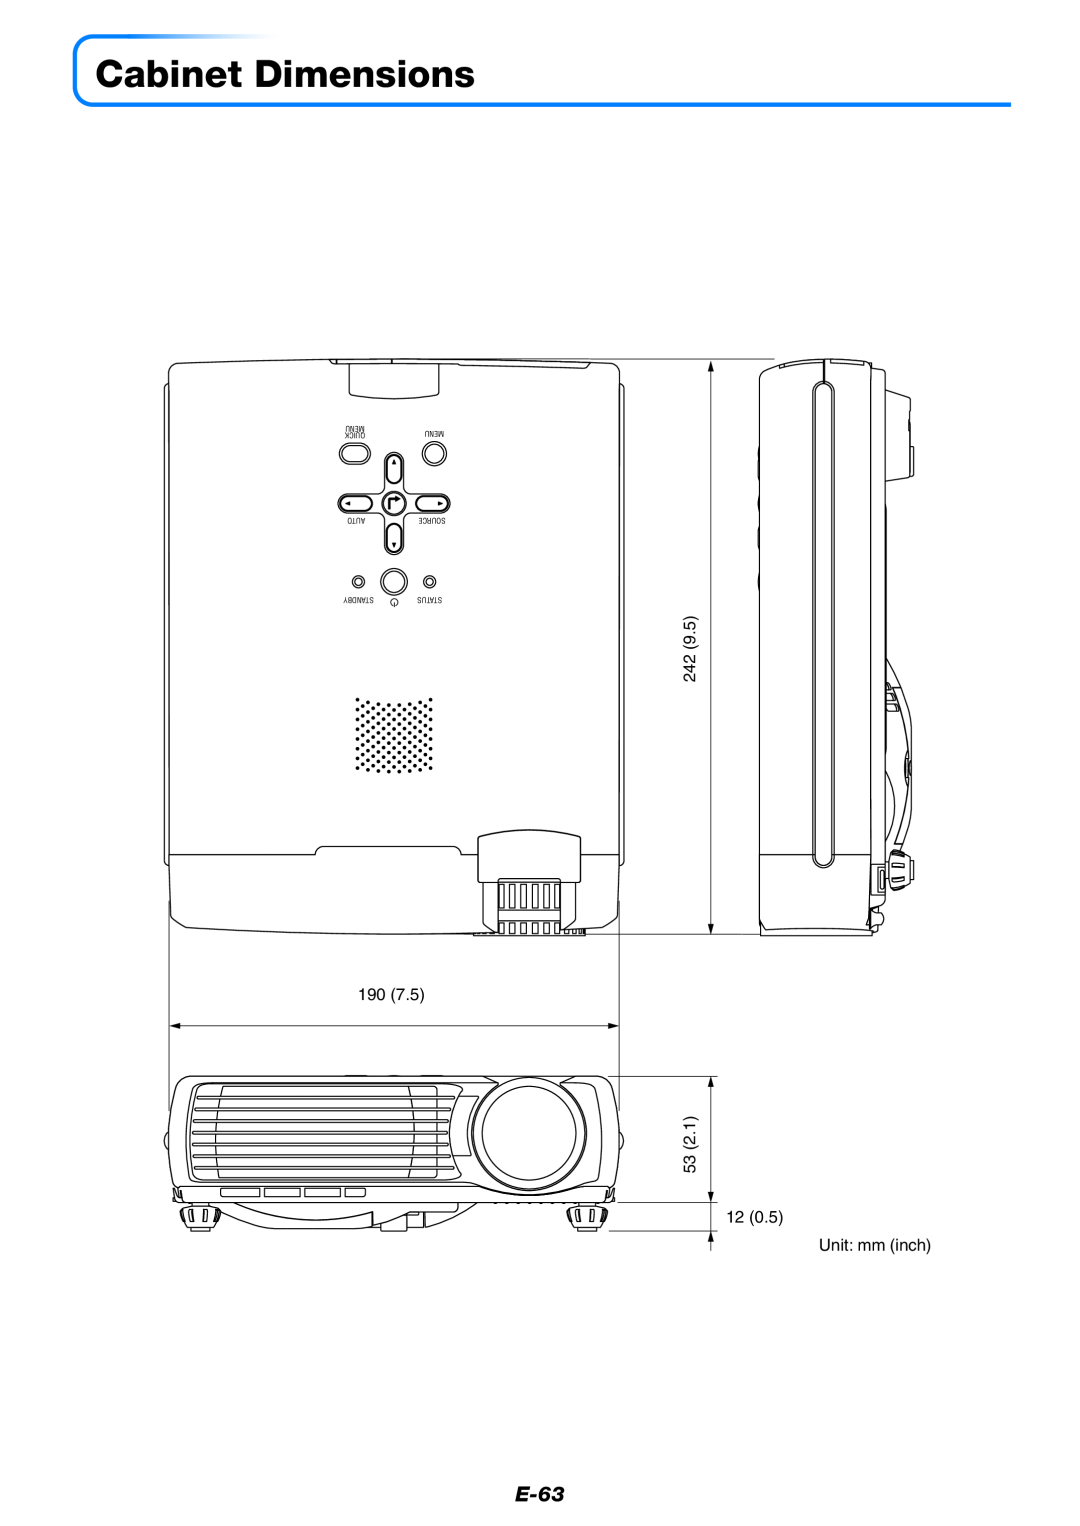
Dimension
Reset
Setup
Page 64
Image 64
Page 63
Page 65
Page 64
Image 64
Page 63
Page 65
Contents
XD60U
User Manual
DATA PROJECTOR
MODEL
IMPORTANT SAFETY INFORMATION
When using the projector in Europe COMPLIANCE NOTICE
IMPORTANT SAFETY INFORMATION
Do not look into the lens when it is operating
Do not look into the air outlet grille when projector is operating
Place of installation
Unplug immediately if there is something wrong with your projector
Major Features
Lightweight at about 1.5 kg/3.3 lb high-intensity mobile projector
Powerful functions for presentations
Lamp-mode switch function for the lamp output
Table of Contents
Setup and Projection
Preparation and Background Knowledge
General Operation
Adjustments and Settings
Menu Operations
Miscellaneous
Table of Contents
Checking the Supplied Accessories
Remote control includes one button battery
Power cable 1.8 m / 5.9 feet
No. 246C484-10/No. 246C484-20/No. 246C484-30
Checking the Supplied Accessories
Carrying case for projector and accessories
“WARNING”
Wash hands after handling
Names of the Main Unit Parts
SOURCE
Built-in Security Slot
E-10
PC connector E-15
AUDIO connector E-20
E-11
Names of the Remote Control Parts
Precautions Handling of the Remote Control
Preparing the Remote Control
Button Battery Replacement
Remote Control Range
Using the remote control for the first time
The Procedure Up to Projecting to the Screen
E-13
4 Connecting the power cable and switching on the power
When selecting the language of menu displays, etc
Screen Size and Projection Distance
Placement Guide
E-14
Personal Computers with a DVI Connector
Connections with Personal Computer
E-15
Connecting Personal Computers and Video Equipment
Personal Computers with a Mini D-Sub 15-Pin Connector
E-16
Connecting Personal Computers and Video Equipment
DVI/mini D-Sub 15-pin conversion cable Supplied item
To Output the External Output Signal of a Notebook Computer
E-17
Manufacturer
Model
Connections with Composite Signals
Video Equipment with VIDEO Connectors
Video Equipment with S-VIDEO Connectors
E-18
Connections with Component Signals
When the Video Equipment Has a YCbCr Connector or YPbPr Connector
E-19
Projecting component signals
Connections with Audio Connectors
E-20
Audio cable Supplied item
Audio conversion cable
Operating
E-21
Power Cable Connections and Switching the Power On/Off
2 Switch on the projector power
When Menu Language Select is Displayed Upon Switching On the Power
E-22
Power Cable Connections and Switching the Power On/Off
2 Press the ENTER button to set
Switch off the power of the connected equipment
Switch off the power of the projector
3 Unplug the power cable
Finishing
Adjustment of the Projection Screen
Adjustment of the Projection Screen
E-24
2 Adjust the projection image to the screen
Making Adjustments with the Adjusters
E-25
Adjustment of the Projection Screen
3 Turn the focus ring and adjust the focus of the screen
Automatic Adjustment of Analog RGB
General Operation
Input Selection
E-26
Selection of Aspect Ratio
E-27
Personal Computer Signal
Video Signals / Component Signals
Cancelling Video and Audio Temporarily
Freezing a Moving Picture
Lamp Mode
E-28
Adjustment of the Volume
Keystone
E-29
Adjustment Method
Enlargement of the Image and Video Movement
The image can also be moved in the following circumstances
E-30
1 Press the ZOOM button to enlarge the image
Using the Presentation Timer
E-31
Timer settings display
3 Press the ENTER button and start the timer
Protecting the Projector with the Security Lock
E-32
Registering the password
To cancel the number you have input, press the CANCEL button
E-33
If the password input display appears when the power is turned on
Input the password using the number buttons 1 to
Canceling the password/Changing the password
Using the Quick Menu
Content of Adjustments and Settings
E-34
This function permits frequently used adjustments to be performed
Menu Operation Method
Names and Functions of Buttons Used for Menu Operations
E-35
Remote Control
Menu Screen Names and Functions
E-36
Item Name This is the name of the ad- justment or setting
Adjustment Bar and Settings Contents
Performing Menu Operations
Menu Display 1 Press the MENU button to display the menu
Selection of the Menu Name
2 Press the SELECT button to select the menu name
Making Adjustments/Settings
Displaying the Cursor
3 Press the SELECT button to display the item name selection cursor
Selection of the Item Name
Closing the Menu 6 Press the MENU button and close the menu display
Selecting Another Menu Name with Remote Control Operation
E-39
List of Item Names Offering Input Selection and Adjustments/Settings
E-40
The color space can only be adjusted with high definition TVs
Menu name
E-41
Terminal
Picture Adj. Picture Adjustment
Image
Brightness / Contrast / Color / Tint / Sharpness
Picture Adj. / Fine Picture / H Position / V Position
Reset
Fine Picture
H Position
V Position
Color
Quick Color Adj
Gamma
E-44
Color Temp
White
Color Space
E-45
White Balance
E-46
View
Aspect
Filter
E-47
Vertical Flip/Horizontal Flip
Keystone Save
E-48
The menus and other on-screen displays cannot be adjusted
Setup
Auto Power Off
Auto Source
Menu Position
Presentation Timer
Input Format
E-50
Setup
Option
Language
On Screen
Background
Startup Screen
Security Lock
E-52
Option
Factory Default
Lamp Timer Reset
Info
Status
Resolution / Frequency
Lamp Timer
E-54
This displays the lamp timer
When an Indicator is Lit or Blinking
Thermal Protector
E-55
Indicator status
Troubleshooting
Check the following matters before requesting servicing
E-56
Problem Power does not turn on
Cleaning
Cleaning a Soiled Projector Main Unit
Cleaning the Inside of the Projector
Dirty Lens
Replacing the Lamp Cartridge
E-58
E-59
1 Unplug the power cord 2 Turn the projector upside-down
Replacing the Lamp Cartridge
3 Remove the lamp cover
E-60
7 Reset the Lamp Timer
5 Mount the new lamp cartridge
6 Mount the lamp cover
Specifications
E-61
Optical
Electrical
E-62
Table of Supported Frequencies
Signal
E-63
Cabinet Dimensions
AUTO
MITSUBISHI ELECTRIC CORPORATION
1 Zusho Baba, Nagaokakyo-City, Kyoto Japan
Top
Page
Image
Contents