Adjusting projected images (continued)

To adjust the ratio of change in brightness (GAMMA MODE):

You can select a preset gamma mode using the menu. (See page 26 for menu setting.)

1.Display the IMAGE menu.

2.Select GAMMA MODE by pressing the S or T button.

3.Select your desired gamma mode by pressing the W or X button.

To cancel the menu:

4.Press the MENU button.

To adjust the original ratio of change in brightness (To customize the gamma mode):

To customize (and store) the gamma mode to your preference, carry out the following procedure.


(See page 26 for menu setting.)


1.

Select GAMMA MODE in the IMAGE menu.


GAMMA MODE - USER1


2.

Press the W or X button to select USER1


or USER2 .


REFERENCE


VIDEO


3.

Press the ENTER button.


ADJUST MODE


ALL


4.

Press the S or T button to select REFERENCE.


HIGH


0

0

0

5.

Press the W or X button to select basic gamma curve.


MID


0

0

0


• Generally, select the most preferable gamma curve from the preset gamma


LOW


0

0

0


curve.


6.Press the S or T button to select ADJUST MODE.

7.Press the W or X button to adjust mode of gamma curve (ALL, RED, GREEN, or BLUE).

• Select whether to adjust RED, GREEN, and BLUE collectively or separately.

8.Press the S or T button to select the desired item.

HIGH

: Use to adjust the gradation of the bright scenes. (The values displayed correspond to RED,


GREEN, and BLUE from the left respectively.)

MID

: Use to adjust the gradation of the medium brightness scenes. (The values displayed correspond


to RED, GREEN, and BLUE from the left respectively.)

LOW

: Use to adjust the gradation of the dark scenes. (The values displayed correspond to RED,


GREEN, and BLUE from the left respectively.)

9.Press the W or X button to adjust the selected item. 10.Repeat steps 6 - 9 for optimum adjustment results.

To cancel the menu:

11.Press the MENU button.

To enable the stored gamma mode:

1.Select USER1 or USER2 by pressing the GAMMA button on the remote control.

• Change in the brightness may be hard to recognize in some images.

Noise reduction

This projector has the following noise reduction functions. However, these functions don't work with 720p, 1080i, and 1080p signals and signals supplied from computer.

TRNR (temporal recursive noise reduction)

Reduces random noise appearing in projected images. Adjust the reduction level using the W or X button.

MNR (mosquito noise reduction)

Reduces mosquito noise appearing around sharp edges in DVD images. Adjust the reduction level using the W or X button.

BAR (block artifact removal)

Reduces block noise or mosaic-like patterns appearing in DVD images. Turn on this function using the W or X button.

EN-33

Page 33
Image 33
Mitsumi electronic HC6500 user manual To adjust the ratio of change in brightness Gamma Mode, Noise reduction

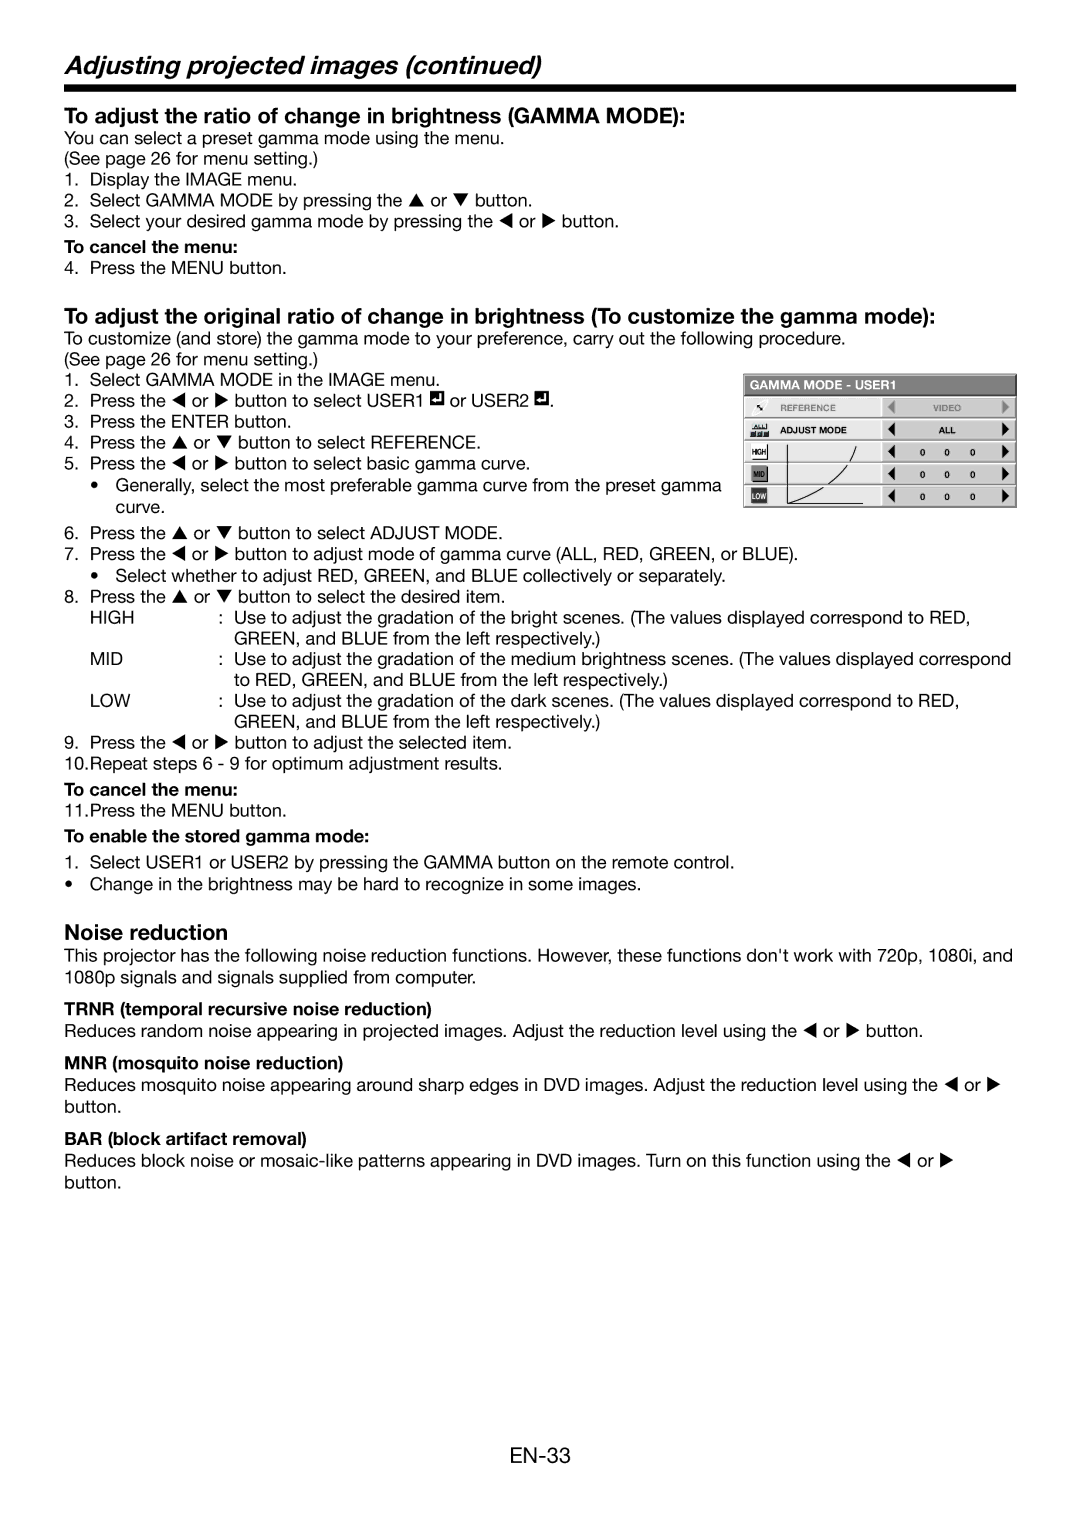
HC6500 specifications

The Mitsumi HC6500 is an innovative electronic component that has garnered attention for its versatile features and advanced technologies. This device is primarily known for its role as a high-performance connectivity solution in various electronic applications. The HC6500 stands out in the crowded market of electronic components by incorporating several key characteristics that enhance its overall functionality and usability.

One of the main features of the HC6500 is its wide compatibility with various communication protocols. This allows it to easily integrate into different systems, whether they are automotive, industrial automation, or consumer electronics. The device supports both wired and wireless communication, making it a flexible option for designers looking to streamline their connectivity solutions.

The HC6500 also boasts a compact design, which reduces space requirements in circuit designs. Its form factor is particularly beneficial for applications where space is at a premium, such as in portable devices and IoT gadgets. This small footprint does not compromise performance, as the HC6500 delivers robust connectivity with high data transfer rates that cater to the demands of modern applications.

In terms of power efficiency, the HC6500 is engineered to operate with low power consumption, which is essential for battery-operated devices. This energy efficiency is complemented by its advanced thermal management features, ensuring stable performance even under heavy loads or extended use.

The device also incorporates sophisticated error correction technologies, which enhance data integrity during transmission. This is particularly vital in critical applications, such as medical devices and automotive systems, where data accuracy is non-negotiable. The HC6500’s ability to maintain a reliable connection under various environmental conditions is another hallmark of its design.

Furthermore, the HC6500 is built with an emphasis on durability. Its materials and construction are designed to withstand extreme temperatures, vibrations, and other challenging conditions often encountered in industrial and outdoor environments. This reliability ensures that the HC6500 can perform consistently over a long lifespan, reducing maintenance and replacement costs.

Overall, the Mitsumi HC6500 is a well-rounded electronic component that combines cutting-edge technology with practical features, making it an excellent choice for designers and engineers looking to enhance their products with reliable connectivity solutions.