4

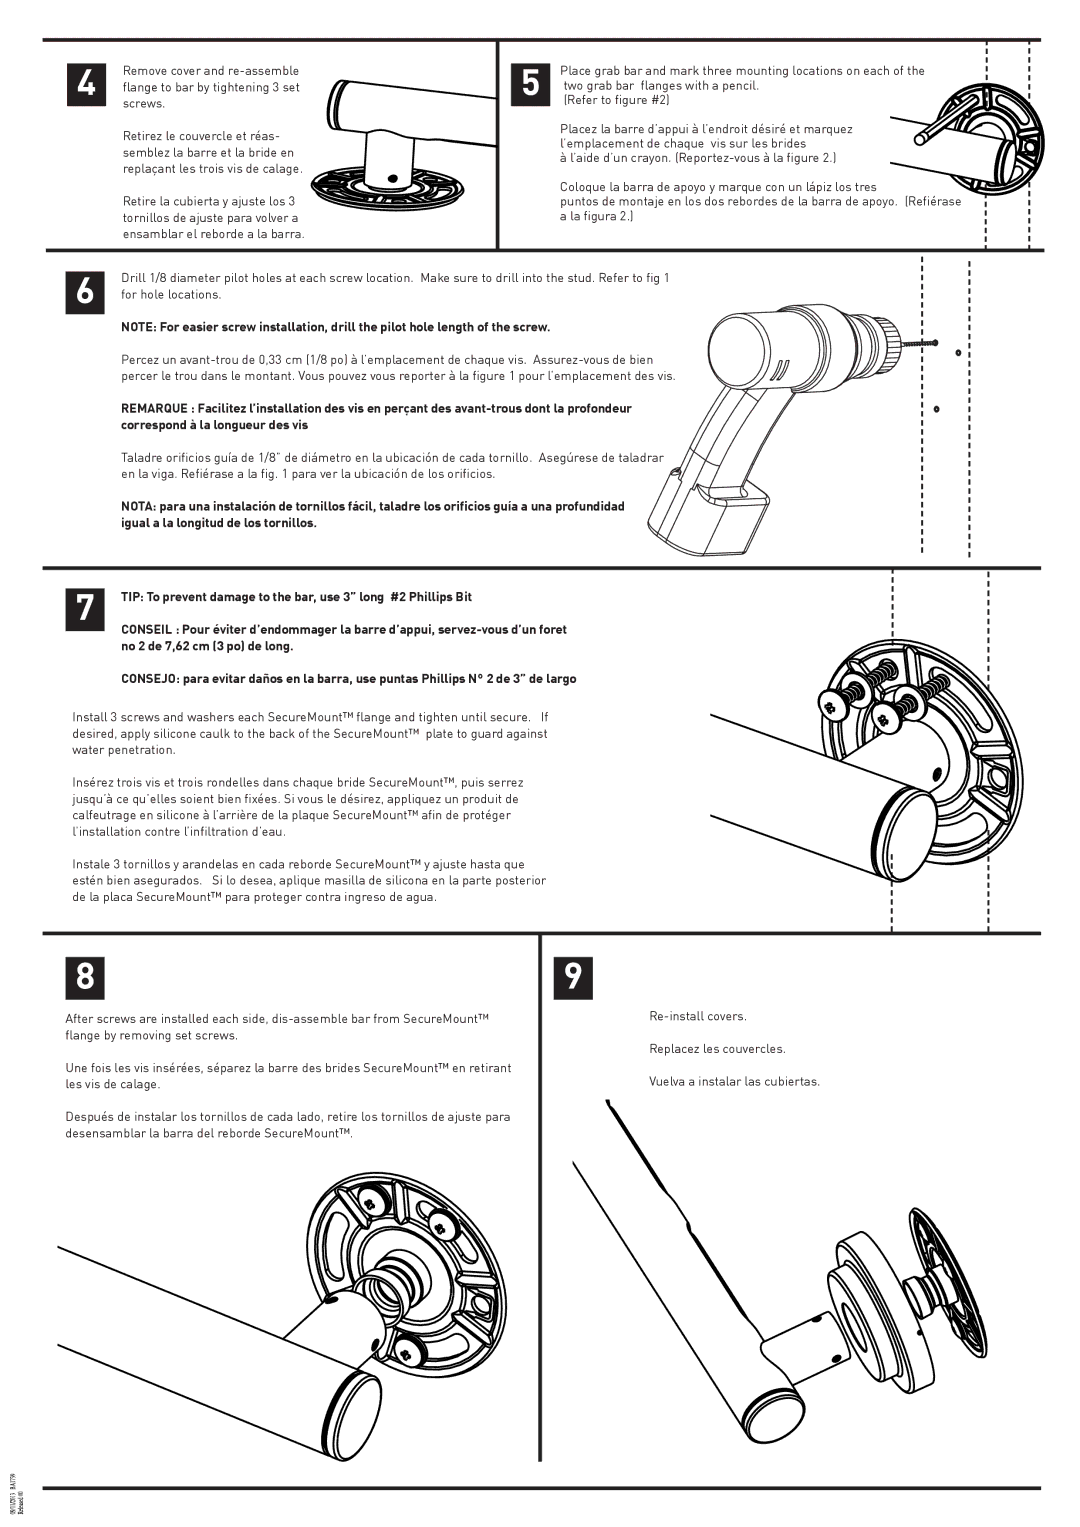
Remove cover and re-assemble


flange to bar by tightening 3 set


screws.


Retirez le couvercle et réas-


semblez la barre et la bride en


replaçant les trois vis de calage.


Retire la cubierta y ajuste los 3


tornillos de ajuste para volver a


ensamblar el reborde a la barra.

5

Place grab bar and mark three mounting locations on each of the

two grab bar flanges with a pencil.


(Refer to figure #2)

Placez la barre d’appui à l’endroit désiré et marquez l’emplacement de chaque vis sur les brides

à l’aide d’un crayon. (Reportez-vous à la figure 2.)

Coloque la barra de apoyo y marque con un lápiz los tres

puntos de montaje en los dos rebordes de la barra de apoyo. (Refiérase a la figura 2.)


Drill 1/8 diameter pilot holes at each screw location. Make sure to drill into the stud. Refer to fig 1


6


for hole locations.


NOTE: For easier screw installation, drill the pilot hole length of the screw.


Percez un avant-trou de 0,33 cm (1/8 po) à l’emplacement de chaque vis. Assurez-vous de bien


percer le trou dans le montant. Vous pouvez vous reporter à la figure 1 pour l’emplacement des vis.


REMARQUE : Facilitez l’installation des vis en perçant des avant-trous dont la profondeur


correspond à la longueur des vis


Taladre orificios guía de 1/8” de diámetro en la ubicación de cada tornillo. Asegúrese de taladrar


en la viga. Refiérase a la fig. 1 para ver la ubicación de los orificios.


NOTA: para una instalación de tornillos fácil, taladre los orificios guía a una profundidad


igual a la longitud de los tornillos.


7

TIP: To prevent damage to the bar, use 3” long #2 Phillips Bit

CONSEIL : Pour éviter d’endommager la barre d’appui, servez-vous d’un foret no 2 de 7,62 cm (3 po) de long.

CONSEJO: para evitar daños en la barra, use puntas Phillips N° 2 de 3” de largo

Install 3 screws and washers each SecureMount™ flange and tighten until secure. If desired, apply silicone caulk to the back of the SecureMount™ plate to guard against water penetration.

Insérez trois vis et trois rondelles dans chaque bride SecureMount™, puis serrez jusqu’à ce qu’elles soient bien fixées. Si vous le désirez, appliquez un produit de calfeutrage en silicone à l’arrière de la plaque SecureMount™ afin de protéger l’installation contre l’infiltration d’eau.

Instale 3 tornillos y arandelas en cada reborde SecureMount™ y ajuste hasta que estén bien asegurados. Si lo desea, aplique masilla de silicona en la parte posterior de la placa SecureMount™ para proteger contra ingreso de agua.

8

After screws are installed each side, dis-assemble bar from SecureMount™ flange by removing set screws.

Une fois les vis insérées, séparez la barre des brides SecureMount™ en retirant les vis de calage.

Después de instalar los tornillos de cada lado, retire los tornillos de ajuste para desensamblar la barra del reborde SecureMount™.

9

Re-install covers.

Replacez les couvercles.

Vuelva a instalar las cubiertas.

Page 3
Image 3
Moen Iso installation instructions Correspond à la longueur des vis, Igual a la longitud de los tornillos

Iso specifications

Moen Iso is an innovative line of faucets designed to blend modern aesthetics with exceptional functionality. Known for its sleek and minimalist design, the Moen Iso collection appeals to contemporary homeowners who value both style and practicality in their kitchen and bathroom fixtures.

One of the standout features of the Moen Iso faucets is their high arc swivel spout, which provides ample space for filling large pots and pans, making daily tasks more convenient. Additionally, the faucet is designed with a single-handle lever that allows for easy temperature and flow control, ensuring a smooth user experience. This ergonomic design caters to the busy lifestyles of modern families, saving time and effort during food preparation and other tasks.

Moen Iso faucets are equipped with advanced technologies that enhance their usability and efficiency. The Power Clean spray technology offers a powerful, focused stream of water that is perfect for tackling tough messes without the need for excessive effort. This feature is particularly useful in the kitchen, where food residue and grease can be challenging to clean.

Another significant characteristic of the Moen Iso line is the inclusion of Spot Resist Stainless finish. This innovative finish resists fingerprints and water spots, ensuring that the faucet maintains its sleek appearance over time. Homeowners can enjoy a clean-looking fixture without constant cleaning and maintenance, making it ideal for busy households.

In terms of installation, Moen Iso faucets come with the Duralast cartridge, designed for longevity and smooth operation. This cartridge provides consistent performance over the years, reducing the need for frequent repairs or replacements. The faucets are also easy to install, making them a practical choice for DIY enthusiasts who prefer to tackle plumbing projects themselves.

Moreover, the Moen Iso collection is designed with sustainability in mind. The faucets are WaterSense certified, meaning they adhere to strict water efficiency standards, helping homeowners save on water bills while being environmentally friendly.

In summary, the Moen Iso line of faucets showcases a harmonious blend of modern design, advanced technology, and user-friendly features. With its high arc spout, Spot Resist Stainless finish, Power Clean technology, and commitment to sustainability, the Moen Iso is an excellent choice for any home looking to enhance its kitchen or bathroom space while enjoying reliable performance and elegant style.