Pour Demonter

AVERTISSEMENT: Fermer les DEUX alimintations d'eau et ouvrez les DEUX poignées du robinet, afin de détendre la pres- sion de l'eau et de vous assurer que l'eau a été COMPLETEMENT fermée.

Ces instructions s'appliquent à la fois aux côté chaud et froid. Les piéces et les procedures sont les mêmes pour chaque côté.

1.Avec la lame d'un cuteau ôtez le couvercle de la poignée.

2.Otez la vis de la poignée avec un tounevis.

3.Otez le bouton de la poignée, la poignée triangulaire deluxe, ou la poignée stylisée en tirant vers le haut.

4.Dévissez l'écrou de la cartouche en utilisant une paire de pinces.

5.Retirez la cartouche en prenant la tige de la cartouche entre des pinces et tirez vers le haut.

HANDLE LUG

ERGOT DE POIGNEE

Pour Assembler

ADVERTISSEMENT: Le fait de ne pas suivre ces instructions pourrait endom- mager la cartouche au point qu'elle ne puisse être réparée.

CARTRIDGE

STEM

TIGE DE

CARTOUCHE

1.Tournez la tige de la cartouche vers la GAUCHE (sense contraire des aiguilles d'une montre) jusqu'a la position ouverte (le trou a l'intérieur du piston est aligne avec le trou dans la cartouche). Poussez la cartouche au fond du bâti. Ceci mettra l'arrêt de la poignée en place dans le côté de la cartouche.

2.Vissez l'écrou de la cartouche. Commencez à serrer à la main et N'ECRASEZ PAS LES FILETS. Serrez fermement avec une paire de pinces.

3.AVERTISSEMENT: Assurez-vous que l'autre cartouche du côté opposé est entierement assemblée dans le robinet.

HANDLE STOP

ARRET DE POIGNEE

CARTRIDGE

STEM

TIGE DE

CARTOUCHE

4.Il est maintenant possible d'instller le bouton de la poignée. (Note: pour les modéles a poignée stylises, voir l'illustration). Faites en sorte que les bords plats du bouton de la poignée correspondent avec les bords plats de la tige de la cartouche et laissez retomber le bouton de la poignée sur la tige. NOTE: le numero 90227 et 90228 sont donnés uniquiement à titre de référence pour l'installation. Pour le remplacement de la poignée veuillez vous référrer à la liste des pièces de rechange.

5.Serrez fermement la vis de la poignée. Ne serrez pas trop. Avec une pression du doigt

mettez le couvercle de la poignée en place.

AVERTISSEMENT: Avant d'ouvrir les alimentations d'eau, fermez les poignées du robinet ceci afin d'éviter une inondation accidentelle.

Lavatory Lift Rod and Waste Assembly

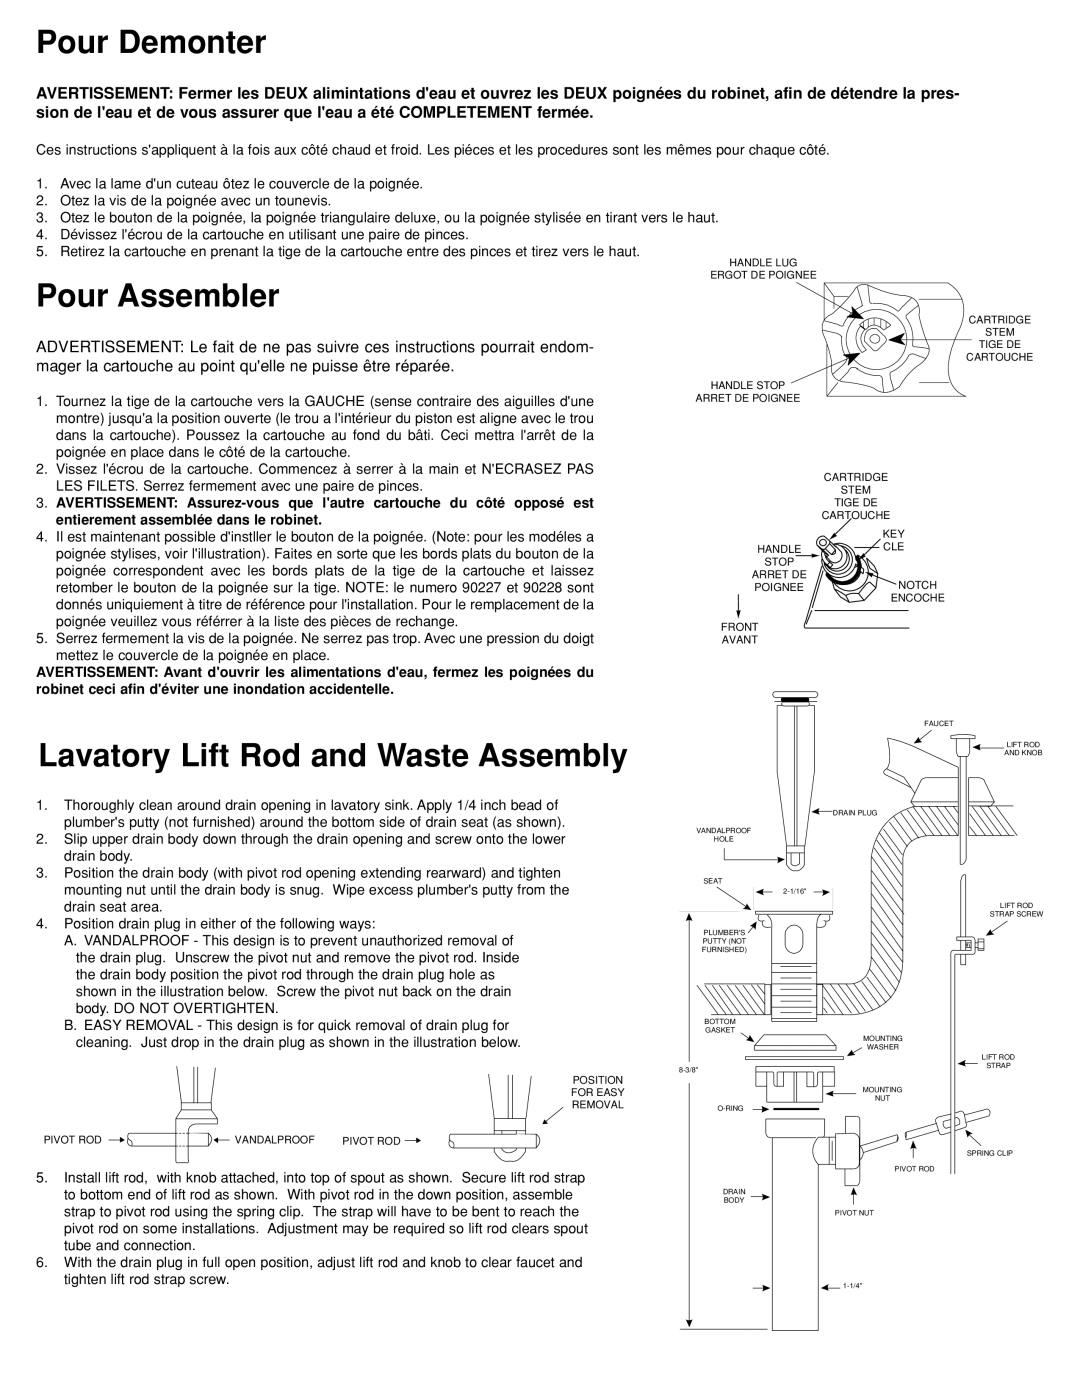
1.Thoroughly clean around drain opening in lavatory sink. Apply 1/4 inch bead of plumber's putty (not furnished) around the bottom side of drain seat (as shown).

2.Slip upper drain body down through the drain opening and screw onto the lower drain body.

3.Position the drain body (with pivot rod opening extending rearward) and tighten mounting nut until the drain body is snug. Wipe excess plumber's putty from the drain seat area.

4.Position drain plug in either of the following ways:

A.VANDALPROOF - This design is to prevent unauthorized removal of the drain plug. Unscrew the pivot nut and remove the pivot rod. Inside the drain body position the pivot rod through the drain plug hole as shown in the illustration below. Screw the pivot nut back on the drain body. DO NOT OVERTIGHTEN.

B.EASY REMOVAL - This design is for quick removal of drain plug for cleaning. Just drop in the drain plug as shown in the illustration below.

KEY

HANDLECLE

STOP

ARRET DE

POIGNEENOTCH

ENCOCHE

FRONT

AVANT

FAUCET

LIFT ROD

AND KNOB

DRAIN PLUG

VANDALPROOF

HOLE

SEAT

2-1/16"

LIFT ROD

STRAP SCREW

PLUMBER'S

PUTTY (NOT

FURNISHED)

BOTTOM

GASKET

MOUNTING WASHER

LIFT ROD

8-3/8"

STRAP

POSITION

FOR EASY

REMOVAL

PIVOT ROD

VANDALPROOF

PIVOT ROD

5.Install lift rod, with knob attached, into top of spout as shown. Secure lift rod strap to bottom end of lift rod as shown. With pivot rod in the down position, assemble strap to pivot rod using the spring clip. The strap will have to be bent to reach the pivot rod on some installations. Adjustment may be required so lift rod clears spout tube and connection.

6.With the drain plug in full open position, adjust lift rod and knob to clear faucet and tighten lift rod strap screw.

MOUNTING

NUT

O-RING

SPRING CLIP

PIVOT ROD

DRAIN

BODY

PIVOT NUT

1-1/4"

Page 3
Image 3
Moen MB074D installation instructions Pour Demonter, Pour Assembler, Lavatory Lift Rod and Waste Assembly

MB074D specifications

The Moen MB074D is a modern kitchen faucet that stands out for its innovative features and sleek design. Crafted by Moen, a leader in the plumbing fixture industry, this faucet combines functionality with a touch of sophistication, making it an excellent choice for contemporary kitchens.

One of the main features of the MB074D is its versatile pull-down spray functionality. The faucet incorporates both a powerful stream and a spray mode, allowing users to switch between different water flow types with ease. This flexibility makes it perfect for various kitchen tasks, from rinsing vegetables to washing large pots. The pull-down design offers extended reach, ensuring that every corner of the sink is easily accessible.

The MB074D is equipped with Moen's patented Reflex technology. This advanced engineering design allows for smooth operation and effortless retraction of the spray head. Thanks to this feature, the hose retracts smoothly and securely back into place, preventing unwanted sagging and ensuring that the sink area remains tidy.

With a beautiful and durable finish, the MB074D is built to withstand the rigors of daily use. It is available in various finishes, including chrome and stainless steel, enabling homeowners to choose a look that complements their kitchen decor. The finish is not only aesthetically pleasing but also resistant to fingerprints and water spots, maintaining its polished look even after repeated use.

Installation of the Moen MB074D is straightforward, thanks to its Duralock Quick Connect system. This feature simplifies the plumbing process, allowing for a faster and more efficient installation without the need for specialized tools. The faucet also comes with a limited lifetime warranty, giving users peace of mind regarding its quality and performance.

Another notable characteristic of the MB074D is its WaterSense certification. This means the faucet is designed to conserve water without sacrificing performance. By using less water, homeowners can reduce their environmental footprint while saving on utility bills.

Overall, the Moen MB074D combines stylish design with top-notch technology and practical features. It is an ideal addition to any modern kitchen, offering convenience, efficiency, and elegance, making everyday tasks a pleasure rather than a chore.