Monarch 9460 ADK Printer
Trademarks
TA B L E O F C O N T E N T S
Command Reference
Table of Contents
Sample Script
W t o U s e t h i s M a n u a l
E v i e w o f T e r m s
2Overview
S t e m R e q u i r e m e n t s
Install i n g t h e S o f t w a r e
N n e c t i n g t h e P r i n t e r
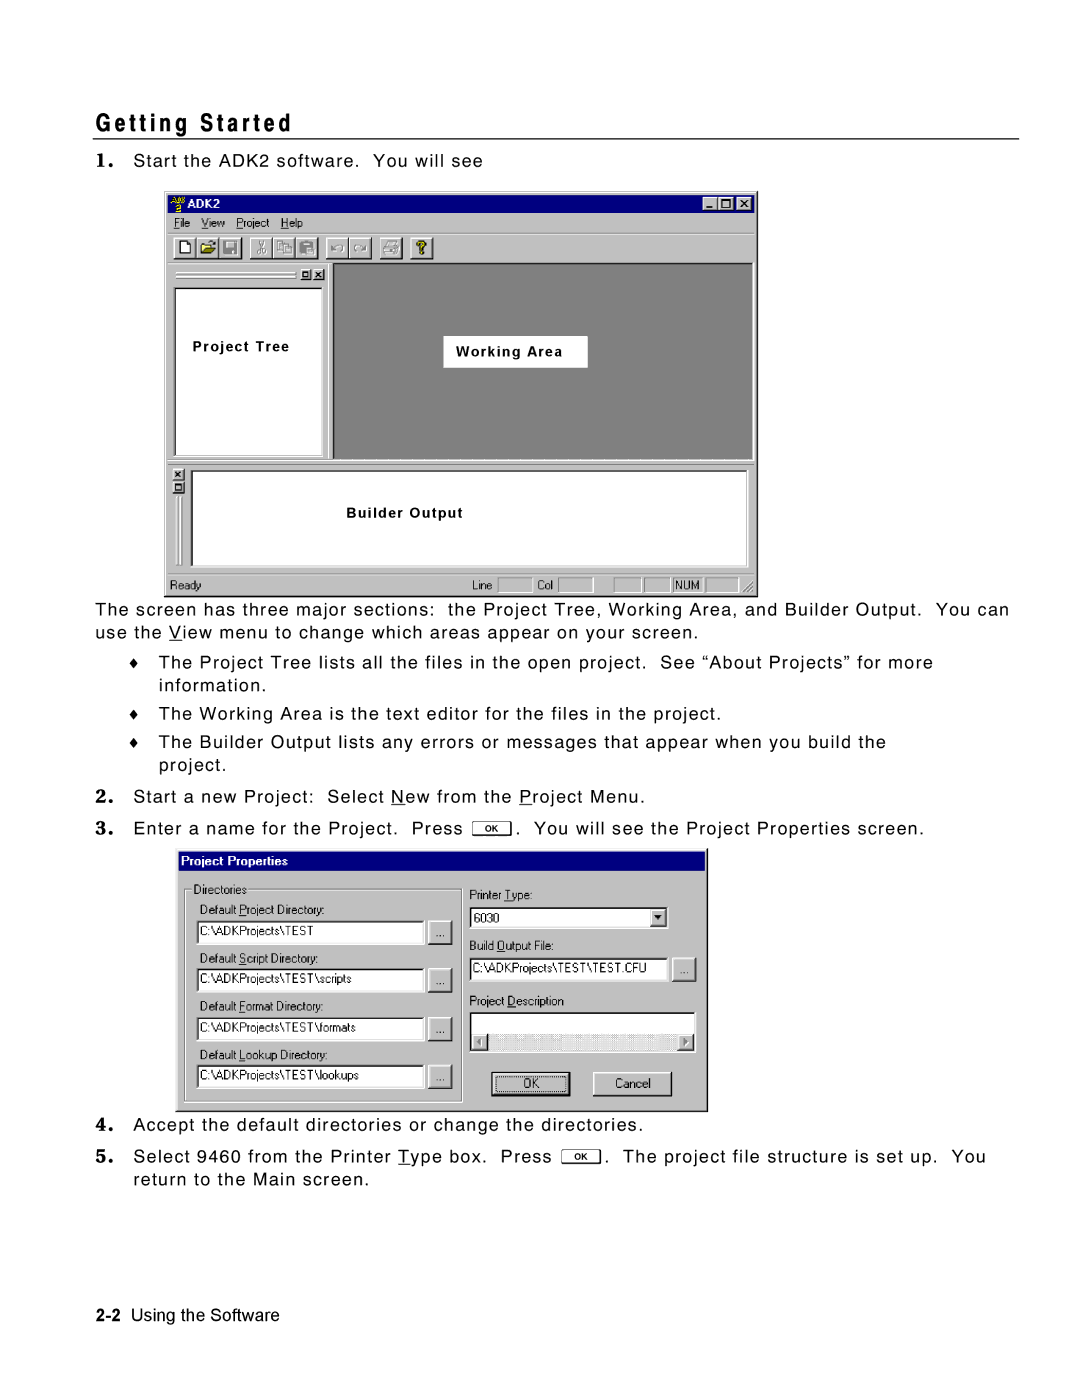
T t i n g S t a r t e d
Page
V i n g a F i l e
O u t P r o j e c t s
I l d i n g P r o j e c t s
A n g i n g t h e D o w n l o a d S e t t i n g s
If you select COM1 COM4
If you select LPT1 LPT2
I t i n g E x i s t i n g P r o j e c t s
W n l o a d i n g a P r o j e c t
If you select Tcpip
8Using the Software
S p l a y i n g t h e R e a d y P r o m p t
C e s s i n g t h e T o o l b o
A d i n g a p p l i c a t i o n s
Choose Tool Box
Begin
N c t i o n s
END
L e s a n d B u f f e r s
A r t i n g a S c r i p t
Function Start Begin
O p e o f F i e l d N a m e s
ADD Control , TEMP1 , *ERROR2, *SUCCESS2
R i p t F l o w C o n t r o l
T a S t o r a g e
M m e n t s i n a S c r i p t
T a C o d i n g
O g r a m m i n g C o n v e n t i o n s
E l d N a m e s
Y w o r d s
Command Reference
E c i a l C h a r a c t e r s
When a label is defined
When a label is not defined
R i p t F l o w
R i p t C o n t r o l C o m m a n d s
N c t i o n a l R e l a t i o n s h i p s
T h C o m m a n d s
M p i l e r D i r e c t i v e s
T a M a n i p u l a t i o n C o m m a n d s
L e M a n a g e m e n t C o m m a n d s
P u t / O u t p u t C o m m a n d s
Example
ADD CONTROL,TEMP1,*ERROR2
Buffer-field 1
ADD WHOLESALE,TEMP2
P V E R S I O N
Appversion AP11, VER
Index
G R E a D
Raw-Data, Destination,
Argread PARAMLIST, PARAM1, #1
Int-field only
ASC int-field,asc-field
Int-field and Asc-field
ASC TAINT, Taascii
T O S T a R T
Autostart
Device
A I L a B L E D a T a
Availabledata device , invalid label , valid label
Availabledata COMM, , *CHARLN
Asc-field and Int-field
T C L E a R
Bitclear TEMP1, #2
Buffer-field1 and Buffer
T M a S K
Operation
Field2
Buffer-field
T S E T
Both buffer-field1 and bit-position must be numeric
Bit-position
Buffer-field1 and count
T S H I F T
Direction
Bitshift LEFT, TEMP1, #1
Buffer-field1
T T E S T
Bittest TEMP1, #2, *CLEARED
Bsearch lookup-field,value , invalid label , valid label
Bsearch CONTROLID, INPUT, *ERRORID
E a R C H
Value
Param
L L
Call function-name param1, param2, …,paramX
Call Computetax
END Function Addnum Begin
Function Start
Call
ADD
A R T Y P E
Chartype type , buffer-field1
Using type and buffer-field1
Type
Check item , buffer-field , invalid label , valid label
E C K
Value Description
Check BATTERY, *LOWBATTERY
CHR asc-field,int-field
CHR TAASCII, Taint
Clear Printer
E a R
Clear TEMP1
Commport
O S E C O M M
Closecomm #1
No valid label
M P a R E
Modifier
Is no invalid label
Source and Destination
N C a T
Concat SKU,BCFIELD
Buffer2
T R I P
Field-buffer1 and Field
Field-buffer2 only
Data-type
T a T Y P E
Datatype Alphanumeric
Buffer Field
DEC buffer-field , invalid label , valid label
DEC Tempsku
F I N E
Define TEMPORARY,CURRQTY,4,N
Delay Timeout
Delay #interval
Delay #20
L a Y
Hotkey1, Hotkey2,
Disable F1, F2, F3
S a B L E
Hotkey3
V I D E
Divide CONTROL,TEMP1,*ERROR2
Divide PRICE,#100,*ERROR2
Buffer Field1
Enable F1, F2, F3
A B L E
I T
Exit
Fetch src1 , src2 , invalid label , valid label
T C H
Src1 and Src2
E L D L E N
Fieldlen WHOLESALE,TEMP2
X D a T a
Fixdata buffer-field1
Buffer-field and Type
N E R a T E
Generate INPUT, #2
Minimum and Maximum
Examplef
Key
T K E Y
Hotkey key, function-name
Hotkey F3, Querylookup
Elseif buffer-field2 comparison buffer-field4
Buffer-field1 comparison buffer-field2
Buffer-fields
Comparison Description
INC buffer-field , invalid label , valid label
INC COUNT01
Include TRUCKIN.ULT
C L U D E
Include C\PROGS\SAMPLE\SPECIAL.ULT
Overwrite-flag
S E R T
Position
M P
Jump *REQUESTSKU
Labelcount buffer-field1 , invalid label , valid label
B E L C O U N T
Labelcount Numoflabels
Left SHIPNO,SKU,#5
F T
Left SHIPNO,SKU,NUMCHARS
N K F I L E
Linkfile CHCKDGIT.PKT
Row-position and col-position can be one of the following
C a T E
Locate row-position, col-position
Source
W E R
Lower Tempsku
Field-buffer1 and Field Buffer2 only
Field-buffer1, Field
Buffer2, and Field Buffer3
Field-buffer3 only
Macro-body
C R O
Macro macro-name
Defining the Macro
Compare
Macro Ptridle Begin Move Check
Move PIEND$
Buffer-field1, start, Length only
Buffer-field1, 2, Start
MID LOCATION,TEMP1,#5,#5
V E
Move source, destination , invalid label , valid label
Destination
Move INPUT,CONTROLID
Multiply buffer-field1 ,buffer-field2 , invalid label
Multiply PRICE,TEMP1,*ERROR2
L T I P L Y
Valid label
Commport and Timeout
Opencomm commport, timeout
E N C O M M
Max-length
Pad-field, Pad-character
PAD L,PRICEFIELD,*,LPRICE
Parse invalid label , valid label
R S E
Parse
Quantity
I N T
Format-number
Format-number and quantity must be numeric
Comparison
E R Y
Buffer-field2
Is numeric, buffer-field2must be numeric
Command again to ensure a valid record pointer
Rule
Control passes to the *PROCESSID
Record
A D
Read record table-name , invalid label , valid label
Read Lookup
Clear Display Move
Restorescreen
S T O R E S C R E E N
Savescreen Clear Display Move
Compare FSIZE,EQ,#12,,*GOODDATA
T U R N
Return
Buffer-field1, 2
G H T
Right buffer-field1 ,buffer-field2 ,length , invalid label
Right SHIPNO,SKU,#5
Length
Buffer-field1,Buffer-field2
Rstrip SHIPNO, SKU, #5
V E S C R E E N
Savescreen
File-type
E K
To modifier
Seek NEXT,LOOKUPFILE,*EOFLABEL
SUB CONTROLID,TEMP1
Switch buffer-field1 Case buffer-field
I T C H
While
Sysset function, parameter1, parameter2
S S E T
Function/Description Parameter1 Parameter2
192 * width in inches 192 * length in inches
Sysset PROMPTS, #1
Token Delimeter character , invalid label , valid label
K E N
Character, buffer-field1
Buffer-field1 and Buffer-field2
Buffer-field1 and buffer-field2 can be one of the following
Buffer-field2 only
P E R
Upper Tempsku
Source and Type
L I D a T E
Validate source, type Invalid label , valid label
Validate Input #2
I L E
While buffer-field1 comparison buffer-field2
Ptridle
While
Endwhile
88Command Reference
M P L E S C R I P T
Concat
Concat 13,~034FISHING ROD~034, Scratch
Concat R,1,~034MIAMISBURG OH 45342~034, Scratch
Scratch
Scratch Concat
Concat R,1,~034170 Monarch LANE~034, Scratch
DEPT#25~034, Scratch
D E
Page
Page
Index