SAFETY TIPS

WARNING: TO REDUCE THE RISK OF FIRE, ELECTRIC SHOCK, OR INJURY TO PERSONS,

OBSERVE THE FOLLOWING: READ AND SAVE THESE INSTRUCTIONS

1.Installation work and electrical wiring must be done by qualified person(s) in accordance with applicable codes ANSI/NFPA 70-1999),

2.including fire-rated construction.

3.Use this unit only in the manner intended by the manufacturer. If you have any questions contact the manufacturer.

After making the wire connections, the wires should be spread apart with the grounded conductor and the equipment-grounding con-

4.ductor on one side of the outlet box and ungrounded conductor on the other side of the outlet box.

Before you begin installing the fan, Switch power off at Service panel and lock service disconnecting means to prevent power from being switched on accidentally. When the service disconnecting means cannot be locked, securely fasten a prominent warning device,

5.such as a tag, to the service panel.

6.Be cautious! read all instructions and safety information before installing your new fan. Review the accompanying assembly diagrams.

7.When cutting or drilling into wall or ceiling, do not damage electrical wiring and other hidden utilities.

Make sure the installation site you choose allows the fan blades to rotate without any obstructions. Allow a minimum clearance of 7

8.feet from the floor to the trailing edge of the blade.

To reduce the risk of fire, electric shock, or personal injury, mount to outlet box or supporting system acceptable for fan support and

9.use only the screws provided with the outlet box. (Mounting must support at least 35 lbs.)

Do not bend blade holders during installation to motor, balancing or during cleaning. Do not insert foreign object between rotating

10.blades.

11.Attach the mounting bracket using only the hardware supplied with the outlet box.

12.To reduce the risk of fire or electric shock, do not use this fan with any solid state fan speed control device, or variable speed control. The combustion airflow needed for safe operation of fuel-burning equipment may be affected by this unit’s operation. Follow the heat- ing equipment manufacturer’s guideline safety standards such as those published by the National Fire Protection Association (NFPA),

13.and the American Society for Heating, Refrigeration and Air Conditioning Engineers (ASHRAE) and the local code authorities.

Before servicing or cleaning unit, Switch power off at Service panel and lock service disconnecting means to prevent power from being switched on accidentally. When the service disconnecting means cannot be locked, securely fasten a prominent warning device, such

14.as a tag, to the service panel.

Air flow direction: warm weather - switch to left - forward / cool weather - switch to right - reverse


Phillips Screwdriver

Wire Cutters

Pliers

1

2


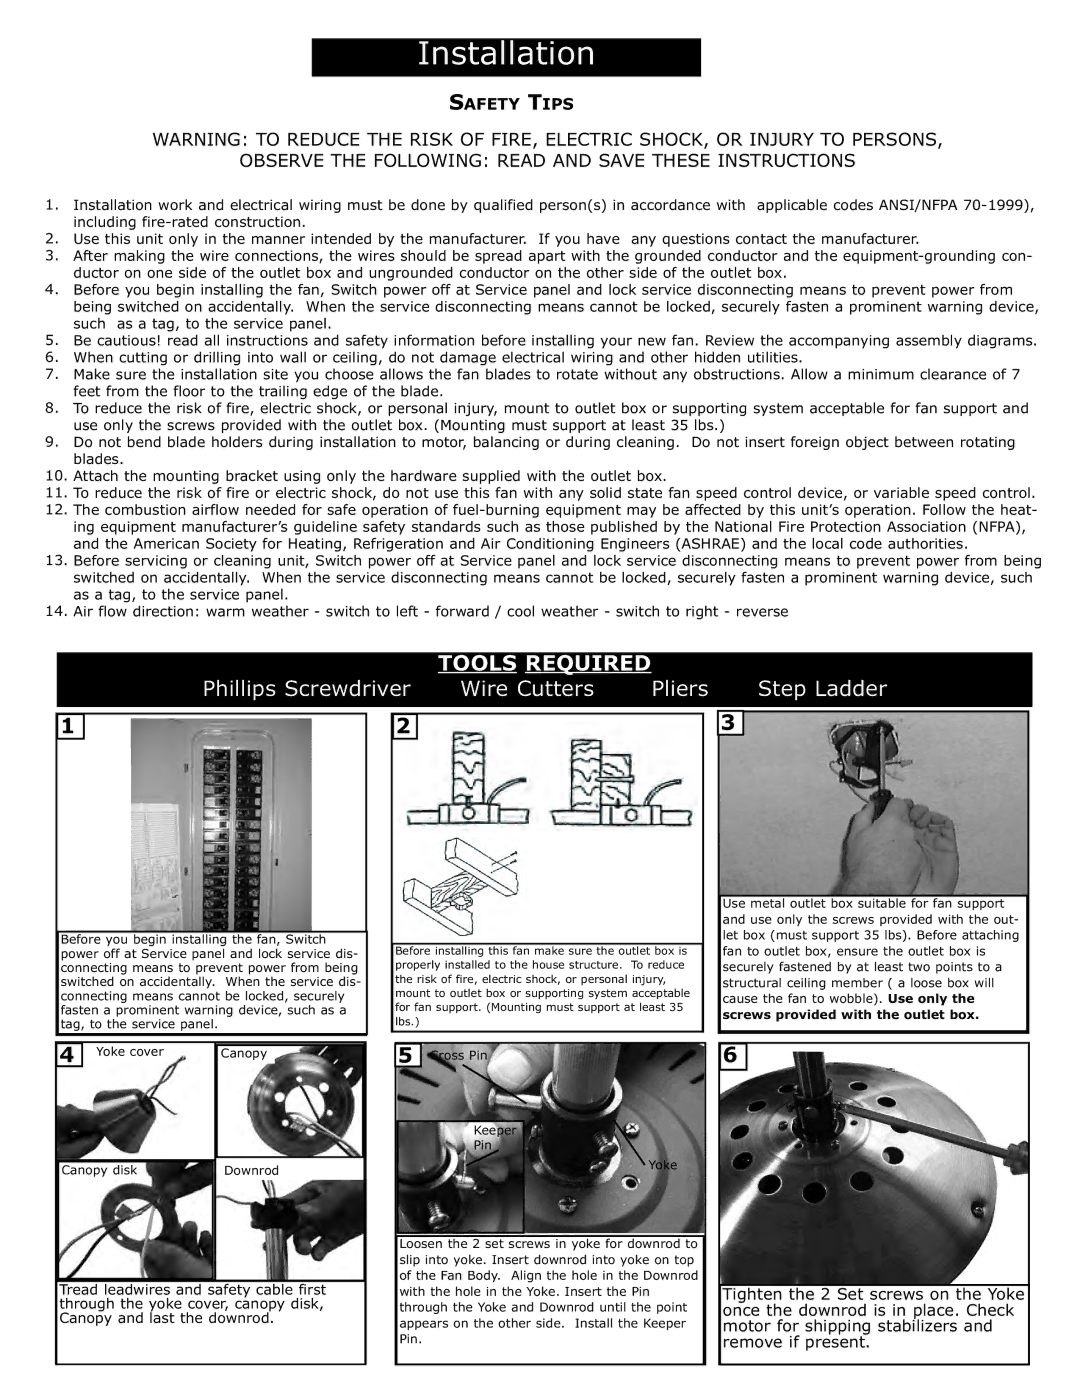
Before you begin installing the fan, Switch


power off at Service panel and lock service dis-


Before installing this fan make sure the outlet box is


connecting means to prevent power from being


properly installed to the house structure. To reduce


switched on accidentally. When the service dis-


the risk of fire, electric shock, or personal injury,


connecting means cannot be locked, securely


mount to outlet box or supporting system acceptable


fasten a prominent warning device, such as a


for fan support. (Mounting must support at least 35


tag, to the service panel.


lbs.)


4


Yoke cover


Canopy


5


Cross Pin


Keeper


Canopy disk


Pin


Yoke


Downrod


Loosen the 2 set screws in yoke for downrod to


slip into yoke. Insert downrod into yoke on top


of the Fan Body. Align the hole in the Downrod


Tread leadwires and


safety cable first


with the hole in the Yoke. Insert the Pin


through the yoke cover, canopy disk,


through the Yoke and Downrod until the point


Canopy and last the downrod.


appears on the other side. Install the Keeper


Pin.


3Step Ladder

Use metal outlet box suitable for fan support and use only the screws provided with the out- let box (must support 35 lbs). Before attaching fan to outlet box, ensure the outlet box is securely fastened by at least two points to a structural ceiling member ( a loose box will cause the fan to wobble). Use only the screws provided with the outlet box.

6

Tighten the 2 Set screws on the Yoke once the downrod is in place. Check motor for shipping stabilizers and remove if present.

Page 2
Image 2
Monte Carlo Fan Company 5MS52 Such as a tag, to the service panel, Safety cable first, Through the yoke cover, canopy disk

5MS52 specifications

The Monte Carlo Fan Company 5MS52 is a highly regarded ceiling fan that blends contemporary style with advanced technology, making it an ideal choice for modern living spaces. Measuring 52 inches in diameter, the 5MS52 is designed to efficiently circulate air, providing comfort in both warm and cool conditions.

One of the standout features of the Monte Carlo 5MS52 is its elegant design, which includes a sleek motor housing and stylish blades available in various finishes. The fan's aesthetic appeal makes it a versatile addition to diverse decor styles, from minimalist to transitional. The blades are designed for optimal airflow while adding a touch of sophistication to any room.

The 5MS52 is equipped with a powerful, energy-efficient motor that ensures quiet operation. This is an important consideration for homeowners who seek comfort without the distraction of noise. Additionally, the fan can be mounted in multiple configurations, including standard, angled, or flush mount, allowing it to fit seamlessly in any space, whether it's a living room, bedroom, or patio.

Another key feature is the integrated LED light kit, providing illumination while enhancing energy efficiency. The dimmable light allows users to adjust brightness levels, ensuring the perfect ambiance for any occasion. The ability to control both the fan speed and lighting through a remote control adds to the convenience, giving users complete command from anywhere in the room.

Monte Carlo incorporates cutting-edge technologies into the 5MS52, such as reversible motor functionality, enabling the fan to efficiently switch between the downdraft mode for cooling and the updraft mode for warming during cooler months. This versatility makes it a year-round solution for climate control.

Furthermore, the fan features a clean and easy installation process, ensuring that even those who are not particularly handy can set it up with relative ease. It is also compatible with universal remote controls and smart home systems, making it increasingly popular in smart homes.

In summary, the Monte Carlo Fan Company 5MS52 is a well-rounded ceiling fan that effectively combines style, functionality, and modern technology. Its sleek design, efficient motor, LED lighting, and ease of installation make it a top choice for homeowners looking to enhance their interiors while maintaining comfort throughout the year.