Description of Controls and Functions (con.) | Locations of |
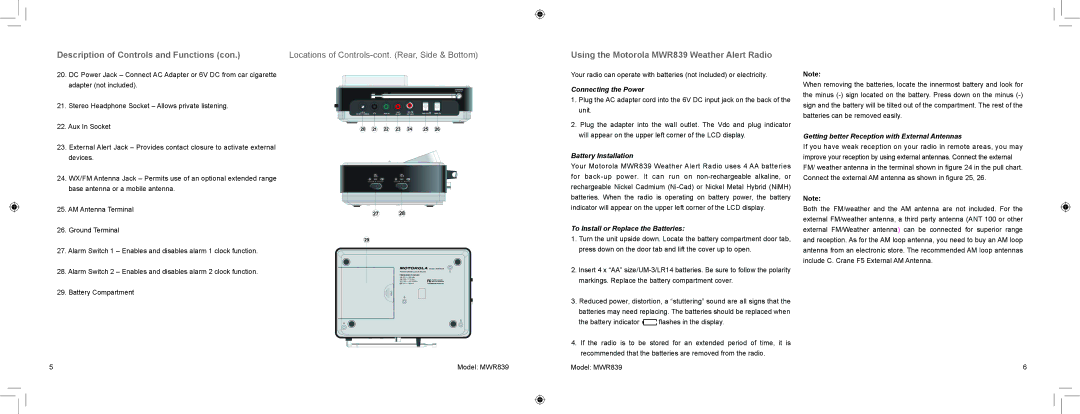
20.DC Power Jack – Connect AC Adapter or 6V DC from car cigarette adapter (not included).
21.Stereo Headphone Socket – Allows private listening.
22.Aux In Socket
23.External Alert Jack – Provides contact closure to activate external devices.
24.WX/FM Antenna Jack – Permits use of an optional extended range base antenna or a mobile antenna.
25.AM Antenna Terminal
26.Ground Terminal
27.Alarm Switch 1 – Enables and disables alarm 1 clock function.
28.Alarm Switch 2 – Enables and disables alarm 2 clock function.
29.Battery Compartment
5 | Model: MWR839 |
Using the Motorola MWR839 Weather Alert Radio
Your radio can operate with batteries (not included) or electricity.
Connecting the Power
1.Plug the AC adapter cord into the 6V DC input jack on the back of the unit.
2.Plug the adapter into the wall outlet. The Vdc and plug indicator will appear on the upper left corner of the LCD display.
Battery Installation
Your Motorola MWR839 Weather Alert Radio uses 4 AA batteries for
To Install or Replace the Batteries:
1.Turn the unit upside down. Locate the battery compartment door tab, press down on the door tab and lift the cover up to open.
2.Insert 4 x “AA”
3.Reduced power, distortion, a “stuttering” sound are all signs that the batteries may need replacing. The batteries should be replaced when
the battery indicator ![]() flashes in the display.
flashes in the display.
4.If the radio is to be stored for an extended period of time, it is recommended that the batteries are removed from the radio.
Model: MWR839
Note:
When removing the batteries, locate the innermost battery and look for the minus
Getting better Reception with External Antennas
If you have weak reception on your radio in remote areas, you may improve your reception by using external antennas. Connect the external FM/ weather antenna in the terminal shown in figure 24 in the pull chart. Connect the external AM antenna as shown in figure 25, 26.
Note:
Both the FM/weather and the AM antenna are not included. For the external FM/weather antenna, a third party antenna (ANT 100 or other external FM/Weather antenna) can be connected for superior range and reception. As for the AM loop antenna, you need to buy an AM loop antenna from an electronic store. The recommended AM loop antennas include C. Crane F5 External AM Antenna.
6