SECTION 2: ASSEMBLING YOUR TILLER

NOTE: References to right or left side of the tiller are determined from behind the unit in the operating position.

To Remove Unit From Carton

Remove staples, break glue on top flaps, or cut tape at carton end and peel along top flap to open carton.

Remove loose parts included with unit (i.e., operator’s manual, etc.).

Cut corners and lay carton down flat.

Remove packing material.

Roll or slide unit out of carton. Check carton thoroughly for loose parts.

Extend control cable and lay on the floor. Be careful not to bend or kink control cable.

IMPORTANT: This unit is shipped without gasoline or oil in the engine. Be certain to service engine with gasoline and oil as instructed in the separate engine manual before operating your machine.

Loose Parts In Carton

Depth Stake

Handle Assembly

Shift Rod

NOTE: All hardware needed for assembly is attached to the loose parts or the tiller.

Before Assembly

WARNING: Disconnect the spark plug wire and ground it against the engine to prevent unintended starting.

Attaching Depth Stake

Tip the tiller forward so it rests on front counterweight.

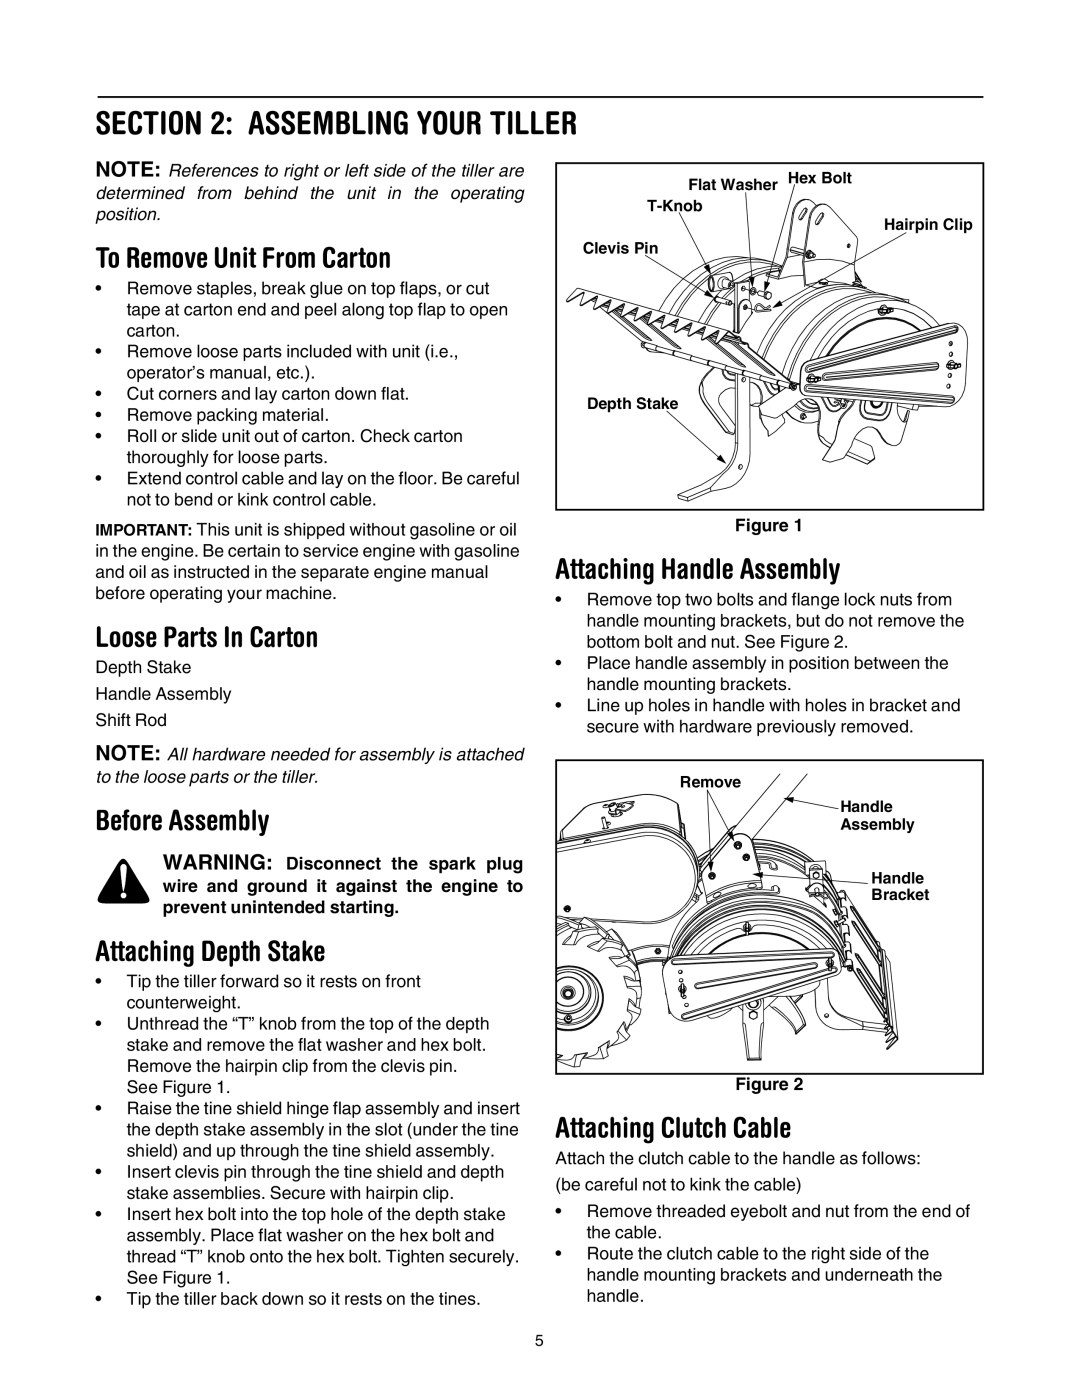
Unthread the “T” knob from the top of the depth stake and remove the flat washer and hex bolt. Remove the hairpin clip from the clevis pin.

See Figure 1.

Raise the tine shield hinge flap assembly and insert the depth stake assembly in the slot (under the tine shield) and up through the tine shield assembly.

Insert clevis pin through the tine shield and depth stake assemblies. Secure with hairpin clip.

Insert hex bolt into the top hole of the depth stake assembly. Place flat washer on the hex bolt and thread “T” knob onto the hex bolt. Tighten securely. See Figure 1.

Tip the tiller back down so it rests on the tines.

Flat Washer

Hex Bolt

T-Knob


Hairpin Clip

Clevis Pin


Depth Stake


Figure 1

Attaching Handle Assembly

Remove top two bolts and flange lock nuts from handle mounting brackets, but do not remove the bottom bolt and nut. See Figure 2.

Place handle assembly in position between the handle mounting brackets.

Line up holes in handle with holes in bracket and secure with hardware previously removed.

Remove

Handle

Assembly

Handle

Bracket

Figure 2

Attaching Clutch Cable

Attach the clutch cable to the handle as follows:

(be careful not to kink the cable)

Remove threaded eyebolt and nut from the end of the cable.

Route the clutch cable to the right side of the handle mounting brackets and underneath the handle.

5

Page 5
Image 5
MTD 454 manual Assembling Your Tiller

454 specifications

The MTD 454 is a powerful and versatile machine designed to meet the demands of both commercial and residential users in the outdoor gardening and landscaping sectors. It embodies a perfect blend of technological innovation, robust construction, and user-friendly features, making it a popular choice among professionals and enthusiasts alike.

One of the standout characteristics of the MTD 454 is its advanced propulsion system. It is equipped with a reliable, high-performance engine that delivers ample power for a variety of applications, from mowing to heavy-duty landscaping. The engine is designed for durability, ensuring a long lifespan and reduced maintenance needs. Additionally, it boasts a fuel-efficient design that helps to minimize operational costs while maximizing productivity.

The cutting deck of the MTD 454 is engineered for exceptional performance, featuring a wide, adjustable cutting height that allows users to choose the desired grass length. This adaptability makes it suitable for various lawn types and conditions, providing a clean and professional finish every time. The deck is made from high-quality materials that enhance its strength and longevity, ensuring it can withstand the rigors of frequent use.

Moreover, the MTD 454 incorporates user-friendly technologies that enhance the overall experience. It features ergonomic handles that provide a comfortable grip, reducing fatigue during extended use. The controls are intuitively placed, allowing for easy operation without diverting attention from the task at hand. This design consideration is particularly appreciated by users who tackle large areas or complex landscaping projects.

Safety is another paramount feature of the MTD 454. It comes equipped with multiple safety mechanisms, such as blade brake systems and protective guards, which help to minimize the risk of accidents during operation. These features are critical for both professional landscapers and occasional users, instilling confidence in the machinery’s reliability.

In summary, the MTD 454 is a robust and efficient outdoor machine, perfectly designed for a range of gardening tasks. Its powerful engine, adjustable cutting deck, user-friendly controls, and safety features make it an ideal choice for anyone looking to enhance their lawn care capabilities. Whether tackling a small residential yard or a larger commercial landscape, the MTD 454 stands ready to deliver outstanding performance and results.