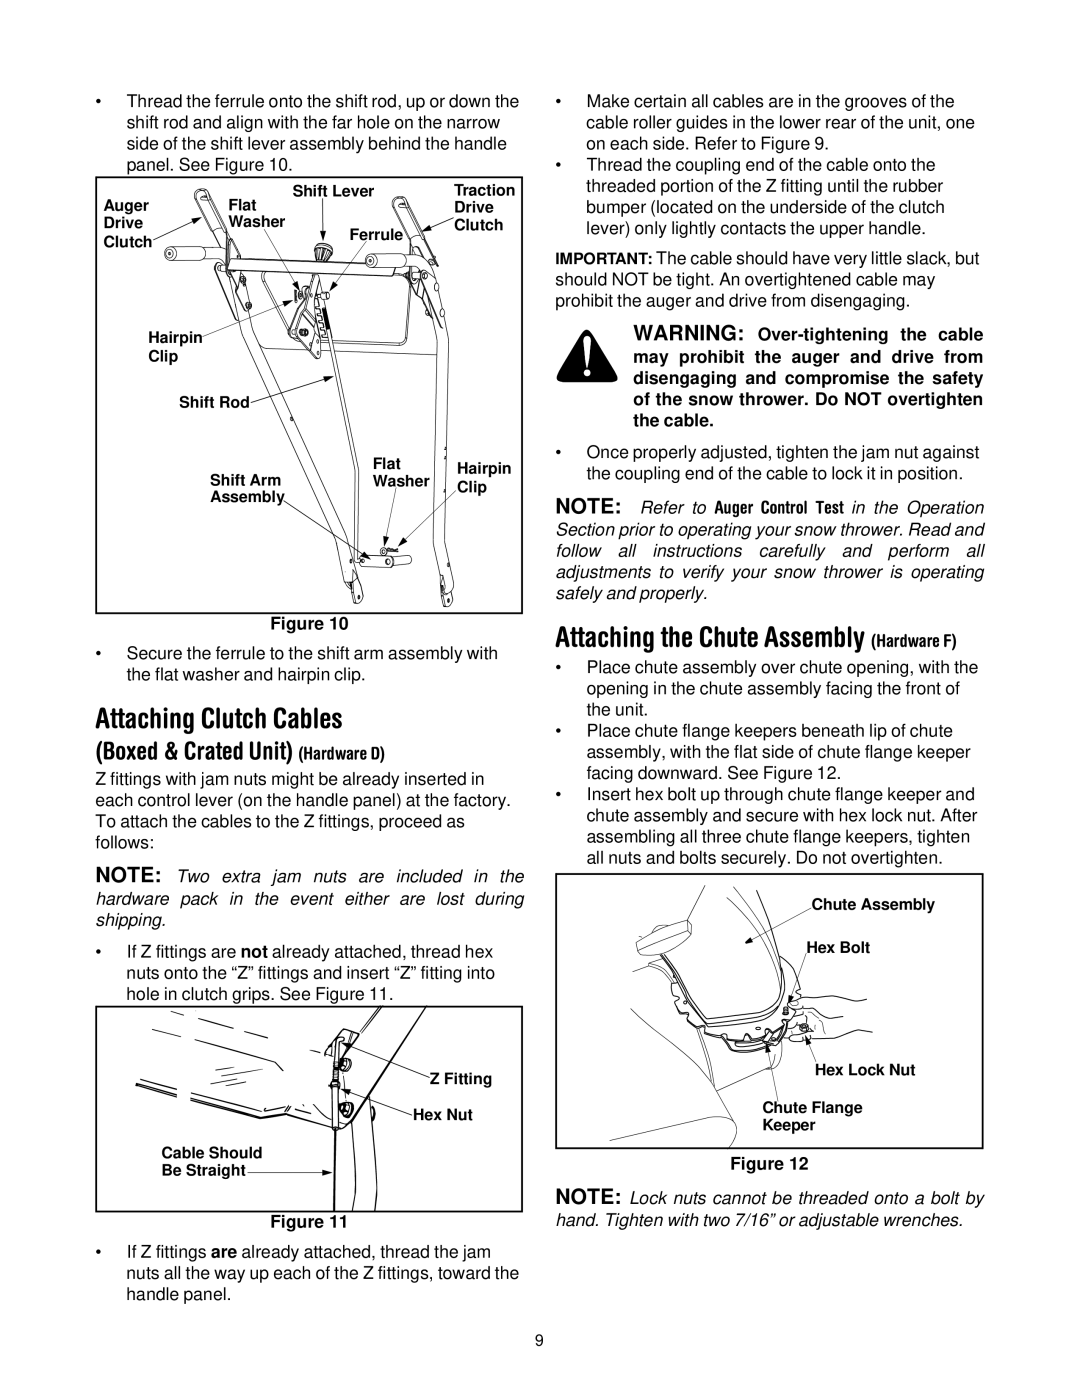
Thread the ferrule onto the shift rod, up or down the shift rod and align with the far hole on the narrow side of the shift lever assembly behind the handle panel. See Figure 10.

Auger

Flat

Shift Lever

Traction


Drive

Drive

Washer

Ferrule

Clutch

Clutch


Hairpin


Clip


Shift Rod


Shift Arm

Flat

Hairpin


Washer

Clip


Assembly


Figure 10

Secure the ferrule to the shift arm assembly with the flat washer and hairpin clip.

Attaching Clutch Cables

(Boxed & Crated Unit) (Hardware D)

Z fittings with jam nuts might be already inserted in each control lever (on the handle panel) at the factory. To attach the cables to the Z fittings, proceed as follows:

NOTE: Two extra jam nuts are included in the hardware pack in the event either are lost during shipping.

If Z fittings are not already attached, thread hex nuts onto the “Z” fittings and insert “Z” fitting into hole in clutch grips. See Figure 11.

Z Fitting

Hex Nut

Cable Should

Be Straight

Figure 11

If Z fittings are already attached, thread the jam nuts all the way up each of the Z fittings, toward the handle panel.

Make certain all cables are in the grooves of the cable roller guides in the lower rear of the unit, one on each side. Refer to Figure 9.

Thread the coupling end of the cable onto the threaded portion of the Z fitting until the rubber bumper (located on the underside of the clutch lever) only lightly contacts the upper handle.

IMPORTANT: The cable should have very little slack, but should NOT be tight. An overtightened cable may prohibit the auger and drive from disengaging.

WARNING: Over-tightening the cable may prohibit the auger and drive from disengaging and compromise the safety of the snow thrower. Do NOT overtighten the cable.

Once properly adjusted, tighten the jam nut against the coupling end of the cable to lock it in position.

NOTE: Refer to Auger Control Test in the Operation Section prior to operating your snow thrower. Read and follow all instructions carefully and perform all adjustments to verify your snow thrower is operating safely and properly.

Attaching the Chute Assembly (Hardware F)

Place chute assembly over chute opening, with the opening in the chute assembly facing the front of the unit.

Place chute flange keepers beneath lip of chute assembly, with the flat side of chute flange keeper facing downward. See Figure 12.

Insert hex bolt up through chute flange keeper and chute assembly and secure with hex lock nut. After assembling all three chute flange keepers, tighten all nuts and bolts securely. Do not overtighten.

Chute Assembly

Hex Bolt

Hex Lock Nut

Chute Flange

Keeper

Figure 12

NOTE: Lock nuts cannot be threaded onto a bolt by hand. Tighten with two 7/16” or adjustable wrenches.

9

Page 9
Image 9
MTD 614E manual Attaching Clutch Cables, Attaching the Chute Assembly Hardware F

614E specifications

The MTD 614E is a versatile and highly regarded lawn mower that caters to both residential and commercial gardening needs. Known for its blend of efficiency, durability, and ease of use, the MTD 614E is designed to make lawn care a breeze for users of all experience levels.

One of the main features of the MTD 614E is its powerful engine. Equipped with a robust and reliable 6.5 HP engine, it delivers ample power for tackling tough grass and uneven terrain. This engine is designed for fuel efficiency while providing sufficient torque for effective cutting and mulching. Users can count on performance that ensures clean cuts and a well-manicured lawn.

The cutting deck of the MTD 614E is another standout feature. The mower is fitted with a 14-inch cutting deck, allowing it to navigate tight spaces and flower beds with ease. The adjustable cutting height—typically ranging from 1 to 3 inches—enables users to customize their mowing to suit different grass types and seasonal conditions. This flexibility is crucial for achieving the desired lawn aesthetic and health.

Durability is a hallmark of the MTD 614E construction. Featuring a sturdy steel frame and high-quality components, this mower can withstand the rigors of regular use. The wheels are designed to offer excellent traction, which is essential for maintaining stability on slopes and uneven ground.

Technologically, the MTD 614E boasts a user-friendly recoil start system, simplifying the process of getting the mower up and running. Maintenance is also straightforward, with easily accessible engine oil and air filter compartments that facilitate routine checks and servicing.

Another notable characteristic of the MTD 614E is its lightweight design, making it easy to maneuver and transport. This is particularly beneficial for homeowners with smaller yards or those who need to move the mower frequently between locations. Additionally, the compact size allows for convenient storage in tight spaces.

The mower's ergonomic handle ensures comfort during operation, reducing strain on the user's hands and back. Overall, the MTD 614E effectively combines power, efficiency, and ease of use, making it a popular choice for individuals seeking an effective lawn care solution. Whether for a small garden or larger green spaces, the MTD 614E proves itself as a reliable partner in maintaining a beautiful lawn.