BA-SERIES
Page
Page
BA-SERIES TROWEL- Table of Contents
BA-SERIES TROWEL- Parts Ordering Procedures
Best Deal! Order via Internet Dealers Only
Order via Fax Dealers Only
BA-SERIES TROWEL- Training Checklist
Daily PRE-OPERATION Checklist
BA-SERIES TROWEL- Daily PRE-OPERATION Checklist
Foryour Safety Andthe Safety of Others
BA-SERIES TROWEL- Safety Message Alert Symbols
Over Speed Conditions Sight and Hearing hazard
BA-SERIES TROWEL- Safety Message Alert Symbols
BA-SERIES TROWEL- Rules for Safe Operation
Safety
Maintenance Safety
BA-SERIES TROWEL- Rules for Safe Operation
Emergencies
Machine Safety Decals
BA-SERIES TROWEL- Operation and Safety Decals
SideView
BA-SERIES TROWEL- Specifications Trowel
Specifications Engines & Electric Motor
BA-SERIES TROWEL- Specifications Engines
BA-SERIES TROWEL- General Information
BA-Series Walk-Behind Trowels
BA-SERIES TROWEL- Controls and Components
BA-SERIES TROWEL- Controls and Components
BA-SERIES TROWEL- Basic Engine
BA-SERIES Trowel Assembly and Installation
Assembly and Installation
HandleTube Installation All Models
Safety KillWire
BA-SERIES Trowel Assembly and Installation
Blade Pitch Cable
BA-SERIES Trowel Assembly and Installation
BA-SERIES TROWEL- PRE-INSPECTION
Before Starting
Engine Oil Check
BA-SERIES TROWEL- PRE-INSPECTION
Lifting theTrowel Onto a Slab Auxiliary Lifting Tube
Lifting Bale Option
Starting the Engine Honda engine
BA-SERIESTROWEL Initial START-UP
Centrifugal Kill Switch
PitchingThe Blades Quick Pitch Handle
BA-SERIES Trowel Operation
BA-SERIES Trowel Operation
BA-SERIES Trowel Options
Clip-On Float Blades Optional
Combo Blades
Grinding Attachments
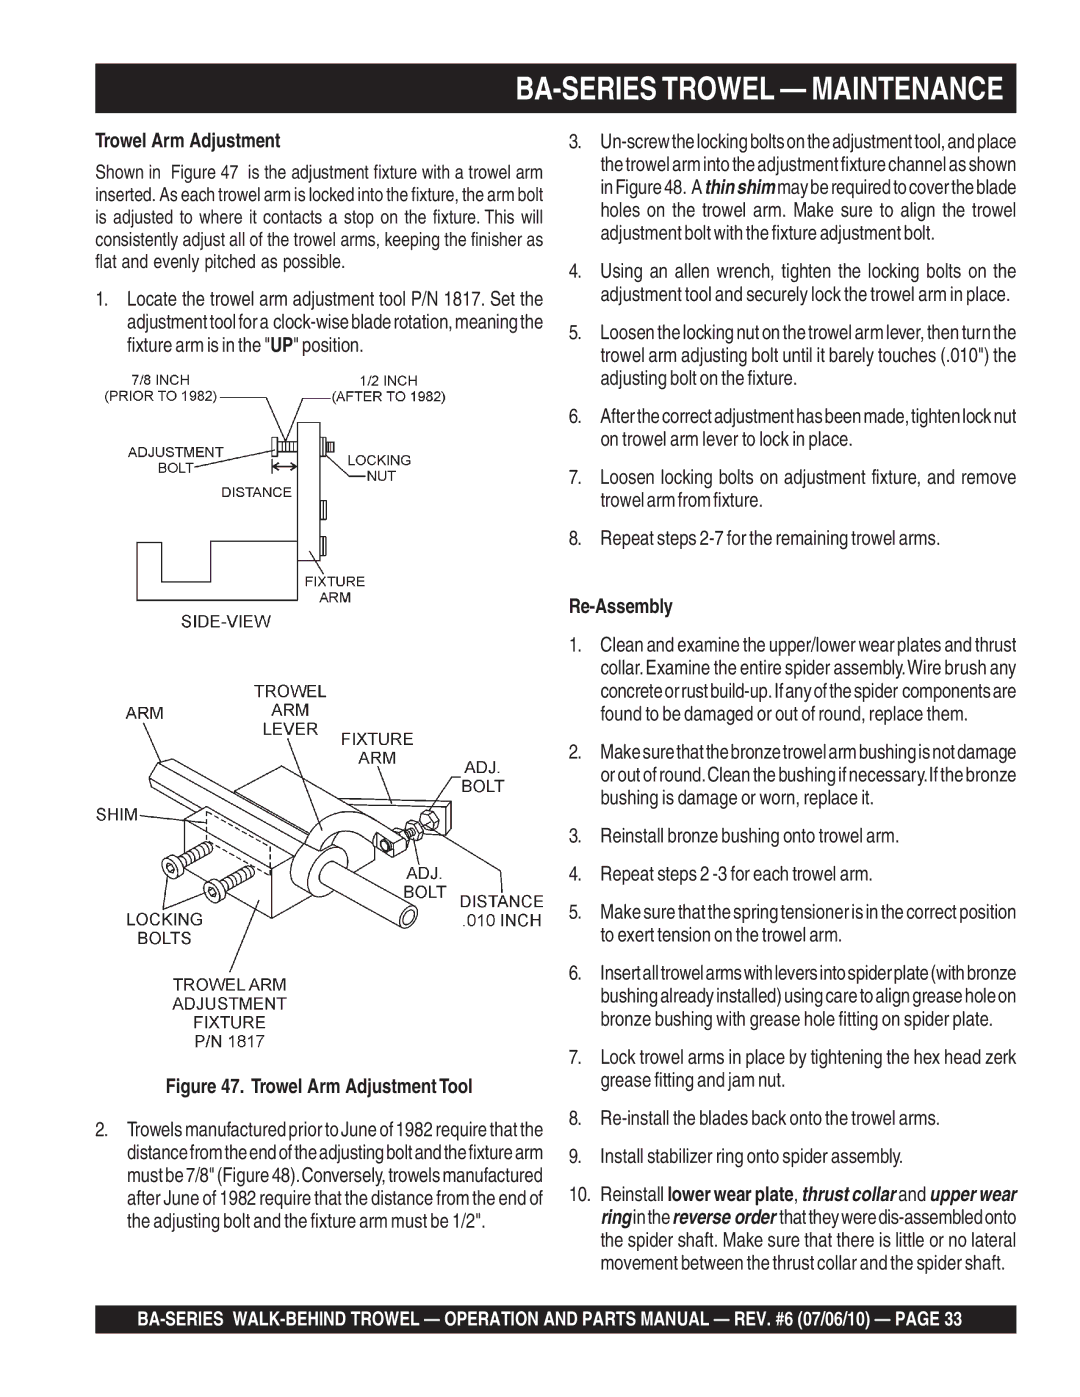
Trowel Arm Adjustment Tool
Daily 8-10 Hours
Trowel Arm Adjustment Procedure
Weekly 50-60 Hours
Monthly 200-300 Hours
BA-SERIES Trowel Maintenance
Spider Removal
Trowel Arm Removal
Trowel Arm Flatness Test
Bronze Bushings Trowel Blade Removal
Re-Assembly
Trowel Arm Adjustment
Testing
Hand Clutch Adjustment
Changing a Blade
Troubleshooting
BA-SERIES Trowel Troubleshooting Trowel
Worn bearings in gearbox?
BA-SERIES Trowel Troubleshooting Trowel
Troubleshooting Engine
BA-SERIES Trowel Troubleshooting Engine
Xxxxx only Not Used on
BA-SERIESTROWEL Explanation of Codes in Remarks Column
To 3 Units
BA-SERIES Trowel Suggested Spare Parts
Nameplates and Decals Quick Pitch Handle
BA-SERIES Trowel Nameplate and Decals
Decal Power Trowel
Decal PRE-LOAD Indicator
Nameplate and Decals
Decal QUICK-PITCH Handle
Standard Handle Assy Detail B Detail a See
BA-SERIESTROWEL Standard Handle Assy
BA-SERIESTROWEL Standard Handle Assy
QUICK-PITCH T-HANDLE Detail B Detail a See
BA-SERIESTROWEL QUICK-PITCH Handle Assy
BLOCK, QP Adjustment
CONNECTOR, QP Control ARM
DECAL, Preload Trim Indicator
DECAL, Latch Warning
Quick Pitch Handle Detail B Detail a See
BA-SERIESTROWEL Quick Pitch Handle Assy
HOUSING, Throttle Cable
SCREW, QP Trim Adjustment
DECAL, Arrow
NUT, QP Trim Ctrl ADJ
BA-SERIESTROWEL -THRUST Bearing KIT Assy
Thrust Bearing KIT Assembly
Flange Bearing
Wear Ring
Thrust Collar W/BUSHING
Bushing
Blade Spider Assy
BA-SERIESTROWEL 4-BLADE Spider Assy
Wear Plate
Assy
Bearing Insert
INT. SHKP. Washer 3/8
OIL for Operation
BA-SERIESTROWEL Gearbox and Engine Mounts Assy
BA-SERIESTROWEL Gearbox and Engine Mounts Assy
BA-SERIESTROWEL Gearbox and Engine Mounts Assy
Front Engine Mount Robin
Front Engine Mount Honda
Front Engine Mount Briggs
Rear Engine Mount Honda 8HP
BA-SERIESTROWEL ENGINES, HONDA, ROBIN, Briggs & Stratton
Engine 8HP Honda
Hand Clutch Assy
BA-SERIESTROWEL Hand Clutch Assy
Part Name QTY
BA-SERIESTROWEL Hand Clutch Assy
Guard Ring Assy
BA-SERIESTROWEL Guard Ring Assy
Guard Ring Assy
Detail a
BA-SERIESTROWEL Stabilizer Ring Assy
WASHER, LOCK, 5/16 MED
Blades & Adjustment Fixture Assy
BA-SERIESTROWEL Blades & Adjustment Fixture Assy
LUBRA-CAP
BA-SERIESTROWEL Blades & Adjustment Fixture Assy
Lifting Bale ASSY. Option
BA-SERIESTROWEL Lifting Bale ASSY. Option
Spacer Robin Engine
AIR Cleaner Assy
Honda GX240K1QA2 Engine AIR Cleaner Assy
GROMMET, AIR Cleaner
COVER, AIR Cleaner
COLLAR, AIR Cleaner
Collar B, AIR Cleaner
Camshaft Assy
Honda GX240K1QA2 Engine Camshaft Assy
ROD Push
SPRING, Weight Return
ARM Valve Rocker
Lifter Valve
Carburetor Assy
Honda GX240K1QA2 Engine Carburetor Assy
Gasket SET
PLATE, Lever Setting
Valve SET, Float
Float SET
Control Assy
Honda GX240K1QA2 Engine Control Assy
ROD, Governor
ARM, Governor
SPRING, Governor
SPRING, Throttle Return
Crankcase Cover Assy
Honda GX240K1QA2 Engine Crankcase Cover Assy
HOLDER, Governor Weight
WEIGHT, Governor
PIN, Governor Weight
GASKET, Case Cover
Crankshaft Assy
Honda GX240K1QA2 Engine Crankshaft Assy
90745ZE2600 KEY 6.3 X 6.3 X 961006206000
WEIGHT, Balancer
Cylinder Barrel Assy
Honda GX240K1QA2 Engine Cylinder Barrel Assy
BOLT, Drain Plug
SHAFT, Governor ARM
OIL Seal
WASHER, Drain Plug 12MM
Cylinder Head Assy
Honda GX240K1QA2 Engine Cylinder Head Assy
GUIDE, EX. VALVE, OS, Optional
GUIDE, VALVE, OS, Optional
CLIP, Valve Guide
GASKET, Cylinder Head
FAN Cover Assy
Honda GX240K1QA2ENGINE FAN Cover Assy
CLIP, Wire Harness
Switch ASSY., Engine Stop
CLIP, Tube
Shroud
Flywheel Assy
Honda GX240K1QA2 Engine Flywheel Assy
Flywheel Comp
FAN, Cooling
NUT, Special 16MM
KEY, Special Woodruff
Fuel Tank Assy
Honda GX240K1QA2ENGINE Fueltank Assy
JOINT, Fuel Tank
Rubber Supporter 107MM
Tank COMP., Fuel *NH1*, Black
GASKET, Fuel Filler CAP
Ignition Coil Assy
Honda GX240K1QA2 Engine Ignition Coil Assy
WIRE, Stop Switch 370MM
GROMMET, Wire
Coil ASSY., Ignition
CAP ASSY., Noise Suppressor
Muffler Assy
Honda GX240K1QA2 Engine Muffler Assy
Protector COMP., Muffler
Muffler Comp
PROTECTOR, EX. Pipe
PIPE, EX
Piston Assy
Honda GX240K1QA2 Engine Piston Assy
Ring SET, PISTON, STD
BOLT, Connecting ROD
Ring SET, PISTON, 0.75, Optional
PISTON, Standard
Recoil Starter Assy
Honda GX240K1QA2 Engine Recoil Starter Assy
Honda GX240K1QA2 Engine Recoil Starter Assy
Labels
Honda GX240K1QA2 Engine Labels
LABEL, Caution
EMBLEM, Internal
MARK, CHOKE, External
MARK, OIL ALERT, E
Crankcase Assy
Robin EH25-2 Engine Crankcase Assy
Valve Guide
Includes Items W
Ball Bearing 6206C3
Ball Bearing 6202C3
Robin EH25-2 Engine Crankshaft Assy
NUT
Connecting ROD Bolt
Spring Washer
Woodruff KEY
Intake and Exhaust Assy
Robin EH25-2 Engine Intake and Exhaust Assy
Spring PIN
Release Lever
Snap Ring
Tappet
Governor Assy
Robin EH25-2 Engine Governor Assy
Governor Lever
Wire Bracket
Governor Shaft
Governor ROD CP
Cooling and Starting Assy
Robin EH25-2 Engine Cooling and Starting Assy
LABEL, Trade Mark
Blower Housing CP
LABEL, Recoil OHV
Head Cover
Robin EH25-2 Engine Fueltank Assy
Fuel Tank CAP CP
Fuel Tank CP
Fuel Filter CP
Filter
Robin EH25-2 Engine Carburetor Assy
Adjust Screw
Adjuster
Includes Items W/%
Throttle Valve
Flywheel and Ignition Assy
Robin EH25-2 Engine Flywheel and Ignition Assy
Flywheel CP
Switch Assy
Ignition Coil CP
Clamp
OIL Sensor Assy
Robin EH25-2 Engine OIL Sensor Assy
700 KS31102801
Terms and Conditions of Sale Parts
Page
HERE’S HOW to GET Help

