WM120PH Series
Proposition 65 Warning
SILICOSIS/RESPIRATORY Warnings Silicosis Warning
Respiratory Hazards
Table of Contents
WM120PH/SH Hydraulic Mixer
Parts Ordering Procedures
Ordering parts has never been easier
Safety
Safety Message Alert Symbols
Hazard Symbols
Foryour Safety and Safety of Others
Safety
General Safety
Rules and Regulations
Maintenance Safety
Transporting
Emergencies
Towing Safety Precautions
Towing Guidelines
Safety Chain Connection
TOW BAR to Mixer Connection
Specifications
Specifications Mixer
Dimensions
Dimensions
General Information
Application
Mixer Components
Mixer COMPONENTS/HYDRAULIC Components
Hydraulic Components
Muffler Used to reduce noise and emissions
Engine Components
Initial Servicing
Do not operate electric motor in an explosive environment
Electric Motor Components
Electric Motor
Paddle Blade Adjustment Steel Drum
Adjust paddles as shown in Figure
Paddle Blade Adjustment Poly Drum
Paddle Blade Adjustment Poly Drum
Inspection
Before Starting
Engine OIL Check
Fuel Check
Hydraulic OIL
Hydraulic Hoses
Grease Fittings Bearings
Blade Check
Initial START-UP Gasoline
Starting the Engine
Mixing
Initial START-UP ELECTRIC/OPERATION
Starting the Electric Motor
Dumping Hydraulic
Operation
Dumping Manual
Push the start/stop switch inward to stop the engine
SHUT-DOWN
Stoppingthe Mixer Gasoline Engine
Stoppingthe Mixer Electric Motor
Maintenance Engine
Engine Maintenance Schedule
Maintenance
Engine AIR Cleaner
Install drain bolt with sealing washer and tighten securely
Engine OIL
Maintenance Mixer
Ball Socket and Clamp Face Maintenance
Drum Head Seals
Wheel Bearings
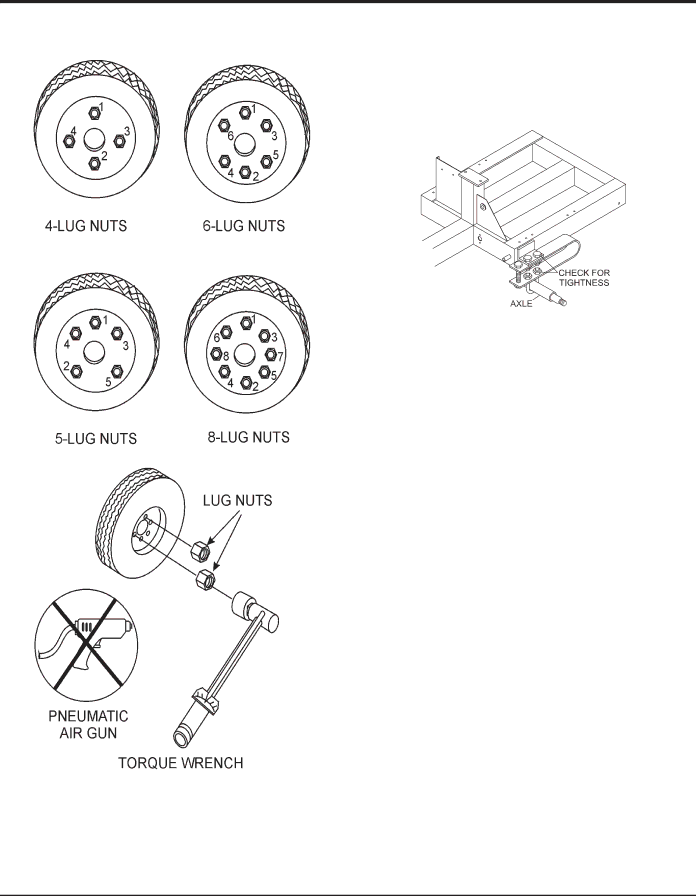
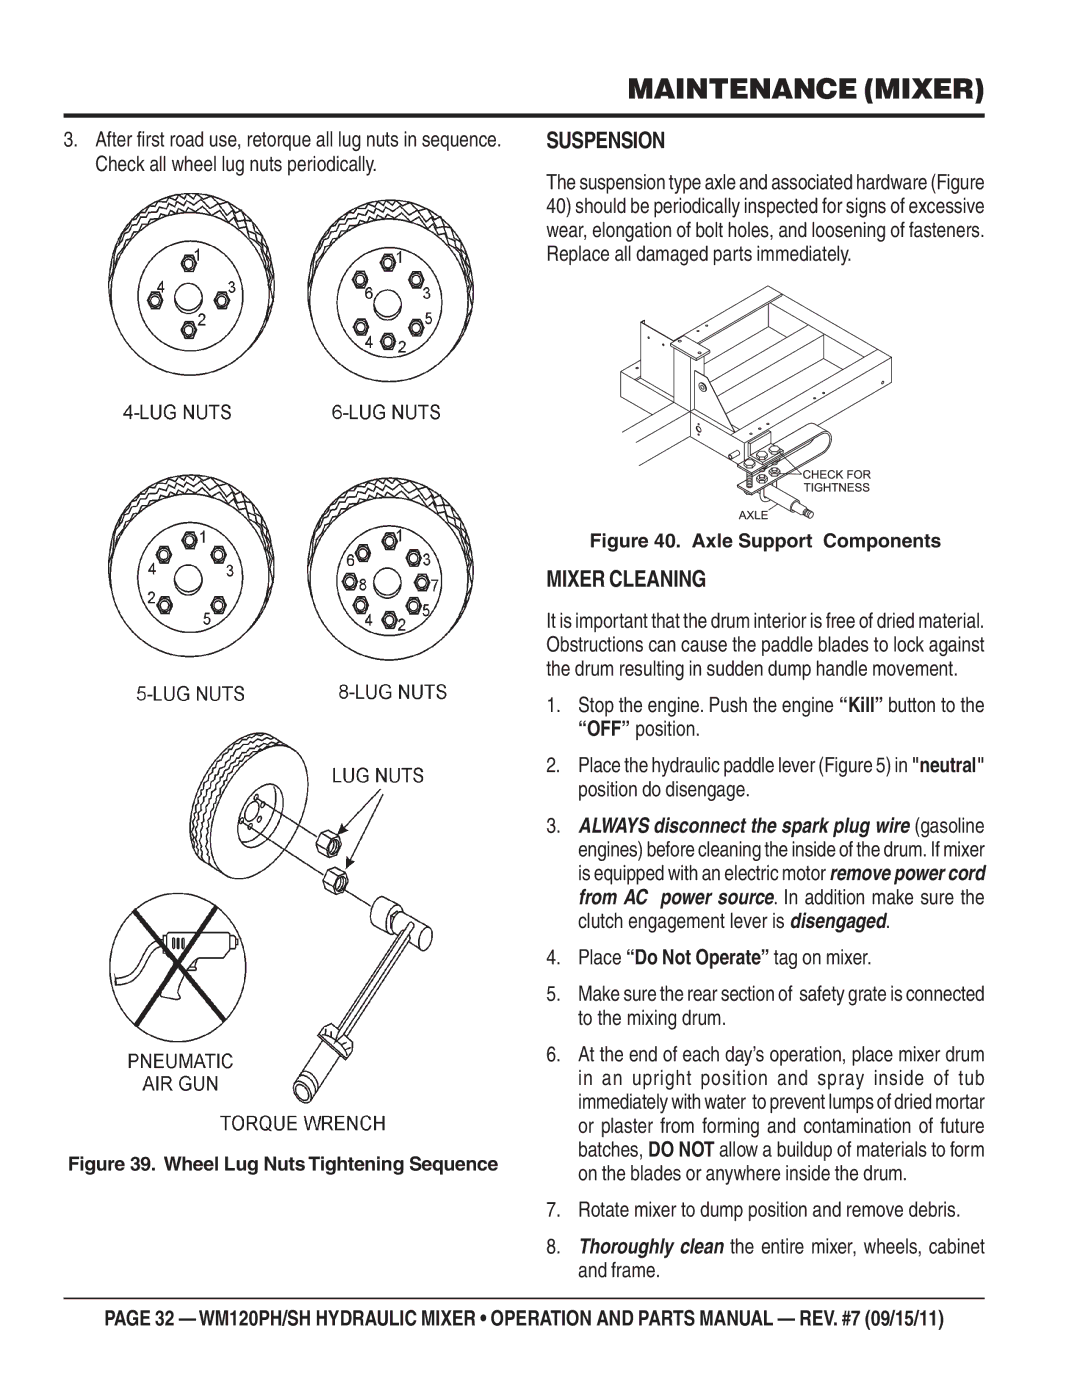
TIRES/WHEELS/LUG Nuts
TIRESWEAR/INFLATION
LUG NUT Torque Requirements
NEVER! use an pneumatic air gun to tighten wheel lug nuts
Mixer Cleaning
Suspension
Maintenance MIXER/STORAGE
Mixer Storage
Troubleshooting Engine
Engine Troubleshooting
White
Solution
Troubleshooting MIXER/ELECTRIC Motor
Symptom
Wiring Diagram Electric Motor
Electric Motor Wiring Diagram
Hydraulic System Diagram
Hydraulic System Diagram
Page
Sample Parts List
Explanation of Code in Remarks Column
Suggested Spare Parts
WM120PS 1TO 3 Units WM120PS 5TO 10 Units
Nameplate and Decals
Part Name
Remarks
Paddle Blades Assy
TOW END12
Part Name QTY Remarks
Plastic Mixing Drum Assy
Bearing Housing
GRATE, Movable
GRATE, Stationary
Manual Dump only
Steel Drum ASSY. Manual
Bearing Housing Front
Bearing HOUSING, Rear
NUT, Nyloc 3/8
Steel DRUM, Manual
Steel Drum ASSY. Hydraulic
Front
Part Name QTY. Remarks
Moveable Grate
BAR, Grate
Steel DRUM, Hydraulic
Paddle Shaft ASSY. PLASTIC/STEEL
SPACER, Thin Seal
Spring
SEAL, Bearing 1-1/2
Bearing
Hydraulic Assy
ARM, Motor Torque
CAP, Spring Mount
HOSE, Pump Output
STRAINER, in Line
January 1996 April
Frame 1 Assy
LUG HUB and Wheel 1-1/16 Axle Spindle
Part Name QTY Remark
Frame 2 Assy
April 1999 MAY
Safety Chain ASM
Contact Unit Sales Dept
No Longer Available
See Frame 3 Assy
MAY 2000 and Above
Frame 3 Assy
GE21000 and Above
LUG NUT
HLC-1
HPC-1
HBC-1
Plastic Engine Cover Assy
January 1996 to MAY
Hinge PIN
Small Hinge Plate
Large Hinge Plate
Lock Washer 1/4
Steel Engine Cover Assy
GE 210001 and Above
Flat Washer 3/8
Hinge
Rubber Latch Assy
Single PHASE, 5 HP Electric Motor Assy
Switch ASSY, 5HP 1PH
Wire Connector
Conduit Connector
Connector
Three PHASE, 5 HP Electric Motor Assy
MOTOR, ELECTRIC, 5HP 3PH
Switch ASSY, 5HP 3PH
Prong Plug
Honda Engine Assy
SWITCH, PUSH-PULL W/O Knob
ENGINE, Honda 13HP GX390U1QA2
TUBE, Exhaust
Plate
Honda GX390K1QA2/GX390U1QA2 AIR Cleaner Assy
COVER, AIR Cleaner
GROMMET, AIR Cleaner
COLLAR, AIR Cleaner
Collar B, AIR Cleaner
Honda GX390K1QA2/GX390U1QA2 Camshaft Assy
Camshaft Assembly
SPRING, Weight Return
ROD, Push
LIFTER, Valve
Honda GX390K1QA2/GX390U1QA2 Piston Assy
BOLT, Connecting ROD
Ring SET, Piston STD
Piston Standard
Piston OS 0.25, Optional
Honda GX390K1QA2/GX390U1QA2 Crankcase Cover Assy
WEIGHT, Governor
HOLDER, Governor Weight
PIN, Governor Weight
GASKET, Case Cover
Honda GX390K1QA2/GX390U1QA2 Crankshaft Assy
WEIGHT, Balancer
BEARING, Radial Ball 6207S
Honda GX390K1QA2/GX390U1QA2 Cylinder Barrel Assy
BOLT, Flange 6X12 CT200
SHAFT, Governor ARM
BOLT, Drain Plug 12 X
Honda GX390K1QA2/GX390U1QA2 Cylinder Head Assy
GUIDE, Valve OS Optional
GUIDE, EX. Valve OS Optional
CLIP, Valve Guide
GASKET, Cylinder Head
Honda GX390K1QA2/GX390U1QA2 FAN Cover Assy
CLIP, Wire Harness
CLIP, Tube
COVER, FAN *R280*, RED
Shroud
Honda GX390K1QA2/GX390U1QA2 Flywheel Assy
FAN, Cooling
Flywheel
Honda GX390K1QA2/GX390U1QA2 Ignition Coil Assy
CLIP, Harness
GROMMET, Wire
WIRE, Stop Switch 430MM
Honda GX390K1QA2/GX390U1QA2 Carburetor Assy
Carburetor Assy
Includes Item W
Valve SET, Float
Float SET
Honda GX390K1QA2/GX390U1QA2 Muffler Assy
Muffler 100DB
PROTECTOR, Muffler
PROTECTOR, Exhaust Pipe
PIPE, Exhaust
Honda GX390K1QA2/GX390U1QA2 Recoil Starter Assy
PULLEY, Recoil Starter
RATCHET, Starter
SPRING, Friction
SPRING, Starter Return
Honda GX390K1QA2/GX390U1QA2- Control Assy
ARM, Governor
ROD, Governor
SPRING, Governor
SPRING, Throttle Return
Honda GX390K1QA2/GX390U1QA2 Fuel Tank Assy
RUBBER, Supporter 107MM
JOINT, Fuel Tank
TANK, Fuel *NH31
TANK, Fuel *NH1
Honda GX390K1QA2 Gasket KIT Assy
061A1Z6700
11381ZE3800
12251ZF6W00
Honda GX390K1QA2/GX390U1QA2 Labels Assy
MARK, Operator
MARK,, Throttle Indication
LABEL, Caution
MARK, Choke Orange
Terms and Conditions of Sale Parts
Freight Policy
Page
HERE’S HOW to GET Help