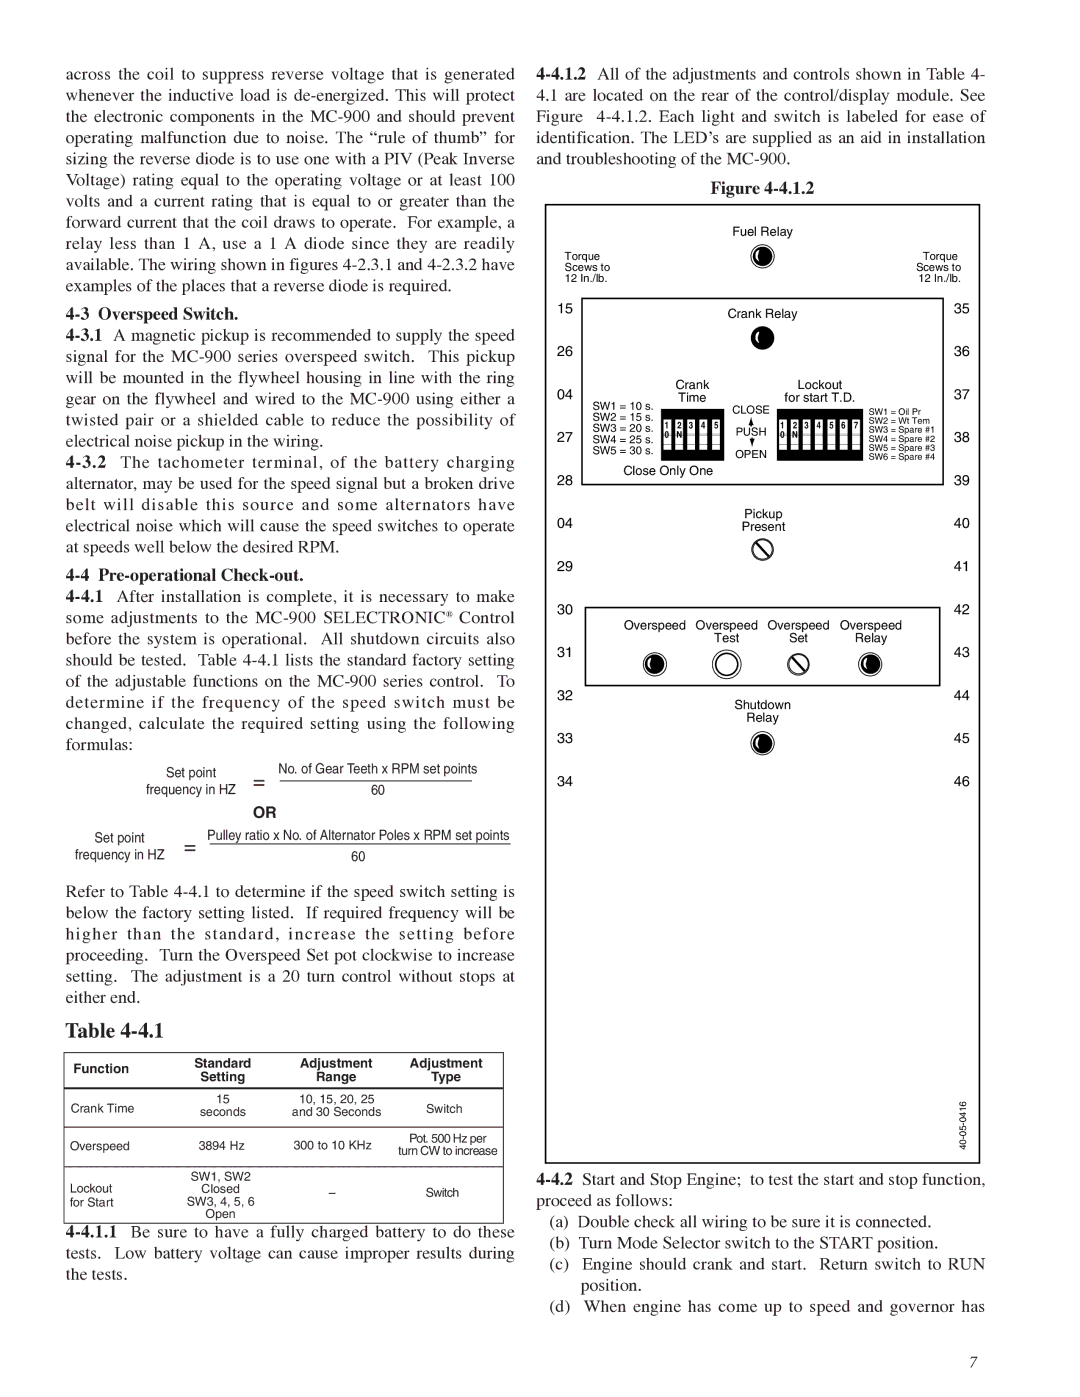
Murphy MC-900 Series manual Overspeed Switch, Pre-operational Check-out

Models: MC-900 Series

1 13
Download 13 pages 37.33 Kb
Page 9
Image 9
4-3 Overspeed Switch.

across the coil to suppress reverse voltage that is generated whenever the inductive load is de-energized. This will protect the electronic components in the MC-900 and should prevent operating malfunction due to noise. The “rule of thumb” for sizing the reverse diode is to use one with a PIV (Peak Inverse Voltage) rating equal to the operating voltage or at least 100 volts and a current rating that is equal to or greater than the forward current that the coil draws to operate. For example, a relay less than 1 A, use a 1 A diode since they are readily available. The wiring shown in figures 4-2.3.1 and 4-2.3.2 have examples of the places that a reverse diode is required.

4-3 Overspeed Switch.

4-3.1A magnetic pickup is recommended to supply the speed signal for the MC-900 series overspeed switch. This pickup will be mounted in the flywheel housing in line with the ring gear on the flywheel and wired to the MC-900 using either a twisted pair or a shielded cable to reduce the possibility of electrical noise pickup in the wiring.

4-3.2The tachometer terminal, of the battery charging alternator, may be used for the speed signal but a broken drive belt will disable this source and some alternators have electrical noise which will cause the speed switches to operate at speeds well below the desired RPM.

4-4 Pre-operational Check-out.

4-4.1After installation is complete, it is necessary to make some adjustments to the MC-900 SELECTRONIC® Control before the system is operational. All shutdown circuits also should be tested. Table 4-4.1 lists the standard factory setting of the adjustable functions on the MC-900 series control. To determine if the frequency of the speed switch must be changed, calculate the required setting using the following formulas:


Set point

=

No. of Gear Teeth x RPM set points

frequency in HZ

60


OR


Set point

=

Pulley ratio x No. of Alternator Poles x RPM set points

frequency in HZ


60


Refer to Table 4-4.1 to determine if the speed switch setting is below the factory setting listed. If required frequency will be higher than the standard, increase the setting before proceeding. Turn the Overspeed Set pot clockwise to increase setting. The adjustment is a 20 turn control without stops at either end.

Table 4-4.1


Standard

Adjustment


Adjustment


Function


Setting

Range


Type


15


10, 15, 20, 25


Crank Time


Switch


seconds

and 30 Seconds


Pot. 500 Hz per


Overspeed


3894 Hz


300 to 10 KHz


turn CW to increase


SW1, SW2


Lockout


Closed


Switch


for Start


SW3, 4, 5, 6


Open


4-4.1.1Be sure to have a fully charged battery to do these tests. Low battery voltage can cause improper results during the tests.

4-4.1.2All of the adjustments and controls shown in Table 4-

4.1are located on the rear of the control/display module. See Figure 4-4.1.2. Each light and switch is labeled for ease of identification. The LED’s are supplied as an aid in installation and troubleshooting of the MC-900.


Figure 4-4.1.2


Fuel Relay


Torque


Torque

Scews to


Scews to

12 In./lb.


12 In./lb.

15


Crank Relay


35


26


36

04


Crank


Lockout


37

SW1 = 10 s.


Time


CLOSE

for start T.D.


SW1 = Oil Pr


SW2 = 15 s.


1

2

3 4

5


1

2 3

4

5

6 7

SW2 = Wt Tem


27

SW3 = 20 s.

PUSH

SW3 = Spare #1

38

SW4 = 25 s.

0

N


0

N


SW4 = Spare #2


SW5 = 30 s.


OPEN


SW5 = Spare #3


SW6 = Spare #4


28

Close Only One


39


04


Pickup


40


Present


29


41

30


42


Overspeed

Overspeed

Overspeed

Overspeed


31


Test


Set


Relay

43


32


Shutdown


44


Relay


33


45

34


46


40-05-0416

4-4.2Start and Stop Engine; to test the start and stop function, proceed as follows:

(a)Double check all wiring to be sure it is connected.

(b)Turn Mode Selector switch to the START position.

(c)Engine should crank and start. Return switch to RUN position.

(d)When engine has come up to speed and governor has

7

Page 9
Image 9
Murphy MC-900 Series manual Overspeed Switch, Pre-operational Check-out