SERVICE AND ADJUSTMENTS

TO LEVEL MOWER HOUSING

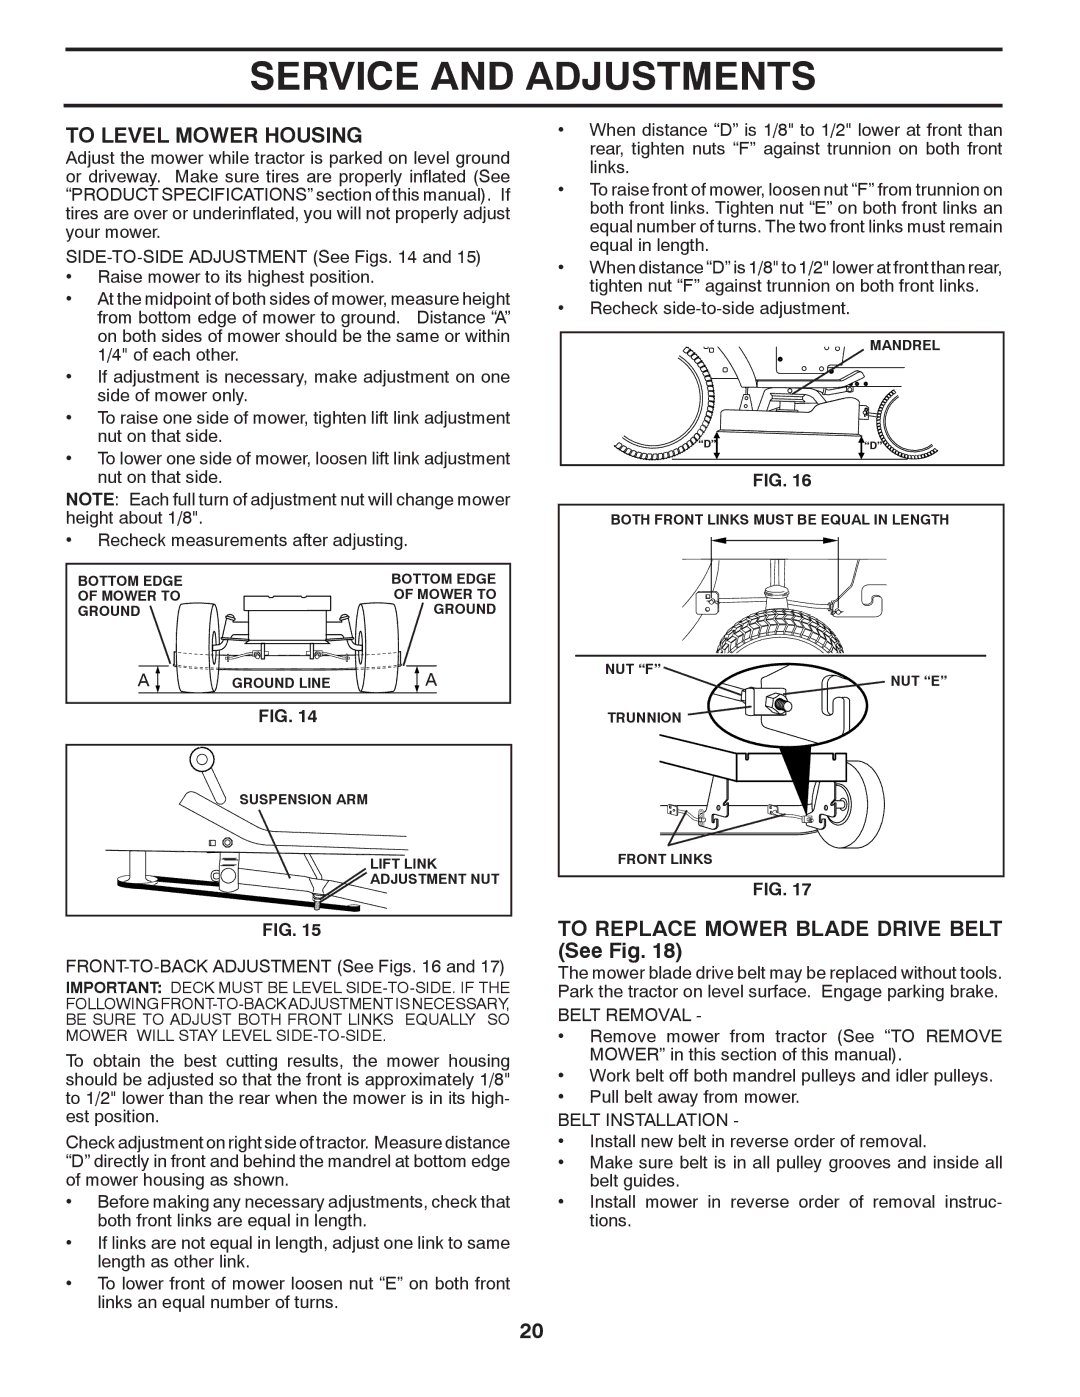
Adjust the mower while tractor is parked on level ground or driveway. Make sure tires are properly inflated (See “PRODUCT SPECIFICATIONS” section of this manual). If tires are over or underinflated, you will not properly adjust your mower.

SIDE-TO-SIDE ADJUSTMENT (See Figs. 14 and 15)

Raise mower to its highest position.

At the midpoint of both sides of mower, measure height from bottom edge of mower to ground. Distance “A” on both sides of mower should be the same or within 1/4" of each other.

If adjustment is necessary, make adjustment on one side of mower only.

To raise one side of mower, tighten lift link adjustment nut on that side.

To lower one side of mower, loosen lift link adjustment nut on that side.

NOTE: Each full turn of adjustment nut will change mower height about 1/8".

Recheck measurements after adjusting.

BOTTOM EDGE


BOTTOM EDGE

OF MOWER TO


OF MOWER TO

GROUND


GROUND

A

GROUND LINE

A

FIG. 14

SUSPENSION ARM

LIFT LINK

ADJUSTMENT NUT

FIG. 15

FRONT-TO-BACK ADJUSTMENT (See Figs. 16 and 17)

IMPORTANT: DECK MUST BE LEVEL SIDE-TO-SIDE. IF THE FOLLOWING FRONT-TO-BACK ADJUSTMENT IS NECESSARY, BE SURE TO ADJUST BOTH FRONT LINKS EQUALLY SO MOWER WILL STAY LEVEL SIDE-TO-SIDE.

To obtain the best cutting results, the mower housing should be adjusted so that the front is approximately 1/8" to 1/2" lower than the rear when the mower is in its high- est position.

Check adjustment on right side of tractor. Measure distance “D” directly in front and behind the mandrel at bottom edge of mower housing as shown.

Before making any necessary adjustments, check that both front links are equal in length.

If links are not equal in length, adjust one link to same length as other link.

To lower front of mower loosen nut “E” on both front links an equal number of turns.

When distance “D” is 1/8" to 1/2" lower at front than rear, tighten nuts “F” against trunnion on both front links.

To raise front of mower, loosen nut “F” from trunnion on both front links. Tighten nut “E” on both front links an equal number of turns. The two front links must remain equal in length.

When distance “D” is 1/8" to 1/2" lower at front than rear, tighten nut “F” against trunnion on both front links.

Recheck side-to-side adjustment.

MANDREL

“D”

“D”

FIG. 16

BOTH FRONT LINKS MUST BE EQUAL IN LENGTH

NUT “F”

NUT “E”

TRUNNION

FRONT LINKS

FIG. 17

TO REPLACE MOWER BLADE DRIVE BELT (See Fig. 18)

The mower blade drive belt may be replaced without tools. Park the tractor on level surface. Engage parking brake.

BELT REMOVAL -

Remove mower from tractor (See “TO REMOVE MOWER” in this section of this manual).

Work belt off both mandrel pulleys and idler pulleys.

Pull belt away from mower.

BELT INSTALLATION -

Install new belt in reverse order of removal.

Make sure belt is in all pulley grooves and inside all belt guides.

Install mower in reverse order of removal instruc- tions.

20

Page 20
Image 20
Murray 96017000700 To Level Mower Housing, To Replace Mower Blade Drive Belt See Fig, Belt Removal, Belt Installation

96017000700 specifications

Murray 96017000700 is a versatile outdoor power equipment known for its robust design and efficient performance. This model is primarily a push mower, making it an ideal choice for homeowners seeking reliable and powerful lawn maintenance tools. Its features and technologies are tailored to provide an effective mowing experience, making it a popular choice among gardening enthusiasts.

One of the standout features of the Murray 96017000700 is its powerful engine. It is equipped with a reliable gas-powered engine that ensures strong performance across various mowing conditions. This engine provides the necessary torque to tackle thick grass and uneven terrains, allowing users to achieve a clean and manicured lawn effortlessly.

The mower boasts a cutting deck that is designed for durability and efficiency. Constructed from high-quality materials, the deck is both lightweight and strong, which helps in providing longevity to the product. Its cutting width allows for efficient mowing of large areas in less time, reducing the effort needed for lawn maintenance.

Another significant characteristic of the Murray 96017000700 is its adjustable cutting height feature. Users can easily adjust the height of the mower's blades to suit different grass types and lengths, ensuring a consistent cut tailored to personal preferences. This flexibility is particularly advantageous during the growing season when grass may vary significantly in height.

The ergonomic design of the mower enhances user comfort and control. Its handle is designed for ease of use, making it simple to maneuver around garden beds, trees, and other obstacles. Additionally, the mower includes a reliable starting system that minimizes the effort required to get the engine running, allowing for a hassle-free mowing experience.

In terms of maintenance, the Murray 96017000700 is specifically designed for easy servicing. Routine checks can be conducted with minimum hassle, and the mower's components are accessible for any necessary repairs or replacements. This ease of maintenance ensures that the mower remains in top working condition for years.

Overall, the Murray 96017000700 stands out in the market for its combination of power, durability, and efficiency. With its user-friendly features and solid construction, it is a valuable addition to any homeowner’s gardening toolkit, making lawn care a manageable and straightforward task. Whether tackling small yards or larger lawns, this mower remains a reliable partner for maintaining lush and healthy grass.