A1 IntegratedAMPLIFIER PROBLEMS?

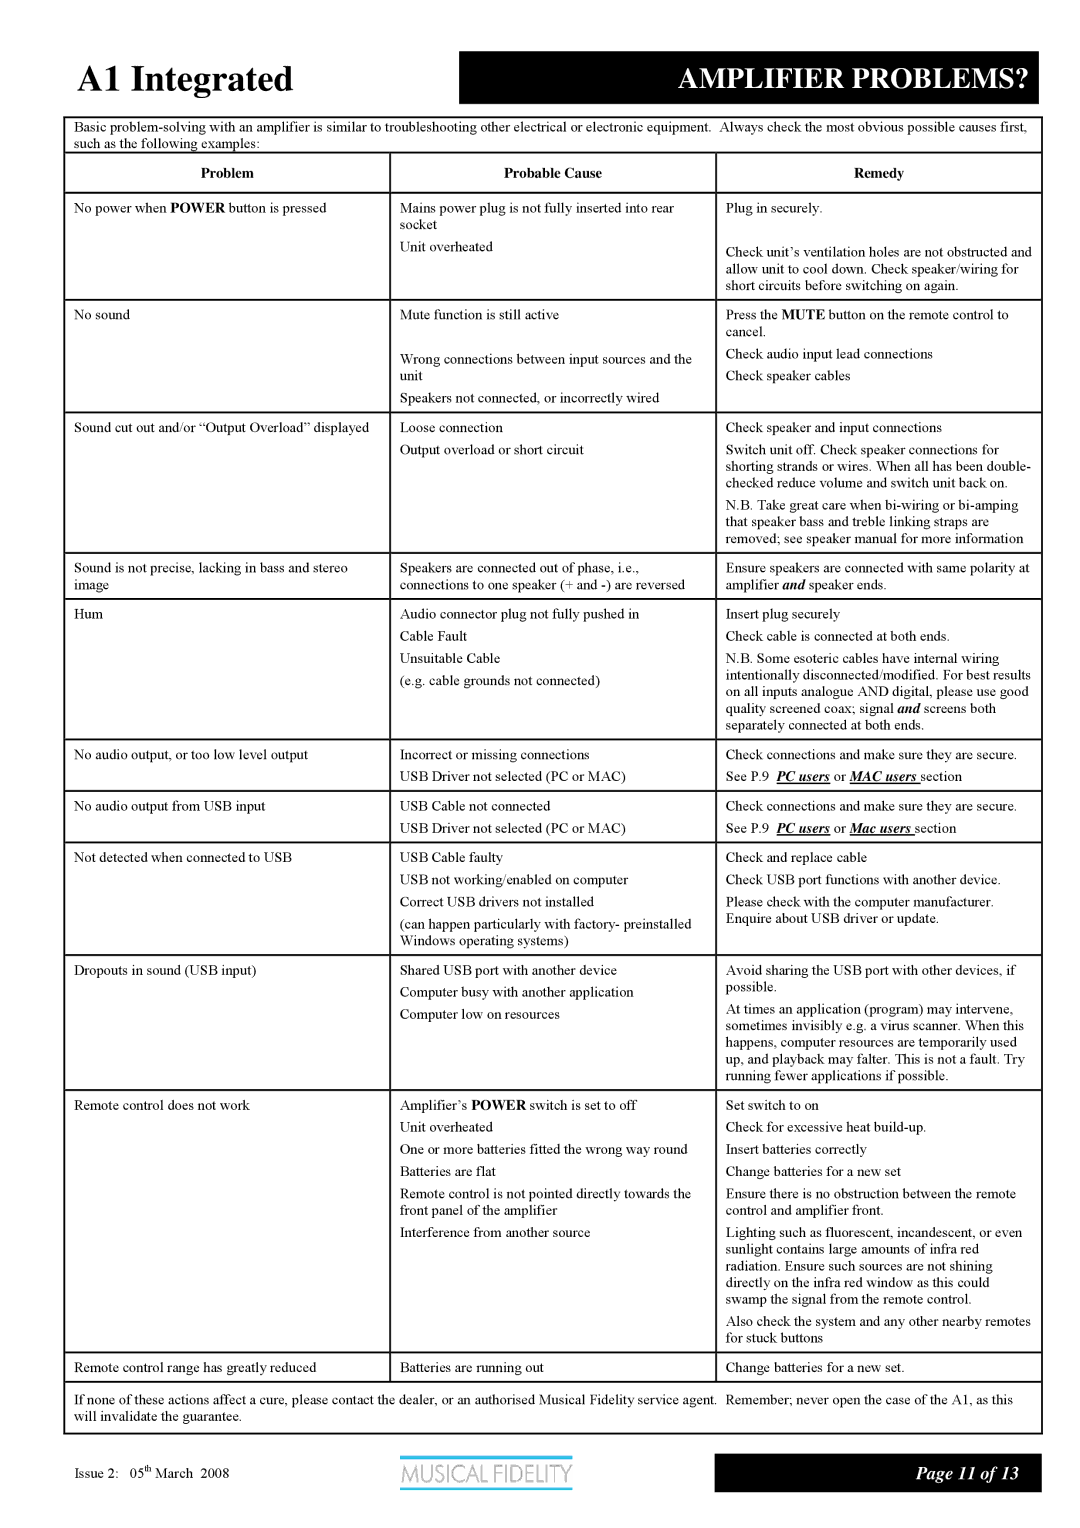
Basic problem-solving with an amplifier is similar to troubleshooting other electrical or electronic equipment. Always check the most obvious possible causes first, such as the following examples:

Problem

Probable Cause

Remedy


No power when POWER button is pressed

Mains power plug is not fully inserted into rear

Plug in securely.


socket


Unit overheated

Check unit’s ventilation holes are not obstructed and


allow unit to cool down. Check speaker/wiring for


short circuits before switching on again.


No sound

Mute function is still active

Press the MUTE button on the remote control to


cancel.


Wrong connections between input sources and the

Check audio input lead connections


unit

Check speaker cables


Speakers not connected, or incorrectly wired


Sound cut out and/or “Output Overload” displayed

Loose connection

Check speaker and input connections


Output overload or short circuit

Switch unit off. Check speaker connections for


shorting strands or wires. When all has been double-


checked reduce volume and switch unit back on.


N.B. Take great care when bi-wiring or bi-amping


that speaker bass and treble linking straps are


removed; see speaker manual for more information


Sound is not precise, lacking in bass and stereo

Speakers are connected out of phase, i.e.,

Ensure speakers are connected with same polarity at

image

connections to one speaker (+ and -) are reversed

amplifier and speaker ends.


Hum

Audio connector plug not fully pushed in

Insert plug securely


Cable Fault

Check cable is connected at both ends.


Unsuitable Cable

N.B. Some esoteric cables have internal wiring


(e.g. cable grounds not connected)

intentionally disconnected/modified. For best results


on all inputs analogue AND digital, please use good


quality screened coax; signal and screens both


separately connected at both ends.


No audio output, or too low level output

Incorrect or missing connections

Check connections and make sure they are secure.


USB Driver not selected (PC or MAC)

See P.9 PC users or MAC users section


No audio output from USB input

USB Cable not connected

Check connections and make sure they are secure.


USB Driver not selected (PC or MAC)

See P.9 PC users or Mac users section


Not detected when connected to USB

USB Cable faulty

Check and replace cable


USB not working/enabled on computer

Check USB port functions with another device.


Correct USB drivers not installed

Please check with the computer manufacturer.


(can happen particularly with factory- preinstalled

Enquire about USB driver or update.


Windows operating systems)


Dropouts in sound (USB input)

Shared USB port with another device

Avoid sharing the USB port with other devices, if


Computer busy with another application

possible.


At times an application (program) may intervene,


Computer low on resources


sometimes invisibly e.g. a virus scanner. When this


happens, computer resources are temporarily used


up, and playback may falter. This is not a fault. Try


running fewer applications if possible.


Remote control does not work

Amplifier’s POWER switch is set to off

Set switch to on


Unit overheated

Check for excessive heat build-up.


One or more batteries fitted the wrong way round

Insert batteries correctly


Batteries are flat

Change batteries for a new set


Remote control is not pointed directly towards the

Ensure there is no obstruction between the remote


front panel of the amplifier

control and amplifier front.


Interference from another source

Lighting such as fluorescent, incandescent, or even


sunlight contains large amounts of infra red


radiation. Ensure such sources are not shining


directly on the infra red window as this could


swamp the signal from the remote control.


Also check the system and any other nearby remotes


for stuck buttons


Remote control range has greatly reduced

Batteries are running out

Change batteries for a new set.


If none of these actions affect a cure, please contact the dealer, or an authorised Musical Fidelity service agent. Remember; never open the case of the A1, as this will invalidate the guarantee.

Issue 2: 05th March 2008

Page 11 of 13


Page 11
Image 11
Musical Fidelity Class A Integrated Amplifier manual A1 IntegratedAMPLIFIER PROBLEMS?

Class A Integrated Amplifier, A1 specifications

The Musical Fidelity A1 is a distinguished Class A integrated amplifier renowned for its exceptional audio performance and elegant design. This amplifier stands out in the crowded hi-fi market due to its focus on delivering pure and uncolored sound. The A1 is designed to reproduce music as it was intended by the artist, making it a favored choice among audiophiles and music enthusiasts.

One of the central features of the A1 is its all-analog Class A circuitry. This design ensures that the amplifier operates with minimal distortion, providing a warm and natural sound signature. With its class A architecture, the A1 is capable of delivering high-quality sound even at low power levels, maintaining excellent fidelity across various volume settings. The output power of the A1 is substantial for its size, typically around 30 watts per channel, which is typical for Class A amplifiers.

The Musical Fidelity A1 is equipped with a robust power supply that underpins its performance. A well-designed power supply is crucial for maintaining stability during high dynamic range passages in music. This amplifier boasts a high-quality toroidal transformer, which offers better electromagnetic shielding and reduces noise, resulting in clearer audio production.

In terms of connectivity, the A1 comes with multiple inputs, including RCA line-level inputs, allowing users to connect various audio sources such as CD players, turntables, and streaming devices. The inclusion of a high-quality phono stage is a notable feature, enabling vinyl lovers to connect their turntables without needing an additional phono preamp.

The build quality of the A1 is equally impressive. Encased in a sturdy chassis, the amplifier features an elegant front panel with straightforward rotary controls for volume and input selection, along with a power switch. Its minimalist design not only looks aesthetically pleasing but also enhances durability.

Musical Fidelity has always prioritized user experience, and the A1 is no exception. The amplifier is engineered to be user-friendly, with a simple setup process and intuitive controls. It perfectly complements a wide range of speakers, providing an engaging listening experience that highlights the subtleties of any music genre.

In summary, the Musical Fidelity A1 Class A Integrated Amplifier is a remarkable component for anyone serious about sound quality. Its high-performance characteristics, solid build quality, and user-centric design make it a standout choice for music enthusiasts seeking an immersive audio experience.