REAR PANEL

1

16

2


3

4

5

6


7


8


9

10

15

14

13

12

11

ATTENTION!

Please make all connections to your T 752 receiver with the unit powered off or unplugged. (It is also advisable to power-down or unplug all associated components while making or breaking any signal or AC power connections.)

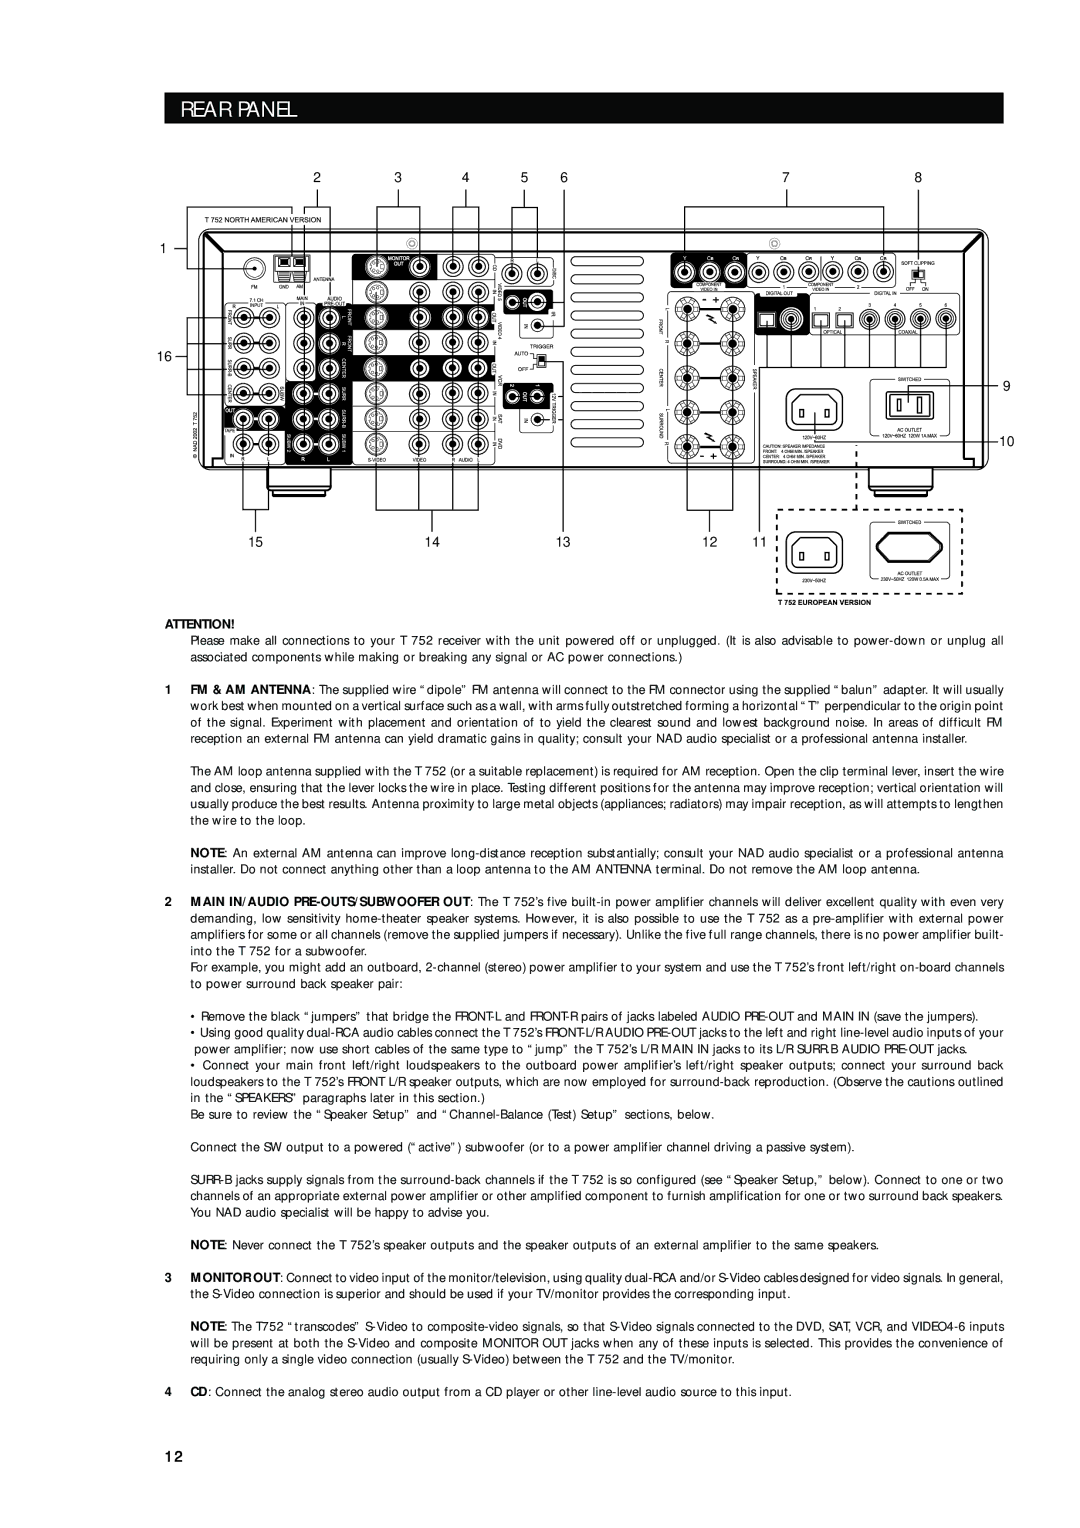
1FM & AM ANTENNA: The supplied wire “dipole” FM antenna will connect to the FM connector using the supplied “balun” adapter. It will usually work best when mounted on a vertical surface such as a wall, with arms fully outstretched forming a horizontal “T” perpendicular to the origin point of the signal. Experiment with placement and orientation of to yield the clearest sound and lowest background noise. In areas of difficult FM reception an external FM antenna can yield dramatic gains in quality; consult your NAD audio specialist or a professional antenna installer.

The AM loop antenna supplied with the T 752 (or a suitable replacement) is required for AM reception. Open the clip terminal lever, insert the wire and close, ensuring that the lever locks the wire in place. Testing different positions for the antenna may improve reception; vertical orientation will usually produce the best results. Antenna proximity to large metal objects (appliances; radiators) may impair reception, as will attempts to lengthen the wire to the loop.

NOTE: An external AM antenna can improve long-distance reception substantially; consult your NAD audio specialist or a professional antenna installer. Do not connect anything other than a loop antenna to the AM ANTENNA terminal. Do not remove the AM loop antenna.

2MAIN IN/AUDIO PRE-OUTS/SUBWOOFER OUT: The T 752’s five built-in power amplifier channels will deliver excellent quality with even very demanding, low sensitivity home-theater speaker systems. However, it is also possible to use the T 752 as a pre-amplifier with external power amplifiers for some or all channels (remove the supplied jumpers if necessary). Unlike the five full range channels, there is no power amplifier built- into the T 752 for a subwoofer.

For example, you might add an outboard, 2-channel (stereo) power amplifier to your system and use the T 752’s front left/right on-board channels to power surround back speaker pair:

Remove the black “jumpers” that bridge the FRONT-L and FRONT-R pairs of jacks labeled AUDIO PRE-OUT and MAIN IN (save the jumpers).

Using good quality dual-RCA audio cables connect the T 752’s FRONT-L/R AUDIO PRE-OUT jacks to the left and right line-level audio inputs of your power amplifier; now use short cables of the same type to “jump” the T 752’s L/R MAIN IN jacks to its L/R SURR.B AUDIO PRE-OUT jacks.

Connect your main front left/right loudspeakers to the outboard power amplifier’s left/right speaker outputs; connect your surround back loudspeakers to the T 752’s FRONT L/R speaker outputs, which are now employed for surround-back reproduction. (Observe the cautions outlined in the “SPEAKERS” paragraphs later in this section.)

Be sure to review the “Speaker Setup” and “Channel-Balance (Test) Setup” sections, below.

Connect the SW output to a powered (“active”) subwoofer (or to a power amplifier channel driving a passive system).

SURR-B jacks supply signals from the surround-back channels if the T 752 is so configured (see “Speaker Setup,” below). Connect to one or two channels of an appropriate external power amplifier or other amplified component to furnish amplification for one or two surround back speakers. You NAD audio specialist will be happy to advise you.

NOTE: Never connect the T 752’s speaker outputs and the speaker outputs of an external amplifier to the same speakers.

3MONITOR OUT: Connect to video input of the monitor/television, using quality dual-RCA and/or S-Video cables designed for video signals. In general, the S-Video connection is superior and should be used if your TV/monitor provides the corresponding input.

NOTE: The T752 “transcodes” S-Video to composite-video signals, so that S-Video signals connected to the DVD, SAT, VCR, and VIDEO4-6 inputs will be present at both the S-Video and composite MONITOR OUT jacks when any of these inputs is selected. This provides the convenience of requiring only a single video connection (usually S-Video) between the T 752 and the TV/monitor.

4CD: Connect the analog stereo audio output from a CD player or other line-level audio source to this input.

1 2

Page 12
Image 12
NAD T752 owner manual Rear Panel

T752 specifications

The NAD T752 is a highly regarded audio/video receiver that has made its mark in the realm of home theater systems. Known for its versatility, performance, and value for money, the T752 is designed to meet the needs of both casual listeners and serious audiophiles. With its robust array of features and technologies, the T752 provides a comprehensive solution for enjoying movies, music, and gaming with impressive clarity and power.

One of the standout features of the NAD T752 is its multi-channel amplification. It delivers a powerful 5.1 channel surround sound experience, allowing users to immerse themselves in rich audio. Each channel is designed to provide a 50 watts output, ensuring sufficient power for driving a variety of speakers while maintaining distortion-free sound.

The T752 incorporates NAD's proprietary PowerDrive technology, which optimizes the performance of the amplifier under different loads. This means that the receiver can efficiently drive low-impedance speakers without sacrificing sound quality or risking damage. This technology is crucial for delivering consistent performance across various listening environments.

In terms of connectivity, the NAD T752 is equipped with a wide range of inputs and outputs, including multiple HDMI ports, composite and component video inputs, and digital audio inputs. This ensures compatibility with a variety of source devices, from Blu-ray players to gaming consoles, making it a versatile addition to any home theater setup. The HDMI connectivity allows for direct switching between devices while also supporting high-definition video and audio formats.

The T752 also features advanced processing capabilities, such as Dolby Digital and DTS decoding, which enhances the surround sound experience, making dialogue clearer and effects more immersive. NAD’s proprietary EISA Award-winning technology further enriches audio playback, ensuring the listener receives a captivating surround sound experience.

Another noteworthy characteristic of the NAD T752 is its user-friendly interface. The receiver is designed for ease of use, with intuitive controls and an on-screen display that simplifies the setup process. Additionally, NAD offers a comprehensive remote control that allows users to manage their listening experience seamlessly.

In conclusion, the NAD T752 stands out as a solid choice for home theater enthusiasts. With its robust sound performance, extensive connectivity options, and advanced audio processing technologies, it delivers a rewarding listening experience. Whether watching films, listening to music, or gaming, the T752 is capable of elevating your entertainment experience to new heights.