FIGURE 29

INSTALLING FLASHING

AND STORM COLLAR

Remove nails from the shingles above and to the sides of the chimney. Place the flashing over the vent pipe and slide it underneath the sides and upper edge of the shingles. Ensure that the vent pipe is properly centered within the flashing, giving a 3/4" margin all around. Fasten to the roof on the top and sides. DO NOT NAIL through the lower portion of the flashing.

Make weather-tight by

sealing with caulking. Where possible, cover

the sides and top

edges of the flashing with roofing material.

Apply waterproof caulking around the vent, 1" above the top of the flashing and push the

storm collar down into the caulking. Attach a rain cap to the top of the last vent section.

'B' VENT ADAPTATIONS

Read the section on opening the door in "Finish- ing" prior to proceeding to prevent damaging the unit.

1.Remove both burners and the log support bracket.

LOG SUPPORT BRACKET REAR BURNER

FRONT BURNER

FIGURE 30

2.Remove the combustion air cover plate and its gasket.

THE TWO SCREWS MUST BE RE-SECURED. FIGURE 30.

3.Undo the bracket holding the thermodisc, turn 90° as shown and reattach to the weld stud located on the right air manifold side. FIGURE 31. (Do not tighten the wing nut until burner is installed; then ensure that the switch firmly touches the underside of the burner tray and tighten. This enables the blower to function properly.)

13

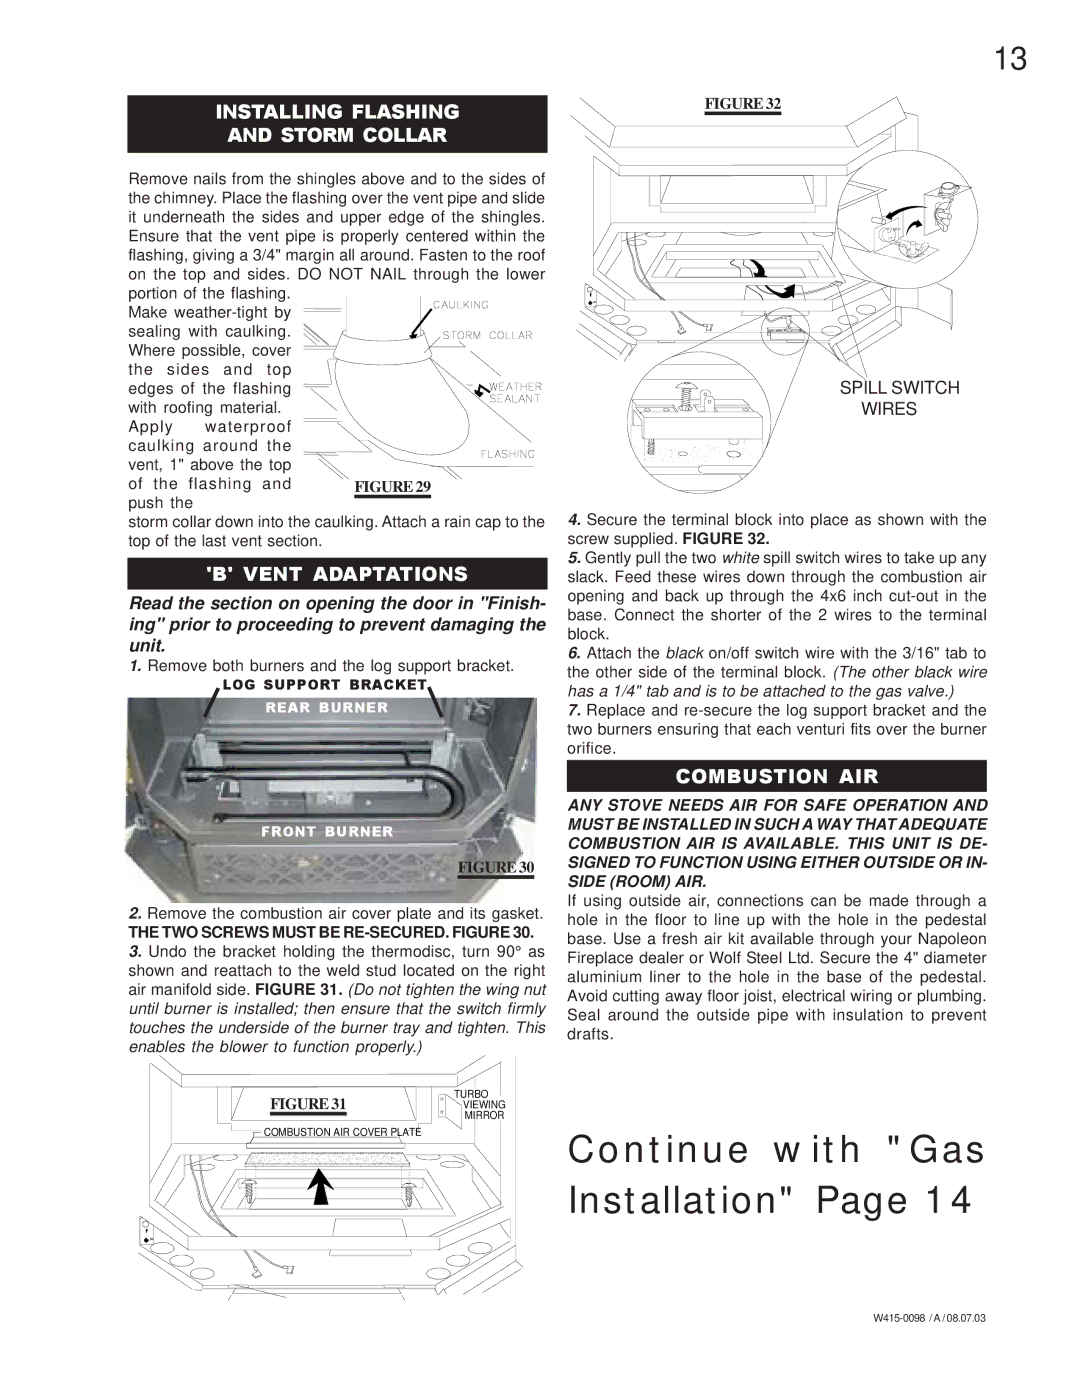
FIGURE 32

SPILL SWITCH

WIRES

4.Secure the terminal block into place as shown with the screw supplied. FIGURE 32.

5.Gently pull the two white spill switch wires to take up any slack. Feed these wires down through the combustion air opening and back up through the 4x6 inch cut-out in the base. Connect the shorter of the 2 wires to the terminal block.

6.Attach the black on/off switch wire with the 3/16" tab to the other side of the terminal block. (The other black wire has a 1/4" tab and is to be attached to the gas valve.)

7.Replace and re-secure the log support bracket and the two burners ensuring that each venturi fits over the burner orifice.

COMBUSTION AIR

ANY STOVE NEEDS AIR FOR SAFE OPERATION AND MUST BE INSTALLED IN SUCH A WAY THAT ADEQUATE COMBUSTION AIR IS AVAILABLE. THIS UNIT IS DE- SIGNED TO FUNCTION USING EITHER OUTSIDE OR IN- SIDE (ROOM) AIR.

If using outside air, connections can be made through a hole in the floor to line up with the hole in the pedestal base. Use a fresh air kit available through your Napoleon Fireplace dealer or Wolf Steel Ltd. Secure the 4" diameter aluminium liner to the hole in the base of the pedestal. Avoid cutting away floor joist, electrical wiring or plumbing. Seal around the outside pipe with insulation to prevent drafts.

TURBO

FIGURE 31VIEWING

MIRROR

COMBUSTION AIR COVER PLATE

Continue with "Gas Installation" Page 14

W415-0098 / A / 08.07.03

Page 13
Image 13
Napoleon Grills GDS 50-P, GDS 50-N, GS 50-P, GS 50-N manual Installing Flashing Storm Collar, Vent Adaptations, Combustion AIR

GS 50-P, GDS 50-N, GDS 50-P, GS 50-N specifications

Napoleon Grills offers a remarkable line of outdoor cooking appliances, including the GS 50-N, GDS 50-P, GDS 50-N, and GS 50-P models. These premium gas grills are designed to elevate outdoor cooking experiences, ensuring that every meal cooked is a memorable one.

The GS 50-N model features a large cooking surface, allowing ample space for grilling multiple foods simultaneously. Its stainless steel construction not only enhances durability but also adds a polished, modern aesthetic to outdoor spaces. The Napoleon GS 50-N is equipped with multiple burners, each providing consistent heat distribution for perfectly cooked meals every time.

On the other hand, the GDS 50-P model stands out due to its innovative design and advanced features. Its infrared burner technology allows for high-temperature grilling, perfect for searing meats and achieving restaurant-quality results. With easy-to-use ignition systems, the grill lights quickly, so users can start cooking without hassle.

The GDS 50-N is another excellent addition to Napoleon's grilling lineup. It features a unique modular design, catering to various cooking styles and techniques. From grilling to smoking, this model's versatility allows users to experiment with different flavors and preparations. Its built-in temperature gauge ensures that cooks can monitor heat levels effortlessly.

The GS 50-P combines style and functionality. Its sleek exterior is complemented by cutting-edge features like Napoleon's patented wave cooking grids, which provide even heat retention and prevent smaller foods from falling through the grates. Moreover, each grill arm boasts side shelves for additional workspace, perfect for meal prep or serving.

Safety is also a consideration with these grills. Each model is designed with features such as flame tamers to protect burners from drippings, which can lead to flare-ups. The grease management system simplifies cleanup, allowing users to focus more on cooking rather than maintenance.

Napoleon’s commitment to quality extends to the warranty offered on these models. Users can feel confident in their purchase, knowing they are covered in the event of manufacturing defects.

In conclusion, the GS 50-N, GDS 50-P, GDS 50-N, and GS 50-P from Napoleon Grills represent the pinnacle of outdoor cooking technology, offering features designed to enhance the grilling experience. From durability and safety to innovative designs and advanced cooking options, Napoleon Grills remains a top choice for barbecue enthusiasts and outdoor chefs alike.