Napoleon Grills WF 18, WF9ST, WF 6, WF 9 manual Installation, Waterfall Surface Materials

Models: WF 9 WF 6 WF 18 WF9ST

1 13
Download 13 pages 41.5 Kb
Page 5
Image 5
INSTALLATION

INSTALLATION

The framing dimensions are included in the framing specifications drawing. The unit is designed to be installed after drywalling. For added protection water resistant drywall (green board) or cement board are recommended in the vicinity of the fountain. The fountain is designed to be attached to the studs over the drywall along both vertical sides of the fountain using drywall screws. This will leave a basically flush surface to trim over. Leak test the waterfall before fully enclosing. All trim used on the fountain should be made of real wood (not MDF), or any other material that is not damaged by moisture, with several coats of a water proof coating (paint or urethane) depending on the desired look. The bottom piece of trim can only be nailed at the ends, because it is mounted in front of the stainless basin. It should be siliconed to the stainless basin for additional support.

After installing the fountain, connect the piping as shown in the piping diagrams. The tubing to connect the unit overflow to the house drain is not supplied. If the unit is being connected to the water supply, use an ice maker plumbing kit (not supplied) to connect the water supply to the float valve. When the unit is operational, adjust the float valve so that it turns the water off when the top of the pump is submerged below 1-2” of water. Ensure that the wing nut on the side of the float valve is properly tightened. Connect the light wire to the terminals on the transformer.

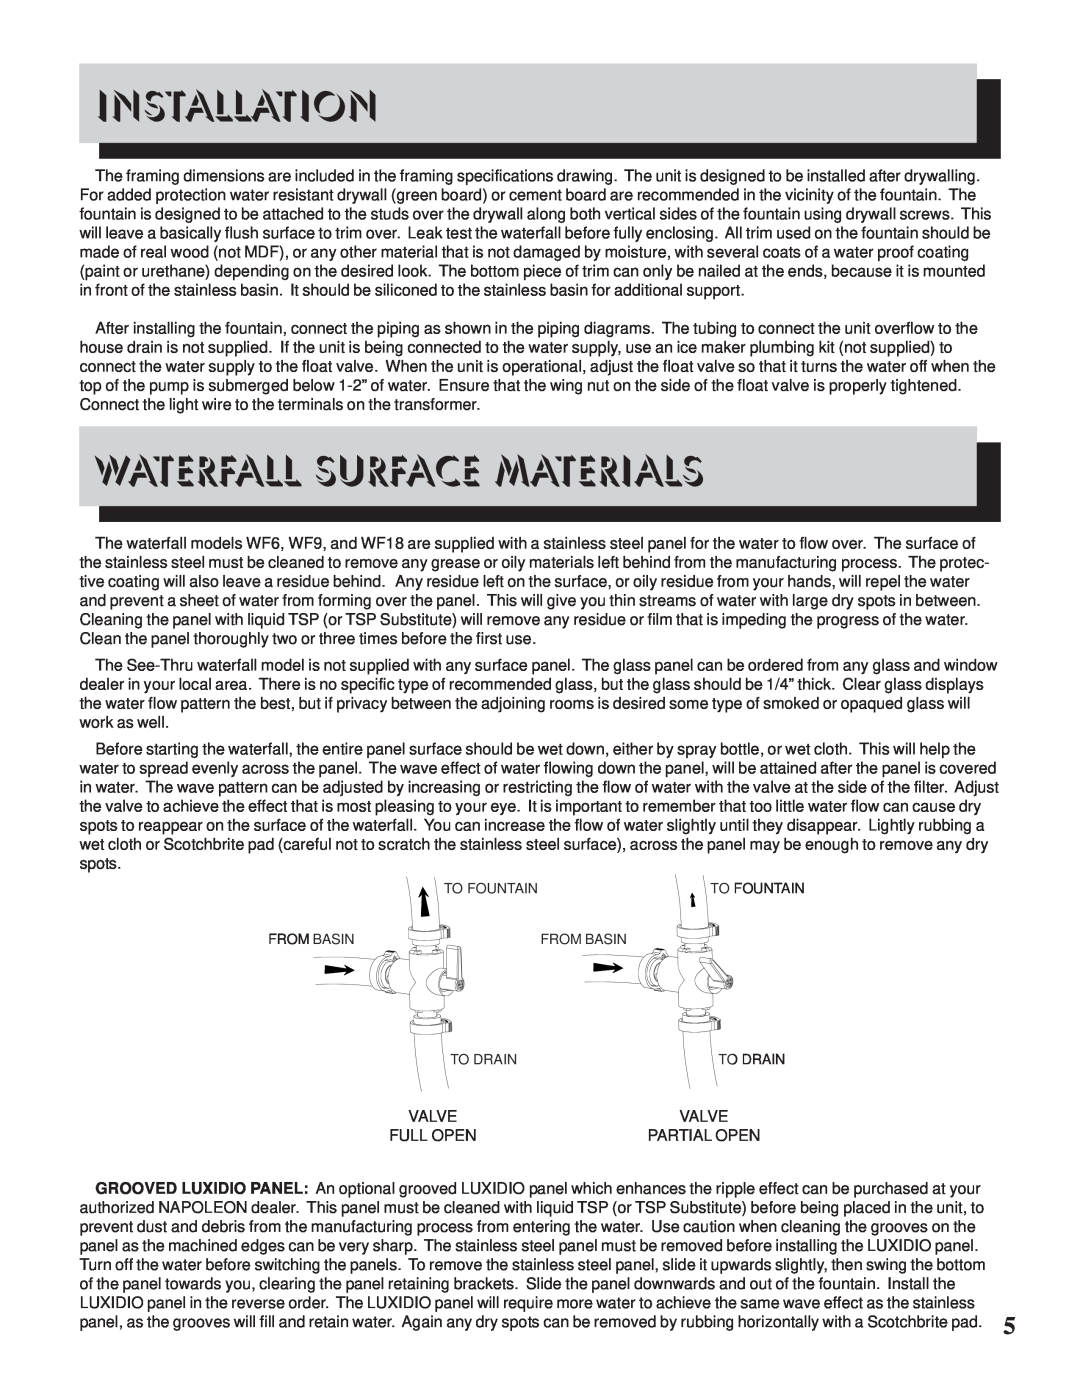
WATERFALL SURFACE MATERIALS

The waterfall models WF6, WF9, and WF18 are supplied with a stainless steel panel for the water to flow over. The surface of the stainless steel must be cleaned to remove any grease or oily materials left behind from the manufacturing process. The protec- tive coating will also leave a residue behind. Any residue left on the surface, or oily residue from your hands, will repel the water and prevent a sheet of water from forming over the panel. This will give you thin streams of water with large dry spots in between. Cleaning the panel with liquid TSP (or TSP Substitute) will remove any residue or film that is impeding the progress of the water. Clean the panel thoroughly two or three times before the first use.

The See-Thru waterfall model is not supplied with any surface panel. The glass panel can be ordered from any glass and window dealer in your local area. There is no specific type of recommended glass, but the glass should be 1/4” thick. Clear glass displays the water flow pattern the best, but if privacy between the adjoining rooms is desired some type of smoked or opaqued glass will work as well.

Before starting the waterfall, the entire panel surface should be wet down, either by spray bottle, or wet cloth. This will help the water to spread evenly across the panel. The wave effect of water flowing down the panel, will be attained after the panel is covered in water. The wave pattern can be adjusted by increasing or restricting the flow of water with the valve at the side of the filter. Adjust the valve to achieve the effect that is most pleasing to your eye. It is important to remember that too little water flow can cause dry spots to reappear on the surface of the waterfall. You can increase the flow of water slightly until they disappear. Lightly rubbing a wet cloth or Scotchbrite pad (careful not to scratch the stainless steel surface), across the panel may be enough to remove any dry spots.

TO FOUNTAIN

TO FOUNTAIN

FROM BASIN

FROM BASIN

TO DRAINTO DRAIN

VALVE

VALVE

FULL OPEN

PARTIAL OPEN

GROOVED LUXIDIO PANEL: An optional grooved LUXIDIO panel which enhances the ripple effect can be purchased at your authorized NAPOLEON dealer. This panel must be cleaned with liquid TSP (or TSP Substitute) before being placed in the unit, to prevent dust and debris from the manufacturing process from entering the water. Use caution when cleaning the grooves on the panel as the machined edges can be very sharp. The stainless steel panel must be removed before installing the LUXIDIO panel. Turn off the water before switching the panels. To remove the stainless steel panel, slide it upwards slightly, then swing the bottom of the panel towards you, clearing the panel retaining brackets. Slide the panel downwards and out of the fountain. Install the LUXIDIO panel in the reverse order. The LUXIDIO panel will require more water to achieve the same wave effect as the stainless panel, as the grooves will fill and retain water. Again any dry spots can be removed by rubbing horizontally with a Scotchbrite pad. 5

Page 5
Image 5
Napoleon Grills WF 18, WF9ST, WF 6, WF 9 manual Installation, Waterfall Surface Materials