• | lead from |
• | crystalline silica from bricks and cement |
Symbology
ASSEMBLY
and other masonry products, and |
• arsenic and chromium from chemically- |
treated lumber. |
Your risk from these exposures varies, |
depending on how often you do this |
type of work. To reduce your exposure |
to these chemicals: work in a well ven- |
tilated area, and work with approved |
safety equipment, such as those dust |
masks that are specially designed to |
filter out microscopic particles. |
6.Keep hands away from all cutting edges and moving parts.
Direct Current
Underwriters
Laboratories, Inc.,
United States and
Canada
No Load Revolutions per Minute (RPM)
![]() WARNING
WARNING
Recharge only with the charger specified for the battery. For spe- cific charging instructions, read the operator’s manual supplied with your charger and battery. This tool is not compatible with
Inserting/Removing Battery Pack
Insert the battery pack from the front by sliding battery pack into the body of the tool. Insert the battery pack until the battery latches lock. To remove the battery pack, press in both battery latches and slide the battery pack off of the tool.
Specifications
| Volts | No Load |
|
| Capacities |
| |
Cat. No. | DC | RPM | Steel | Flat Bit | Auger Bit | Hole Saw | Screws (dia.) |
18 * | Low 0 - 350 | 1/2" | 1" | 1/4" | |||
|
| High 0 - 1 400 | 1/2" | N/A | 1/4" | ||
|
|
|
|
|
|
|
|
OPERATION
* Cat. No.
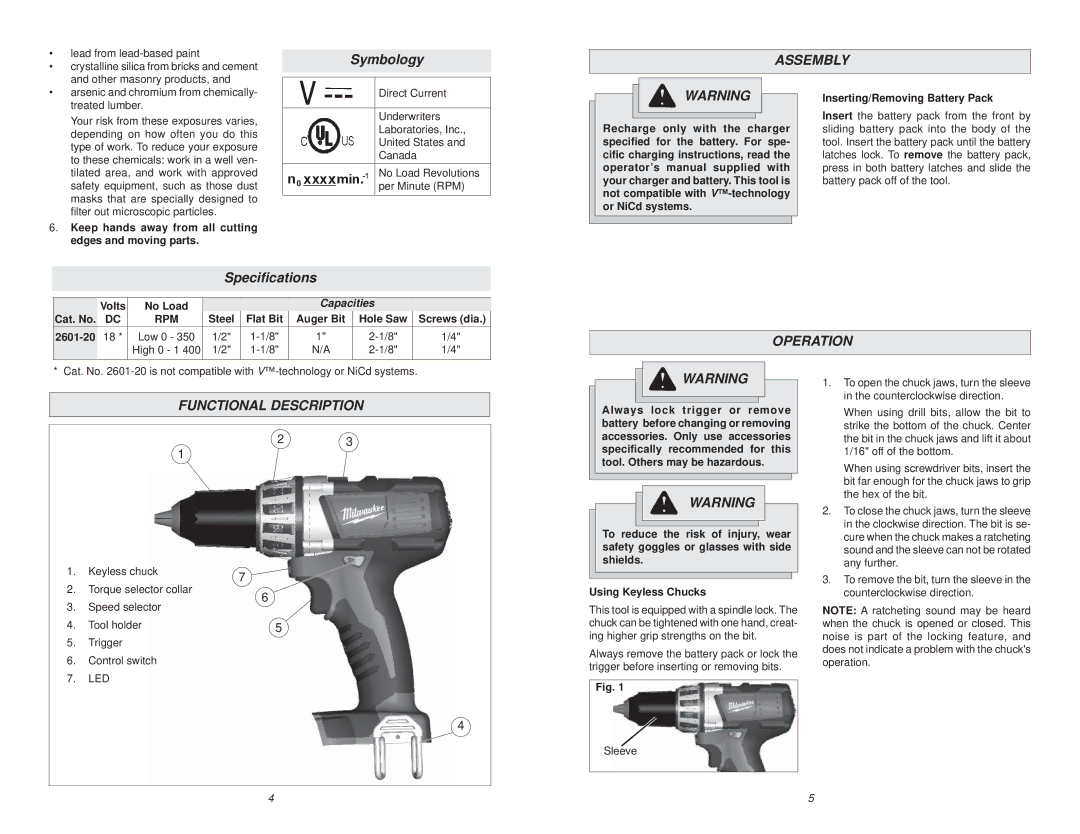
FUNCTIONAL DESCRIPTION
2 3
1
1. | Keyless chuck | 7 | |
2. | Torque selector collar | ||
6 | |||
3. | Speed selector | ||
| |||
4. | Tool holder | 5 |
5. | Trigger |
6. | Control switch |
7. | LED |
![]()
![]()
![]() WARNING
WARNING
Always lock trigger or remove battery before changing or removing accessories. Only use accessories specifically recommended for this tool. Others may be hazardous.
WARNING
To reduce the risk of injury, wear safety goggles or glasses with side shields.
Using Keyless Chucks
This tool is equipped with a spindle lock. The chuck can be tightened with one hand, creat- ing higher grip strengths on the bit.
Always remove the battery pack or lock the trigger before inserting or removing bits.
1.To open the chuck jaws, turn the sleeve in the counterclockwise direction.
When using drill bits, allow the bit to strike the bottom of the chuck. Center the bit in the chuck jaws and lift it about 1/16" off of the bottom.
When using screwdriver bits, insert the bit far enough for the chuck jaws to grip the hex of the bit.
2.To close the chuck jaws, turn the sleeve in the clockwise direction. The bit is se- cure when the chuck makes a ratcheting sound and the sleeve can not be rotated any further.
3.To remove the bit, turn the sleeve in the counterclockwise direction.
NOTE: A ratcheting sound may be heard when the chuck is opened or closed. This noise is part of the locking feature, and does not indicate a problem with the chuck's operation.
4
Fig. 1
Sleeve
4 | 5 |