NEC LCD3090WQXi user manual English-24

Models: LCD3090WQXi

1 34
Download 34 pages 54.92 Kb
Page 26
Image 26

TagA

Tile Matrix

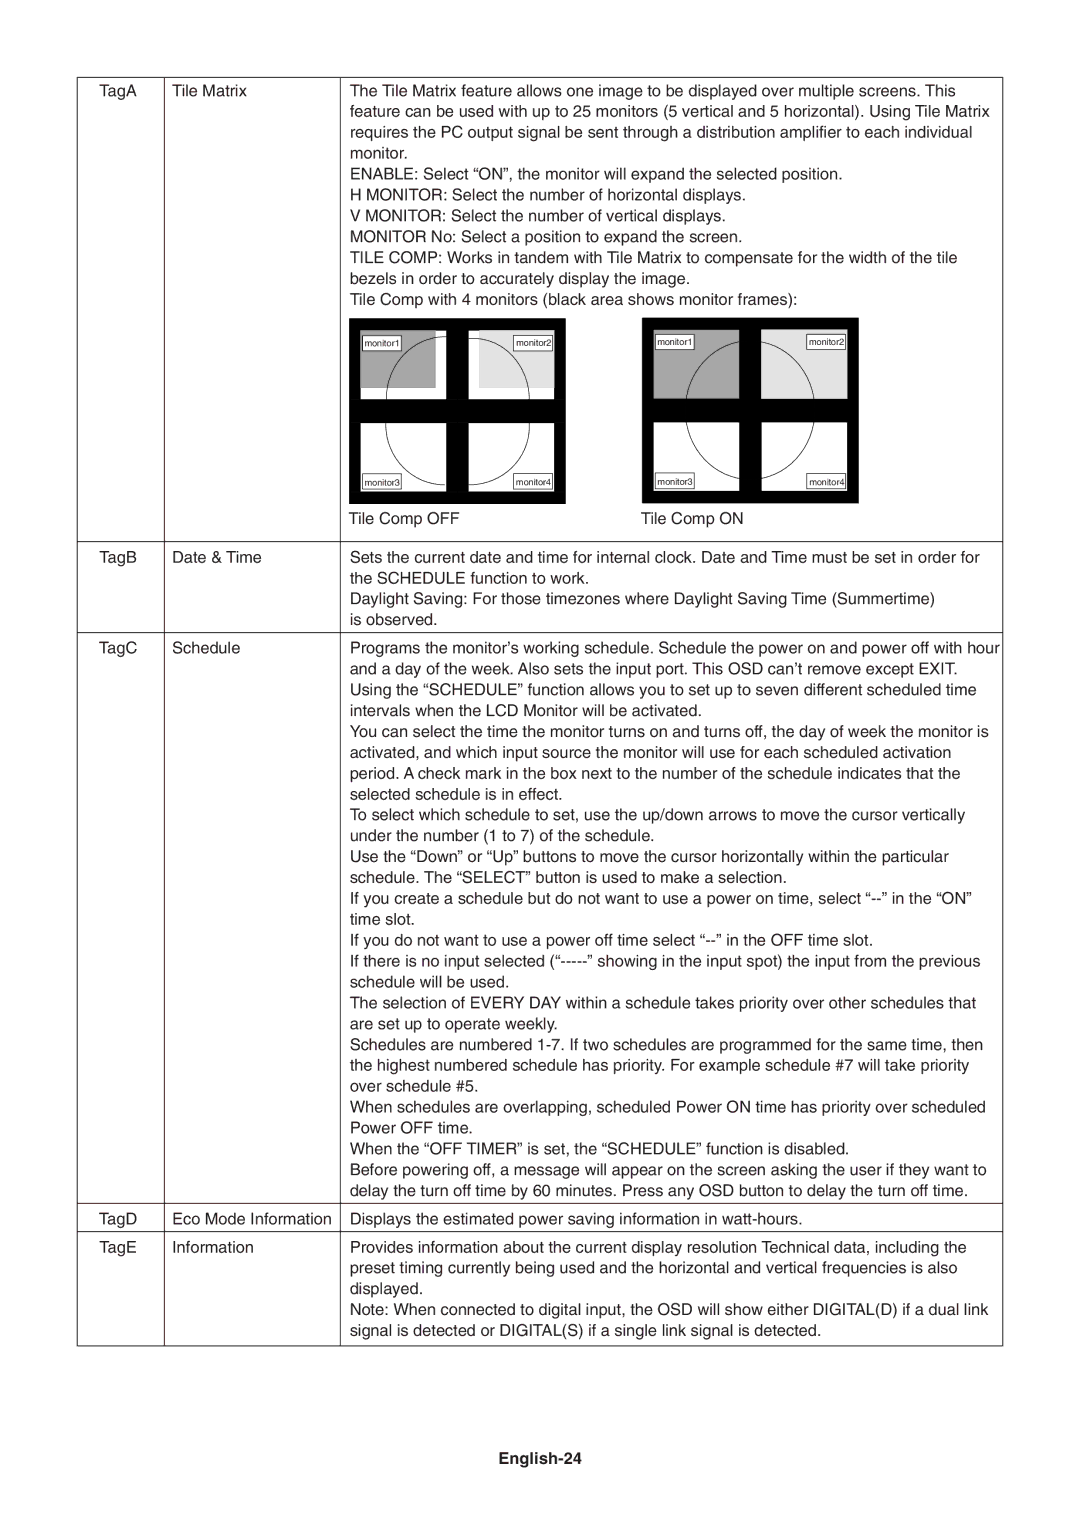
The Tile Matrix feature allows one image to be displayed over multiple screens. This


feature can be used with up to 25 monitors (5 vertical and 5 horizontal). Using Tile Matrix


requires the PC output signal be sent through a distribution amplifier to each individual


monitor.


ENABLE: Select “ON”, the monitor will expand the selected position.


H MONITOR: Select the number of horizontal displays.


V MONITOR: Select the number of vertical displays.


MONITOR No: Select a position to expand the screen.


TILE COMP: Works in tandem with Tile Matrix to compensate for the width of the tile


bezels in order to accurately display the image.


Tile Comp with 4 monitors (black area shows monitor frames):

monitor1

monitor2

monitor1

monitor2


monitor3


monitor4


monitor3


monitor4


Tile Comp OFF


Tile Comp ON


TagB

Date & Time

Sets the current date and time for internal clock. Date and Time must be set in order for


the SCHEDULE function to work.


Daylight Saving: For those timezones where Daylight Saving Time (Summertime)


is observed.


TagC

Schedule

Programs the monitor’s working schedule. Schedule the power on and power off with hour


and a day of the week. Also sets the input port. This OSD can’t remove except EXIT.


Using the “SCHEDULE” function allows you to set up to seven different scheduled time


intervals when the LCD Monitor will be activated.


You can select the time the monitor turns on and turns off, the day of week the monitor is


activated, and which input source the monitor will use for each scheduled activation


period. A check mark in the box next to the number of the schedule indicates that the


selected schedule is in effect.


To select which schedule to set, use the up/down arrows to move the cursor vertically


under the number (1 to 7) of the schedule.


Use the “Down” or “Up” buttons to move the cursor horizontally within the particular


schedule. The “SELECT” button is used to make a selection.


If you create a schedule but do not want to use a power on time, select “--” in the “ON”


time slot.


If you do not want to use a power off time select “--” in the OFF time slot.


If there is no input selected (“-----” showing in the input spot) the input from the previous


schedule will be used.


The selection of EVERY DAY within a schedule takes priority over other schedules that


are set up to operate weekly.


Schedules are numbered 1-7. If two schedules are programmed for the same time, then


the highest numbered schedule has priority. For example schedule #7 will take priority


over schedule #5.


When schedules are overlapping, scheduled Power ON time has priority over scheduled


Power OFF time.


When the “OFF TIMER” is set, the “SCHEDULE” function is disabled.


Before powering off, a message will appear on the screen asking the user if they want to


delay the turn off time by 60 minutes. Press any OSD button to delay the turn off time.


TagD

Eco Mode Information

Displays the estimated power saving information in watt-hours.


TagE

Information

Provides information about the current display resolution Technical data, including the


preset timing currently being used and the horizontal and vertical frequencies is also


displayed.


Note: When connected to digital input, the OSD will show either DIGITAL(D) if a dual link


signal is detected or DIGITAL(S) if a single link signal is detected.

English-24

Page 26
Image 26
NEC LCD3090WQXi user manual English-24

LCD3090WQXi specifications

The NEC LCD3090WQXi is a high-performance 30-inch display that stands out in the realm of professional-grade monitors, particularly in the fields of graphic design, video production, and data visualization. With a resolution of 2560 x 1600 pixels, it offers a stunningly sharp and detailed image that is sure to satisfy even the most demanding users.

One of the standout features of the LCD3090WQXi is its exceptional color reproduction. The display covers an impressive 102% of the sRGB color gamut and about 97% of Adobe RGB, making it an ideal choice for photographers and designers who rely on precise color accuracy. Additionally, the monitor’s 12-bit internal processing allows for over 68 billion colors to be displayed, resulting in smooth gradients and vivid images.

The LCD3090WQXi utilizes IPS (In-Plane Switching) technology, which provides wide viewing angles of up to 178 degrees both horizontally and vertically. This characteristic is crucial for collaborative work environments where multiple people may be viewing the screen at once, ensuring consistent color and brightness irrespective of the viewer's position.

Another significant aspect of the LCD3090WQXi is its ergonomic design. The monitor features height, tilt, and pivot adjustments, allowing users to customize their viewing experience for optimal comfort. This is particularly beneficial for long sessions of graphic design or video editing, where proper posture and screen orientation can reduce eye strain and discomfort.

The connectivity options of the LCD3090WQXi are robust, accommodating a wide range of devices. It includes both DVI-D and DisplayPort inputs, enabling seamless integration with modern graphics solutions. The built-in USB hub offers additional versatility, allowing users to connect peripherals directly to the monitor for increased efficiency.

In terms of calibration, the NEC LCD3090WQXi comes equipped with a built-in ambient light sensor that automatically adjusts brightness based on surrounding lighting conditions. This feature not only enhances image quality but also contributes to energy savings.

Overall, the NEC LCD3090WQXi is more than just a monitor; it is a powerful tool for professionals who demand the very best in color accuracy, image quality, and ergonomic design. Its advanced technologies and features make it a worthy investment for those who thrive in visual-centric industries. Whether for meticulous design work or critical visual analysis, the LCD3090WQXi is engineered to deliver exceptional performance and reliability.