)NSTALLATION 'UIDE
NETGEAR® ReadyNAS™ 2100
Follow these instructions to install your NETGEAR® ReadyNAS™ 2100. Then, consult the ReadyNAS 2100 User Manual for instructions on configuring and operating your unit. A link to the ReadyNAS 2100 User Manual is on the Resource CD and on the NETGEAR support site at http://kbserver.netgear.com. These instructions assume the unit is using the factory default
Estimated completion time: 20 minutes.
Note: A diskless unit requires installing disks and initializing RAID before proceeding. Go to http://kbserver.netgear.com for a list of supported disks. Refer to the ReadyNAS 2100 User Manual for instructions on installing disks and configuring RAID.
Basic Setup
Follow these steps to quickly setup the NETGEAR® ReadyNAS™ 2100.
First, Install the RAIDar Utility
Install the RAIDar utility from the product Resource CD. Windows, MAC and Linux versions of RAIDar are provided.
Next, Connect the Unit
For initial setup, connect the LAN1 Ethernet port of the ReadyNAS to your network, and turn it on. It takes about a minute to boot. The factory default is to get its IP address via DHCP.
Note: After it boots, the IP address assigned to the unit will be displayed in the status area.
Log in to the Unit
1.Run the RAIDar utility. It will detect the unit.
Tip: In your DHCP server, reserve the IP address assigned for your ReadyNAS so that it always gets this address. This helps assure that mapped drives work consistently on any operating system.
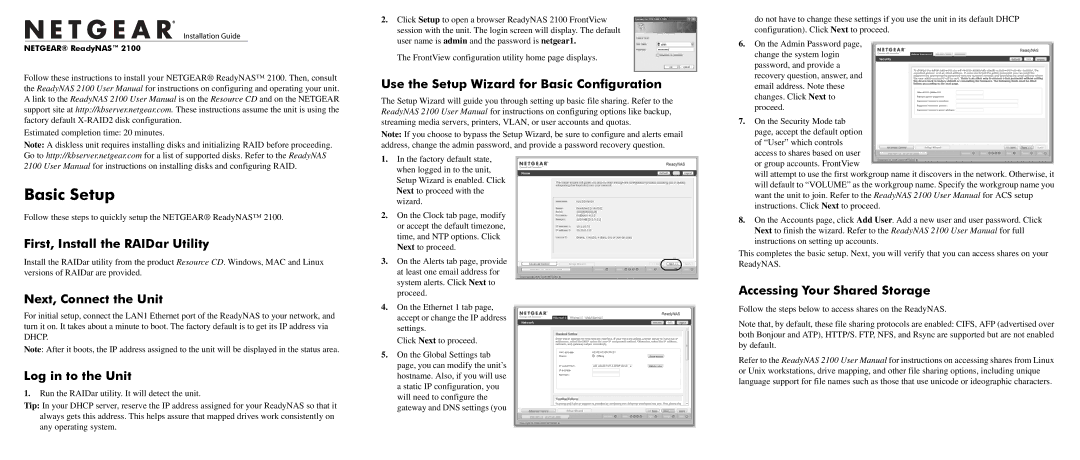
2.Click Setup to open a browser ReadyNAS 2100 FrontView session with the unit. The login screen will display. The default user name is admin and the password is netgear1.
The FrontView configuration utility home page displays.
Use the Setup Wizard for Basic Configuration
The Setup Wizard will guide you through setting up basic file sharing. Refer to the ReadyNAS 2100 User Manual for instructions on configuring options like backup, streaming media servers, printers, VLAN, or user accounts and quotas.
Note: If you choose to bypass the Setup Wizard, be sure to configure and alerts email address, change the admin password, and provide a password recovery question.
1.In the factory default state, when logged in to the unit, Setup Wizard is enabled. Click Next to proceed with the wizard.
2.On the Clock tab page, modify or accept the default timezone, time, and NTP options. Click Next to proceed.
3.On the Alerts tab page, provide at least one email address for system alerts. Click Next to proceed.
4.On the Ethernet 1 tab page, accept or change the IP address settings.
Click Next to proceed.
5.On the Global Settings tab page, you can modify the unit’s hostname. Also, if you will use a static IP configuration, you will need to configure the gateway and DNS settings (you
do not have to change these settings if you use the unit in its default DHCP configuration). Click Next to proceed.
6.On the Admin Password page, change the system login password, and provide a recovery question, answer, and email address. Note these changes. Click Next to proceed.
7.On the Security Mode tab page, accept the default option of “User” which controls access to shares based on user or group accounts. FrontView
will attempt to use the first workgroup name it discovers in the network. Otherwise, it will default to “VOLUME” as the workgroup name. Specify the workgroup name you want the unit to join. Refer to the ReadyNAS 2100 User Manual for ACS setup instructions. Click Next to proceed.
8.On the Accounts page, click Add User. Add a new user and user password. Click Next to finish the wizard. Refer to the ReadyNAS 2100 User Manual for full instructions on setting up accounts.
This completes the basic setup. Next, you will verify that you can access shares on your ReadyNAS.
Accessing Your Shared Storage
Follow the steps below to access shares on the ReadyNAS.
Note that, by default, these file sharing protocols are enabled: CIFS, AFP (advertised over both Bonjour and ATP), HTTP/S. FTP, NFS, and Rsync are supported but are not enabled by default.
Refer to the ReadyNAS 2100 User Manual for instructions on accessing shares from Linux or Unix workstations, drive mapping, and other file sharing options, including unique language support for file names such as those that use unicode or ideographic characters.