)NSTALLATION 'UIDE

FVS318v3 Broadband ProSafe VPN Firewall

Start Here

Follow these instructions to set up your VPN firewall. You can also consult the Reference Manual on the NETGEAR Web site at http://kbserver.netgear.com.

Prepare to Install Your FVS318v3 VPN Firewall

For Cable Modem Service: When you perform the VPN firewall setup steps be sure to use the computer you used when you first set up your cable Internet connection.

For DSL Service: You may need information such as the DSL login name/e-mail address and password in order to complete the VPN firewall setup.

First, Connect the FVS318v3

1.CONNECT THE CABLES BETWEEN THE FVS318V3, COMPUTER, AND MODEM

a.Turn off your computer.

b.Unplug and turn off the broadband modem.

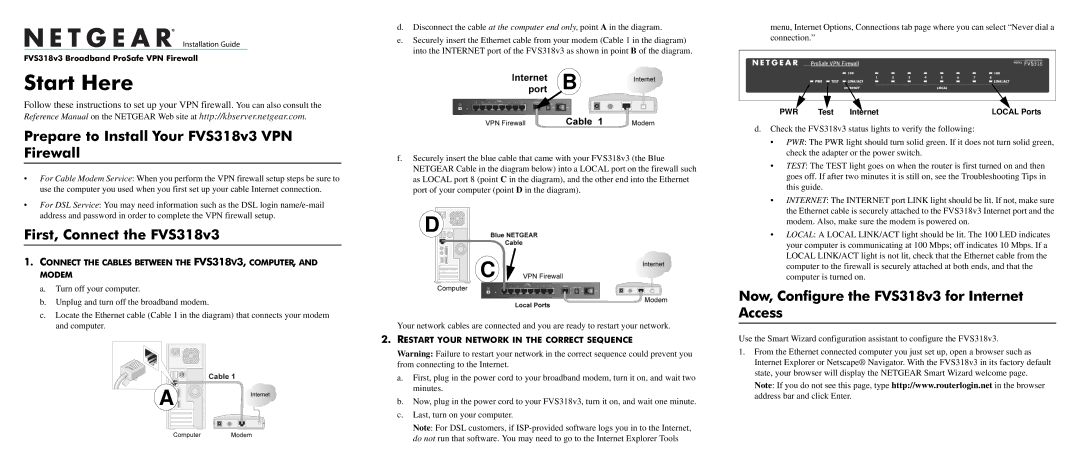
c.Locate the Ethernet cable (Cable 1 in the diagram) that connects your modem and computer.

A

d.Disconnect the cable at the computer end only, point A in the diagram.

e.Securely insert the Ethernet cable from your modem (Cable 1 in the diagram) into the INTERNET port of the FVS318v3 as shown in point B of the diagram.

B

f.Securely insert the blue cable that came with your FVS318v3 (the Blue NETGEAR Cable in the diagram below) into a LOCAL port on the firewall such as LOCAL port 8 (point C in the diagram), and the other end into the Ethernet port of your computer (point D in the diagram).

D

C

Your network cables are connected and you are ready to restart your network.

2.RESTART YOUR NETWORK IN THE CORRECT SEQUENCE

Warning: Failure to restart your network in the correct sequence could prevent you from connecting to the Internet.

a.First, plug in the power cord to your broadband modem, turn it on, and wait two minutes.

b.Now, plug in the power cord to your FVS318v3, turn it on, and wait one minute.

c.Last, turn on your computer.

Note: For DSL customers, if ISP-provided software logs you in to the Internet, do not run that software. You may need to go to the Internet Explorer Tools

menu, Internet Options, Connections tab page where you can select “Never dial a connection.”

PWR

Test Internet

LOCAL Ports

d.Check the FVS318v3 status lights to verify the following:

PWR: The PWR light should turn solid green. If it does not turn solid green, check the adapter or the power switch.

TEST: The TEST light goes on when the router is first turned on and then goes off. If after two minutes it is still on, see the Troubleshooting Tips in this guide.

INTERNET: The INTERNET port LINK light should be lit. If not, make sure the Ethernet cable is securely attached to the FVS318v3 Internet port and the modem. Also, make sure the modem is powered on.

LOCAL: A LOCAL LINK/ACT light should be lit. The 100 LED indicates your computer is communicating at 100 Mbps; off indicates 10 Mbps. If a LOCAL LINK/ACT light is not lit, check that the Ethernet cable from the computer to the firewall is securely attached at both ends, and that the computer is turned on.

Now, Configure the FVS318v3 for Internet Access

Use the Smart Wizard configuration assistant to configure the FVS318v3.

1.From the Ethernet connected computer you just set up, open a browser such as Internet Explorer or Netscape® Navigator. With the FVS318v3 in its factory default state, your browser will display the NETGEAR Smart Wizard welcome page.

Note: If you do not see this page, type http://www.routerlogin.net in the browser address bar and click Enter.

Page 1
Image 1
NETGEAR manual Prepare to Install Your FVS318v3 VPN Firewall, First, Connect the FVS318v3

FVS318v3 specifications

The NETGEAR FVS318v3 is a powerful dual WAN gigabit VPN firewall designed to provide robust security and reliable connectivity for small to medium-sized businesses. It offers an array of features and technologies that make it an outstanding choice for organizations requiring secure network access and improved bandwidth management.

One of the standout features of the FVS318v3 is its dual WAN capability. This allows users to connect two separate internet connections, which enhances redundancy and ensures continuous network availability. In the event that one WAN connection fails, the device automatically switches to the backup connection, minimizing downtime and maintaining productivity.

The firewall offers advanced security features, including a stateful packet inspection (SPI) firewall and NAT (Network Address Translation), which helps protect the network from unauthorized access and external threats. Additionally, the FVS318v3 supports IPsec and SSL VPN protocols, providing secure remote access for employees working from home or on the go. With support for up to 15 SSL VPN clients and 20 IPsec VPN tunnels, it is suitable for businesses that require flexible and secure remote connectivity.

In terms of performance, the FVS318v3 boasts a high-speed gigabit throughput, ensuring fast data transmission and minimal latency. This is particularly important for businesses that rely on cloud-based applications, video conferencing, and other bandwidth-intensive activities. Furthermore, the device is equipped with advanced QoS (Quality of Service) features that allow administrators to prioritize traffic, ensuring that critical applications receive the bandwidth they need during peak usage times.

Another noteworthy characteristic of the NETGEAR FVS318v3 is its user-friendly interface, which simplifies network management and configuration. Administrators can easily set up policies, monitor traffic, and manage connected devices through an intuitive web-based interface. It also offers support for 802.1Q VLAN tagging, allowing for network segmentation and improved security management.

In conclusion, the NETGEAR FVS318v3 is a versatile and feature-rich solution that delivers exceptional security and reliability for businesses. Its dual WAN functionality, advanced VPN capabilities, high-speed performance, and ease of use make it an excellent choice for organizations looking to safeguard their networks while ensuring seamless connectivity for employees.